Categories
How To News Privacy Protect Your Devices Quick Tips Safety Scams Security Tech Tips & Tricks

Take back your privacy: How Incogni helps you to erase your digital footprint

Ever feel like your personal information is floating around the internet without your consent? Our data is more accessible than ever, often ending up in the hands of data brokers who collect, analyze, and sell it to marketers, recruiters, and even identity thieves. It can be overwhelming to think about just how much of our private information is out there and how little control we have over it. With breaches and data leaks happening almost daily, the risks are real and concerning.

That’s where data removal services come in. These services are designed to help you reclaim your privacy by removing your personal information from data brokers and people search sites. By automating the process of sending removal requests, they save you time and effort while enhancing your digital security.

One such service that stands out in this space is Incogni, which takes on the heavy lifting of protecting your personal data so you can focus on what truly matters.

GET SECURITY ALERTS, EXPERT TIPS – SIGN UP FOR KURT’S NEWSLETTER – THE CYBERGUY REPORT HERE


What is Incogni?

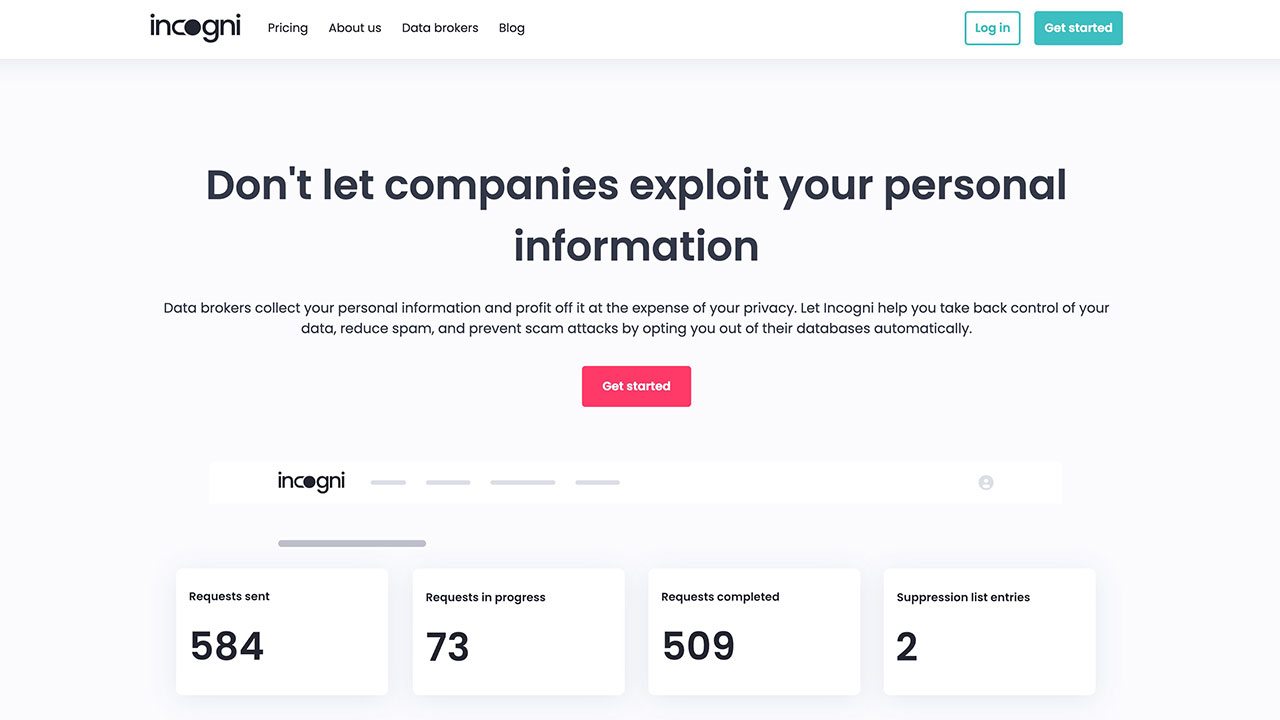
Incogni is a data broker removal service developed by Surfshark, a reputable VPN provider. It acts on your behalf to identify and contact data brokers who may have collected and stored your personal information. By leveraging privacy laws such as the CCPA and GDPR, Incogni compels these entities to remove your data from their databases.
Credit: Incogni


DATA BREACH EXPOSES OVER 56 MILLION CLOTHING STORE CUSTOMERS 


How Incogni works

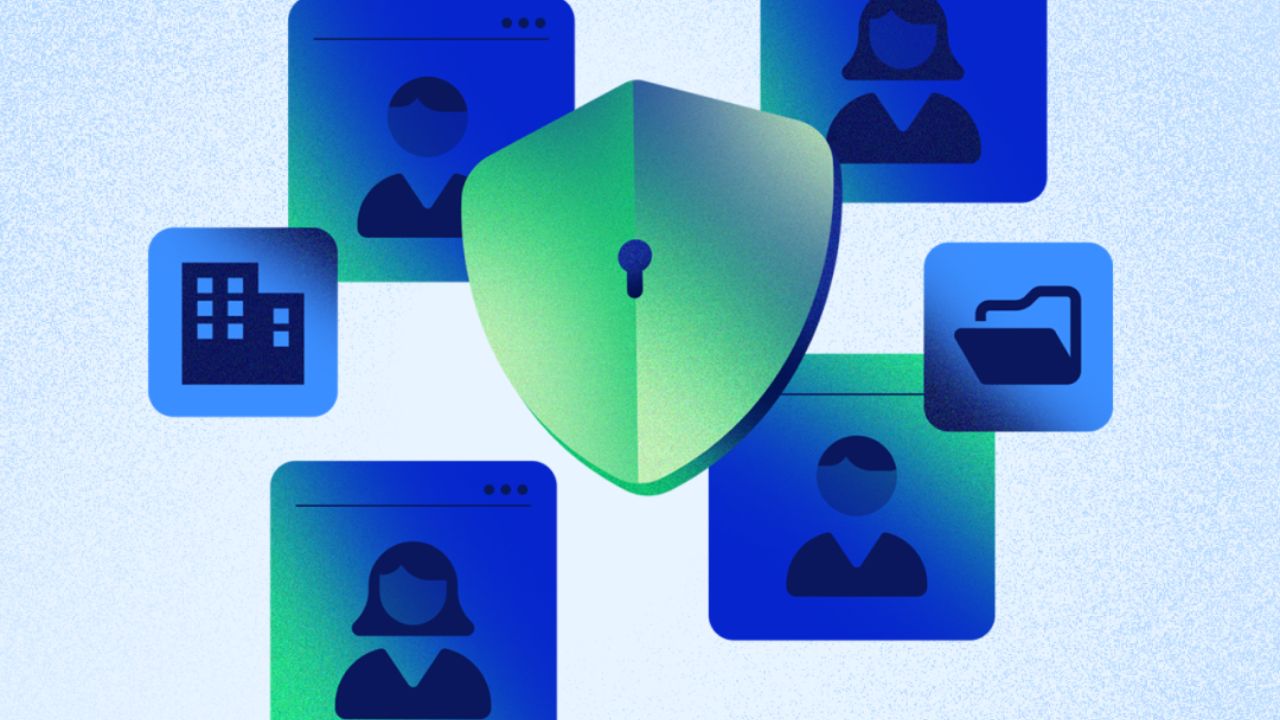
Incogni operates through a sophisticated process that begins with maintaining a comprehensive database of over 190 data brokers. The service then sends out automated removal requests to relevant data brokers on your behalf, leveraging key privacy laws like CCPA and GDPR to ensure compliance with data removal demands. Through continuous monitoring, Incogni periodically reviews and follows up on outstanding requests, guaranteeing a thorough and persistent approach to removing your personal information from digital databases.
Security illustration

Credit: Incogni


DATA BREACH VICTIMS SKYROCKET OVER 1,100%: HOW TO PROTECT YOURSELF 


A breakdown of how Incogni’s automated data removal works

Initial scan (1-48 hours)
The process begins with a thorough scan of people search sites to locate your personal information. Incogni can find records, and then they immediately initiate removal requests.

Widespread removal requests
Incogni casts a wide net by sending automated removal requests to all data brokers in its extensive network who might have your personal data. This ensures no stone is left unturned in protecting your privacy.

Continuous monitoring and removal (30-60 days depending on the broker)
Privacy protection is an ongoing process. Incogni regularly re-scans and sends new waves of removal requests to prevent data brokers, and people search sites from accumulating and selling your information.

Expanding protection
Incogni’s team is constantly on the lookout for new data brokers, and people search sites. By continually adding to its list, they ensure that your level of protection improves over time.

Transparent reporting
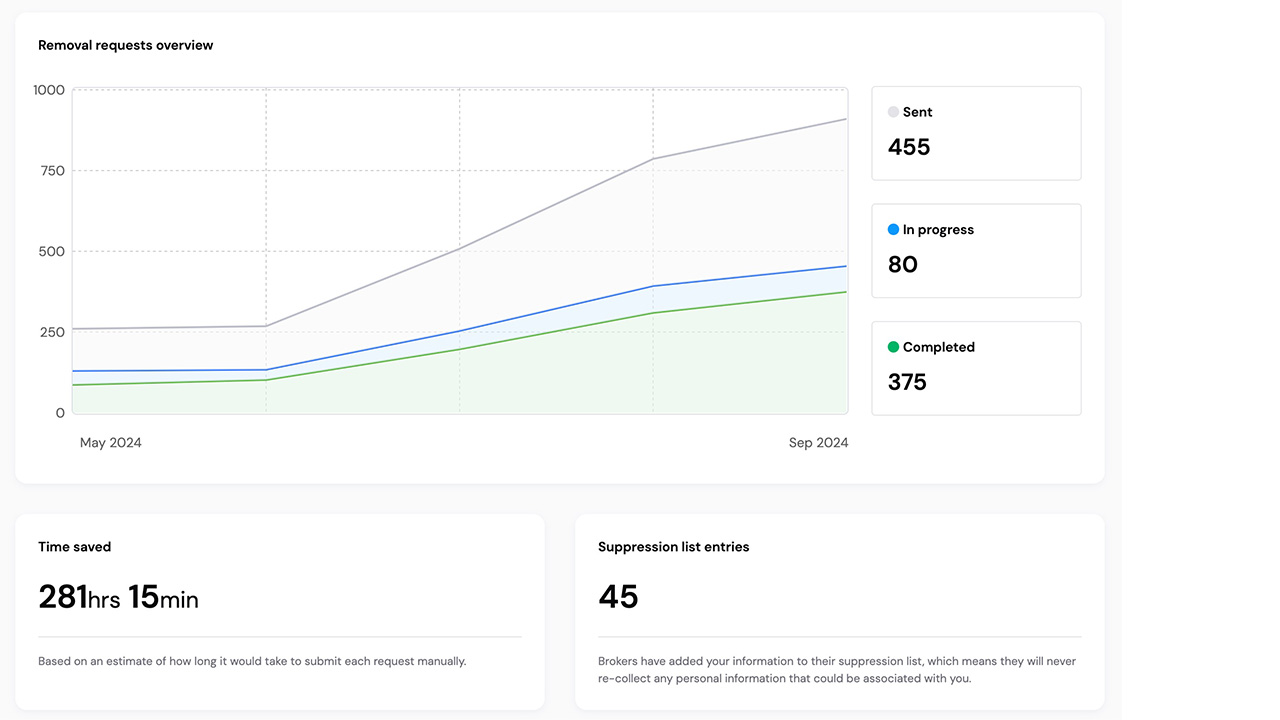
To keep you informed and in control, Incogni provides regular privacy reports. These updates allow you to track our progress and understand the steps we’re taking to protect your personal data.
Personal_Information_Removal_Service___Incogni2


HOW SCAMMERS USE YOUR PERSONAL DATA FOR FINANCIAL SCAMS AND HOW TO STOP THEM 


Why you should care

Protecting your privacy is more important than ever, as data brokers collect and sell your personal information, potentially exposing you to identity theft, fraud, and unwanted marketing. Incogni addresses this concern while saving you valuable time; manually contacting data brokers could consume up to 300 hours, but Incogni automates this process efficiently. The service’s team brings essential legal expertise to navigate complex data removal processes, ensuring your rights are protected.

Moreover, Incogni offers comprehensive coverage by targeting various types of data brokers, including people search sites, recruitment platforms, and financial information databases, providing a thorough approach to safeguarding your personal data across multiple sectors.


Pricing and guarantees

Special for CyberGuy Rea
ders (60% off): 
 Incogni offers A 30-day money-back guarantee and then charges a special CyberGuy discount only through the links in this article of $5.99/month for one person (billed annually) or $13.19/month for your family (up to 4 people) on their annual plan and get a fully automated data removal service, including recurring removal from 200+ data brokers.  I recommend the family plan because it works out to only $4.12 per person per month for year-round coverage. It’s an excellent service, and I highly recommend at least trying it out to see what it’s all about.

 Get Incogni here

 Get Incogni for your family (up to 4 people) here


How to set up and use Incogni

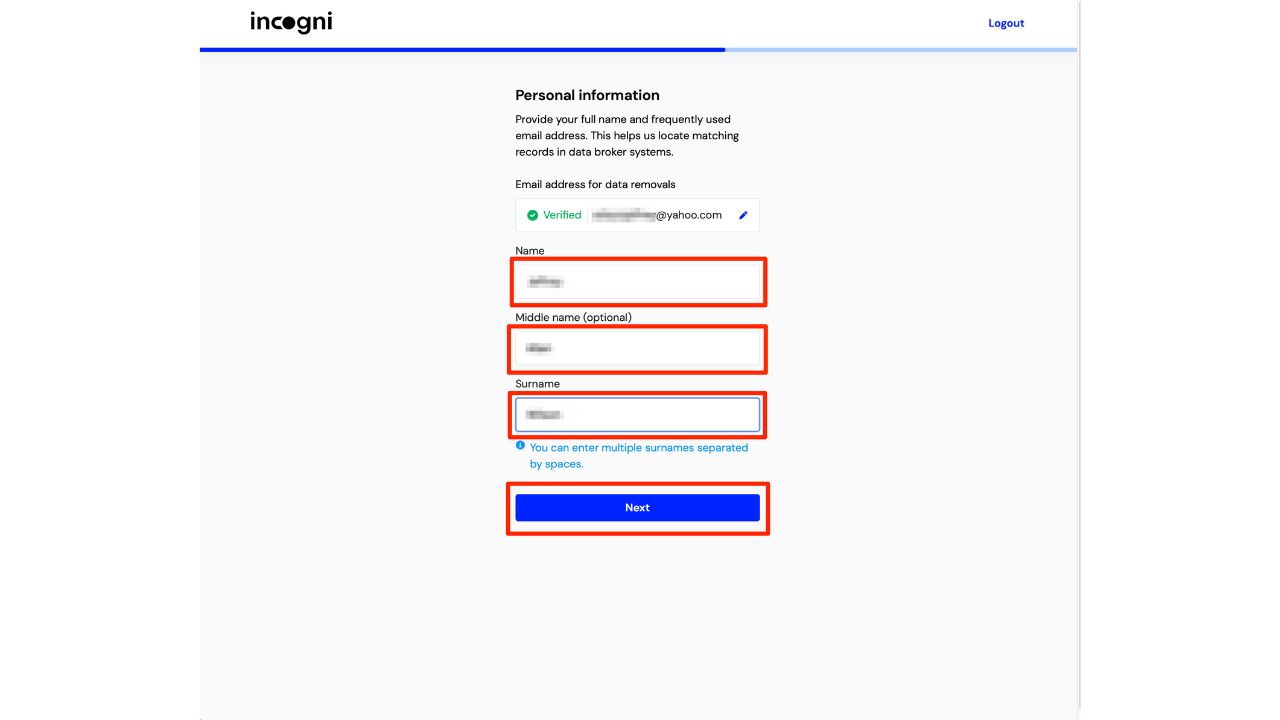
Step 1 – Sign up and create your profile

  • Visit the Incogni website and register for an account.
  • Provide your first name, middle name (optional), and Surname.
  • Then click Next at the bottom of the screen.
Steps to set up Incogni

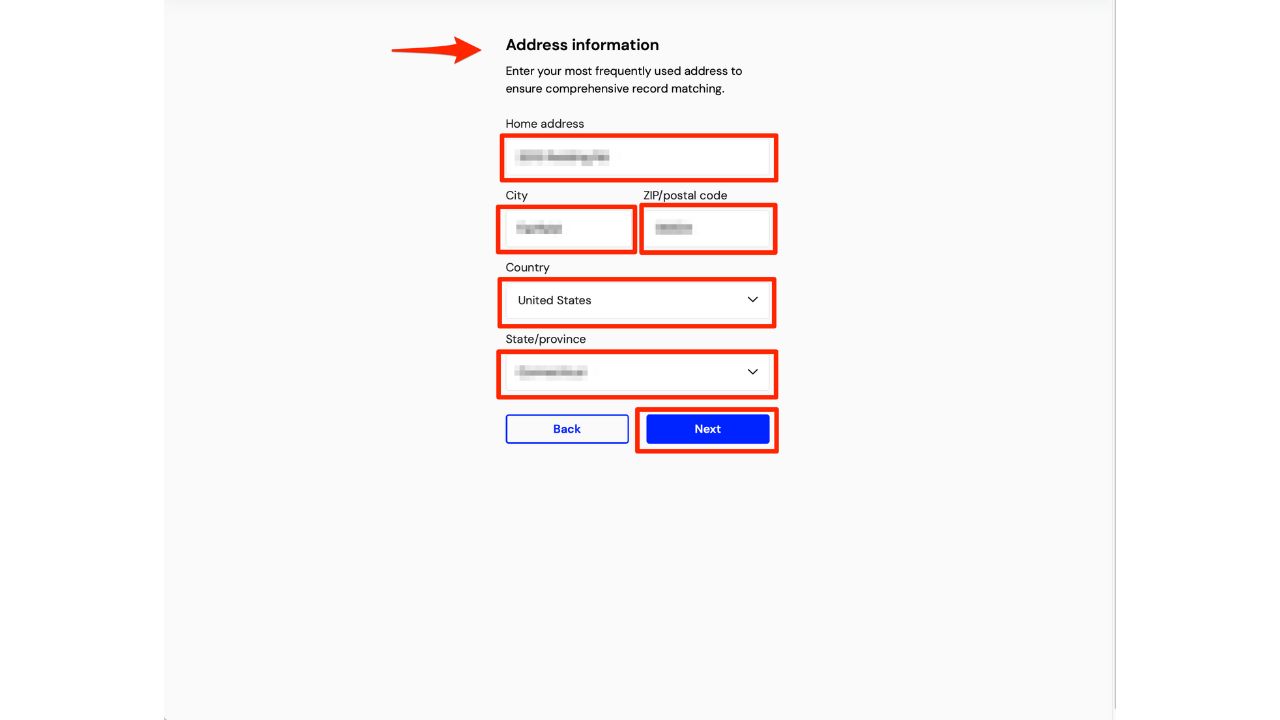
  • Then type in your home address, including City, ZIP/Postal code, and select country and State.
  • Then, click Next.

Steps to set up Incogni

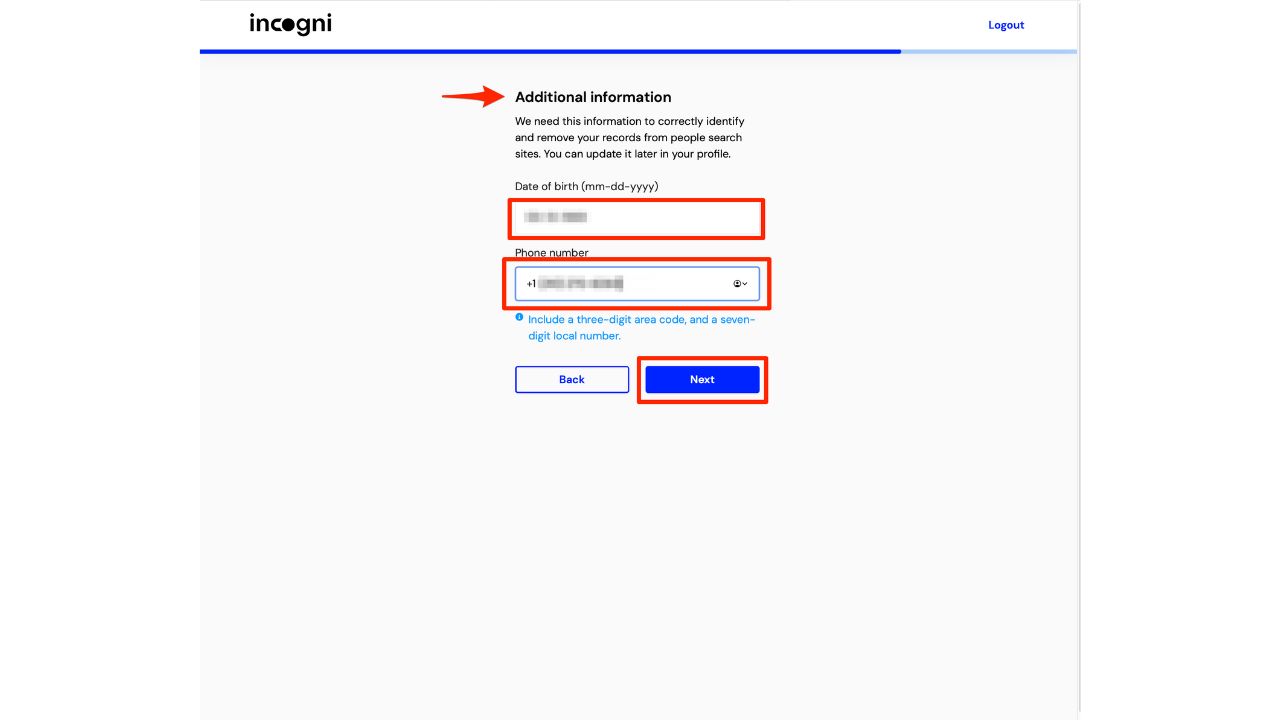
  • Now, you’ll be asked to provide additional information. Incogni needs this information to correctly identify and remove your records from people search sites. You can update it later in your profile.
  • Type your date of birth and phone number.
  • Then click Next. 

Steps to set up Incogni

Step 2 – Grant authorization

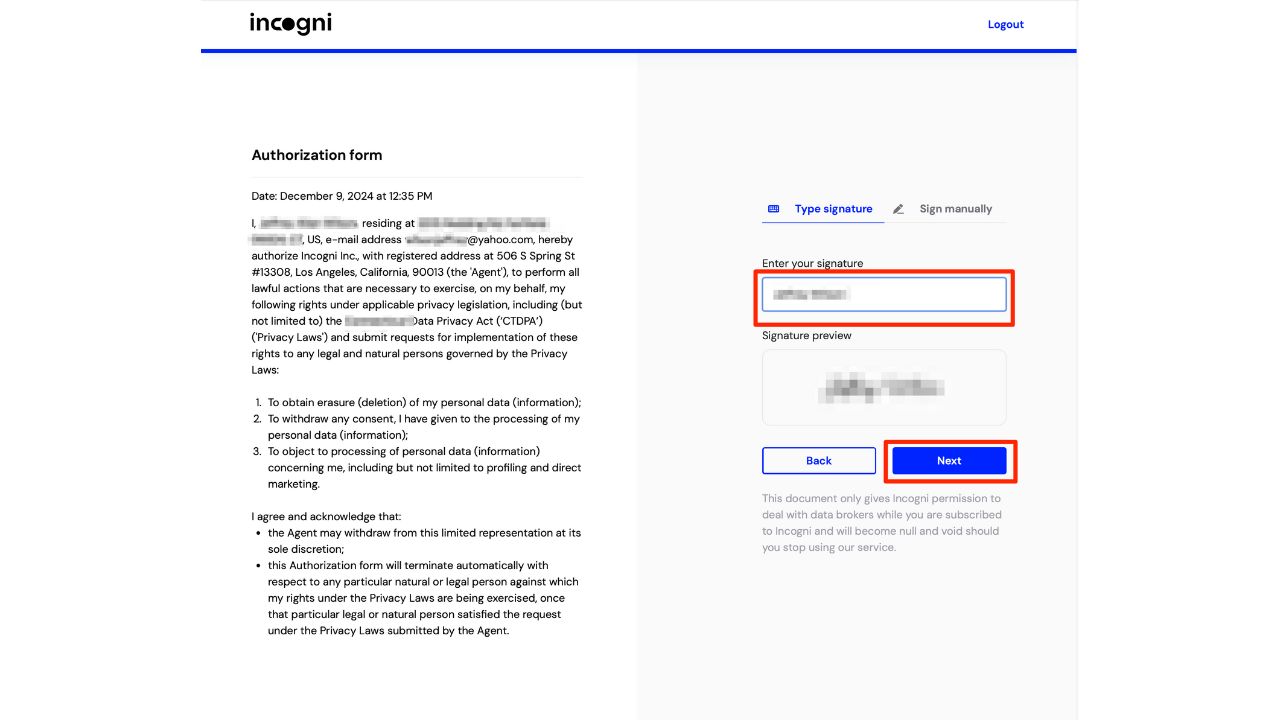
  • This document empowers Incogni to advocate for your privacy rights.
  • Sign the online authorization form, allowing Incogni to act on your behalf.
  • To do this, click where it says “type signature” or “sign manually.”
  • Then, enter your signature where it says to do so.  You’ll see a signature preview of it.
  • Then click Next. 

Steps to set up Incogni

Step 3 – Review the information you provided 

  • You will then be taken to your dashboard.
  • A pop-up will appear in the middle of the screen, asking you to review the information you provided below and confirm it’s correct to start data removal.
  • Then, you can click “Edit or add more” if you want to correct or add any more details or click “Start data removal” to begin the process of removing your data from the data brokers.
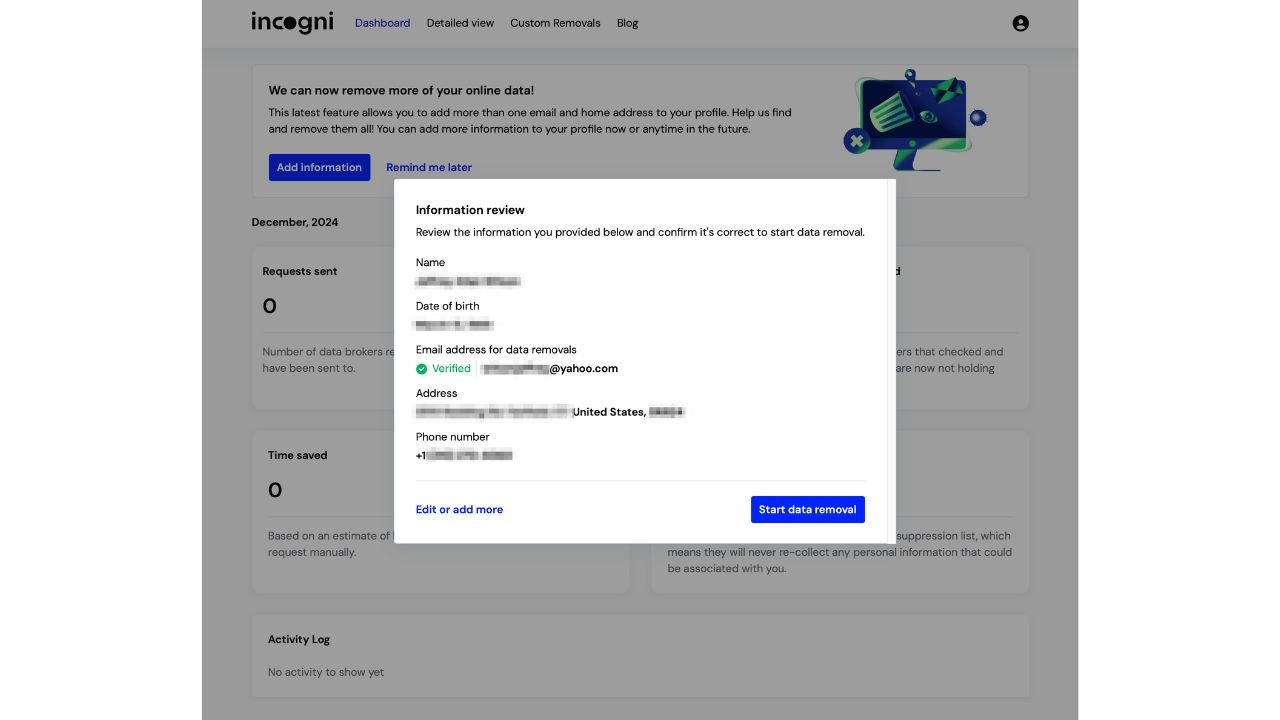
Steps to erase your digital footprint using Incogni

Step 4 – Monitor progress

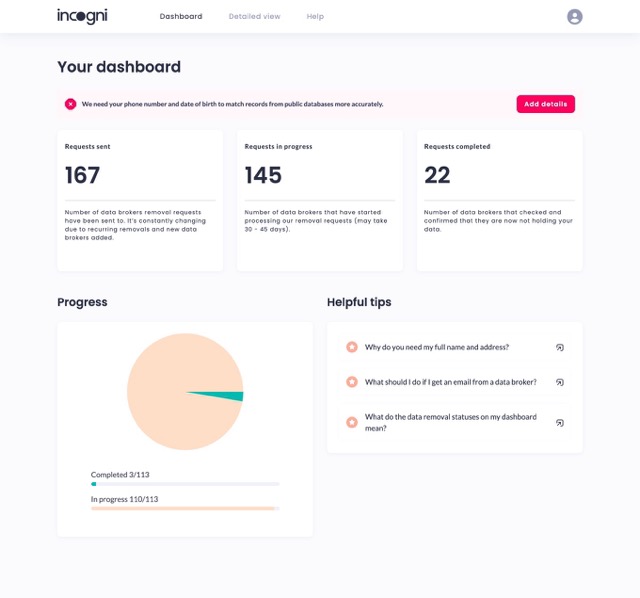
  • Access your dashboard to track the removal progress.
  • Here, you will see Requests sent, Requests in progress, Requests completed, Time saved, Suppression list entries, Activity log and you can click where it says “See full activity log” to see the full list.
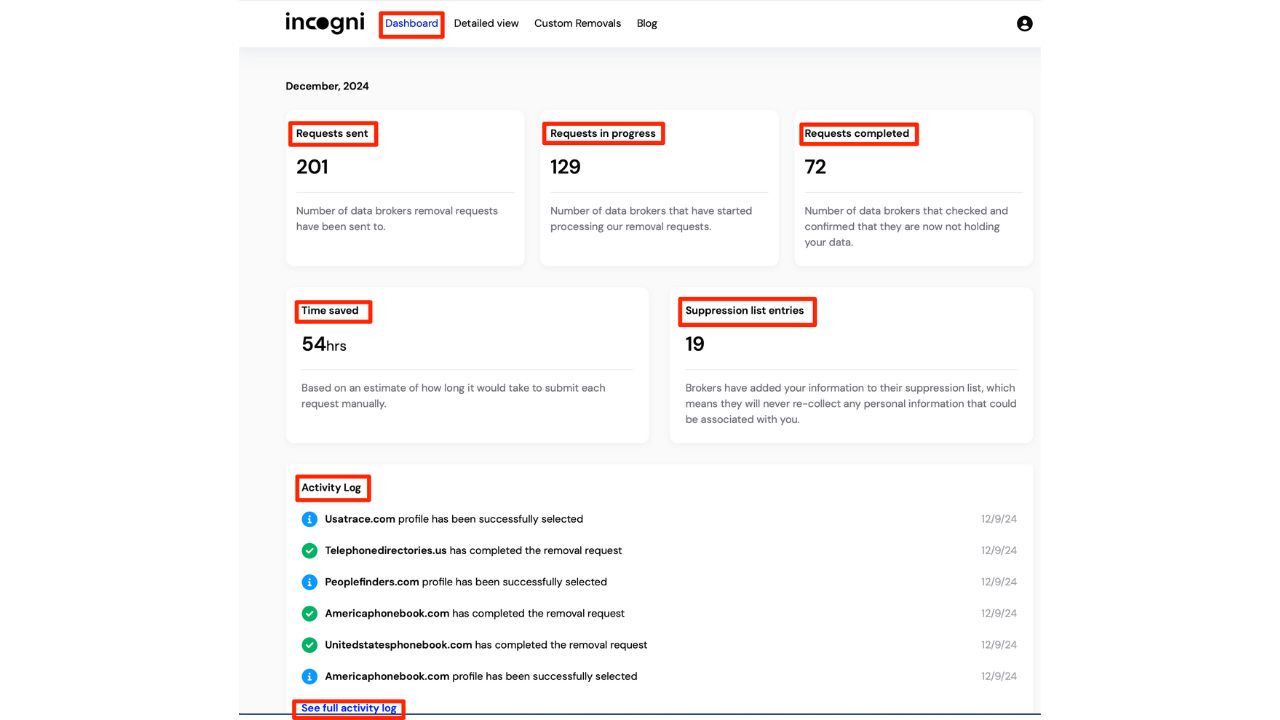
Steps to monitor Incogni

  • You can also click Detailed View at the top of the screen.
  • Then, select between Broker type by clicking Private databases or Public databases. 
  • You can also adjust where it says Compliance score, Severity score, and Request status. 
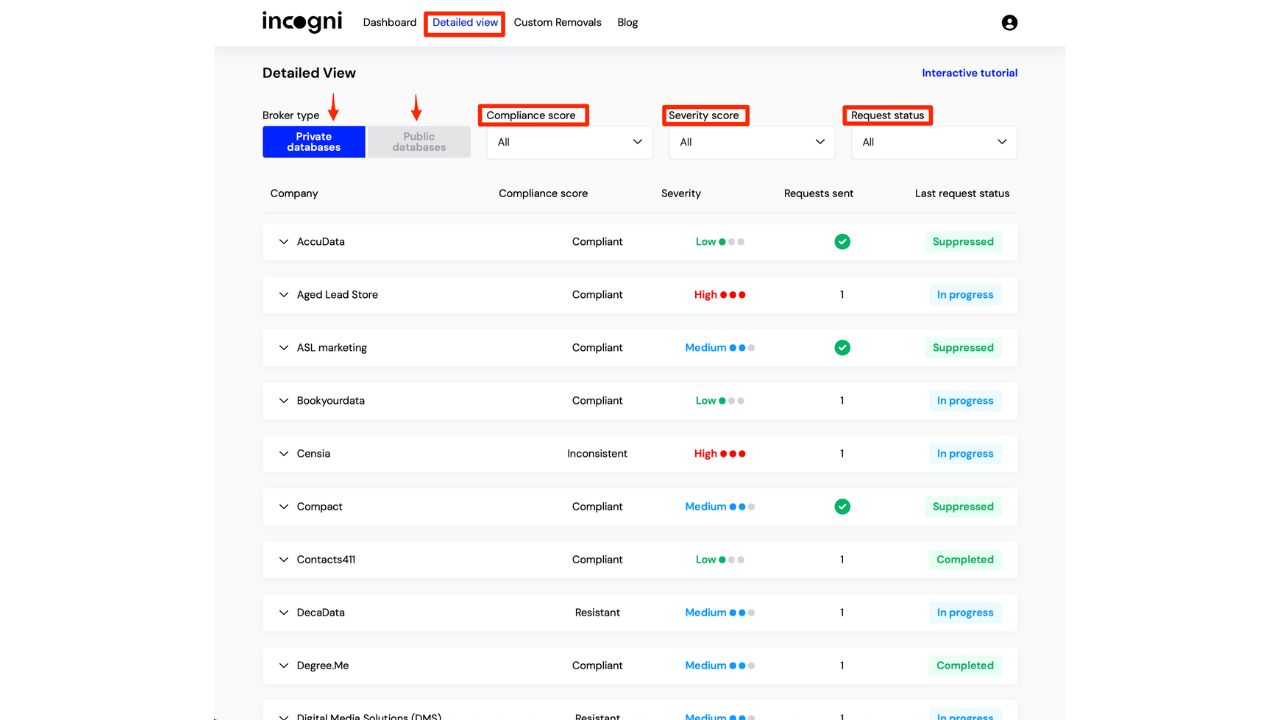
Steps to review Incogni


How to add friends and family members to my Incogni account

1. First, be sure you purchased the friends and family option.

2. Log in to Your Incogni Account:

  • Access the Incogni website and log in to your account.

3. Navigate to the Family & Friends Plan Section:

  • You should see a banner at the top of the screen inviting you to start using the Family & Friends plan. Click the green button labeled “Invite Now.”
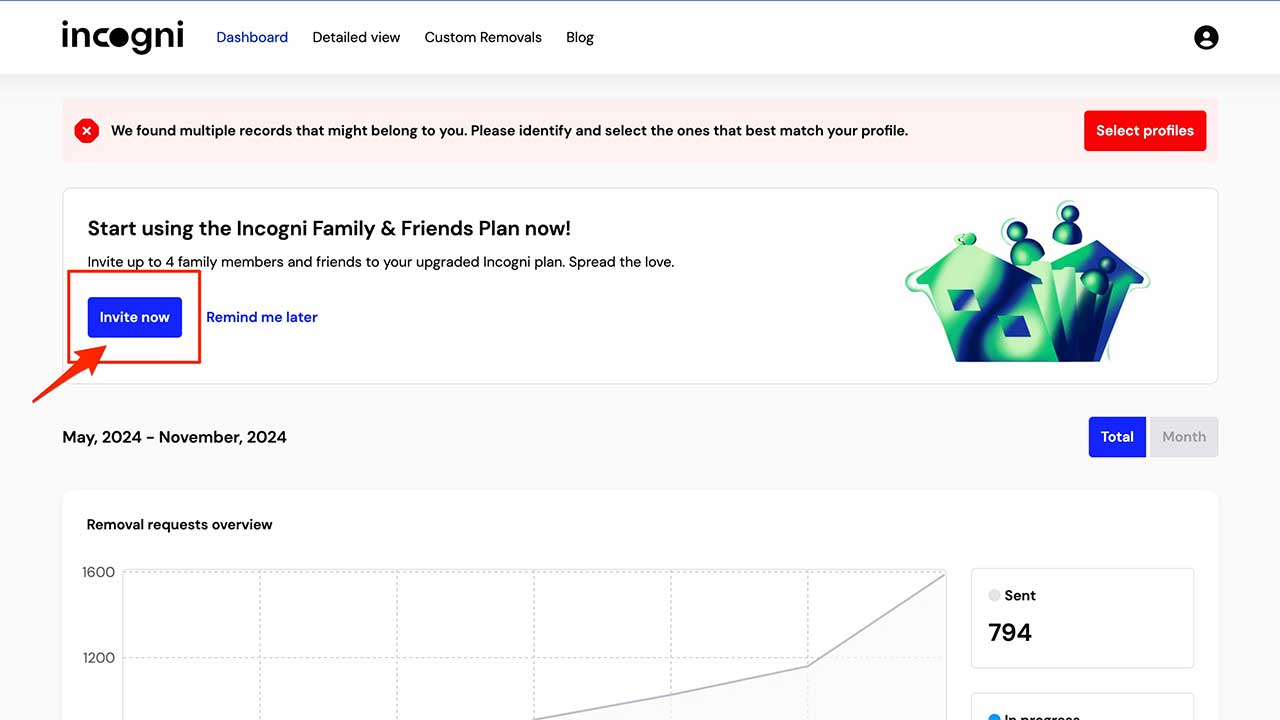
Incogni_friends_and_family_plan_-_invite_now


4. Generate an Invitation Link:

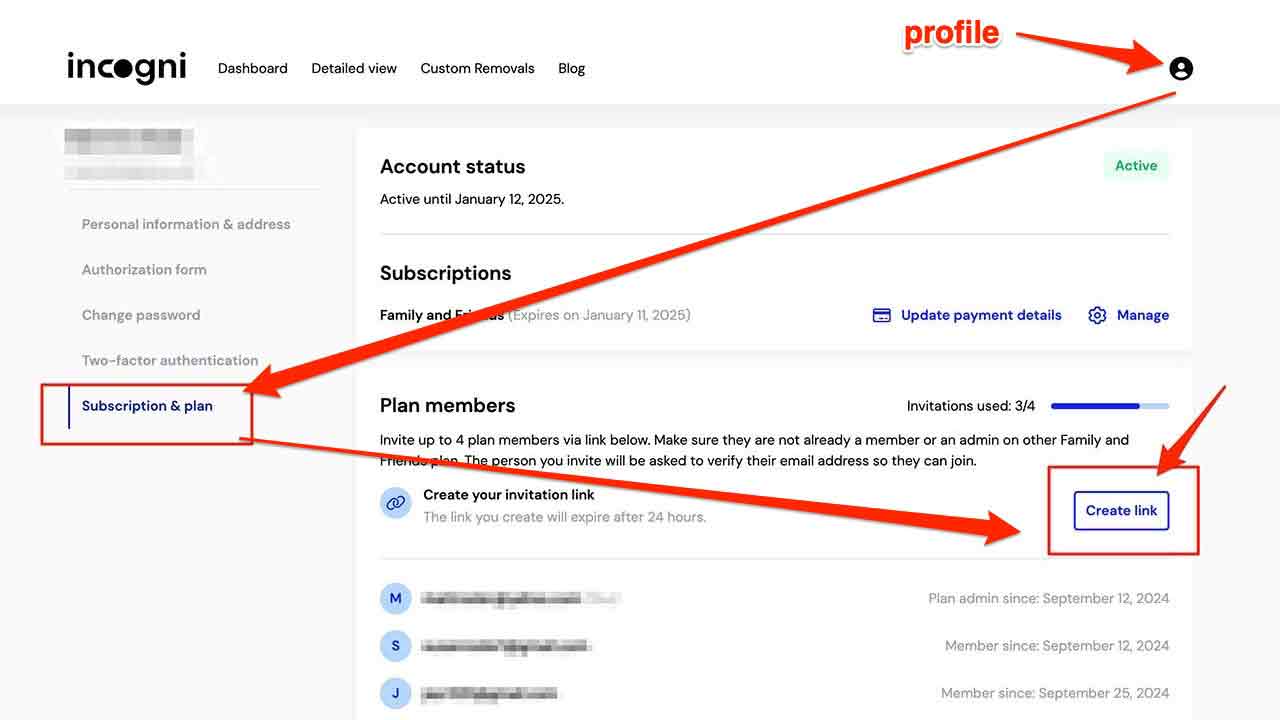
  • Alternatively, you can generate invitation links from the “Subscription & Plan” tab in your profile. To access it:
    • Click the profile icon in the upper-right corner.
    • Select “Profile” from the drop-down menu.
    • From the menu on the left, select “Subscription & Plan.”
    • You’ll see the remaining number of invitations there. Click “Create Link” to generate an invitation link.
Incogni_friends_and_family_plan


5. Share the Link:

    • Share the generated link with your family member or friend via email, SMS, or a messaging app. The links are valid for 24 hours from the moment you click “Create Link.” If the link expires, you can generate a new one by clicking “Create New Link.”

By following these steps, you can easily add your spouse or any other family member to your Incogni Family & Friends plan.


What to expect next

Here’s what to expect as a new member of Incogni:

Monthly progress reports: Each month, you will receive a report detailing the progress of your data removal efforts. If you’re eager to check your status more frequently, you can log into your personal dashboard anytime to view real-time updates and specific details regarding your data removal.

Ongoing data protection: Throughout your subscription, Incogni will actively manage your personal data to keep it off the market. This includes conducting monthly scans of people search sites and sending ongoing requests to data brokers to ensure your information remains protected.

Profile confirmation alerts: Occasionally, Incogni may discover multiple profiles that match your information. In such cases, they will need your confirmation on which profiles to remove. If this happens, you will be notified via email and will see an “action required” banner when you log into your profile.

Service enhancements: Incogni’s commitment to improving your experience means that it will periodically add new data brokers to its network. This expansion allows Incogni to increase the number of removal requests sent on your behalf, enhancing the overall effectiveness of its service.

By signing up for Incogni, you’re taking a proactive step towards safeguarding your personal inform
ation from unwanted exposure online.


Pricing and guarantees

Special for CyberGuy Readers (60% off):  Incogni offers A 30-day money-back guarantee and then charges a special CyberGuy discount only through the links in this article of $5.99/month for one person (billed annually) or $13.19/month for your family (up to 4 people) on their annual plan and get a fully automated data removal service, including recurring removal from 200+ data brokers.  I recommend the family plan because it works out to only $4.12 per person per month for year-round coverage. It’s an excellent service, and I highly recommend at least trying it out to see what it’s all about.

 Get Incogni here

 Get Incogni for your family (up to 4 people) here


Kurt’s key takeaways

Let’s face it: in today’s world, our personal data is more vulnerable than ever, and it can be pretty daunting to think about how much of it is out there for anyone to exploit. That’s why using a service like Incogni can be a smart move. It takes the hassle out of removing your information from data brokers by automating the whole process, which means you can save a ton of time and energy. Plus, it gives you back control over your personal information, allowing you to feel more secure online.

What are your biggest concerns regarding data privacy, and have you taken any steps to safeguard your information online? Share your thoughts and experiences with us in the comments below. 

TO GET MORE OF MY SECURITY ALERTS, SUBSCRIBE TO MY FREE CYBERGUY REPORT NEWSLETTER


Copyright 2025 CyberGuy.com.  All rights reserved.  CyberGuy.com articles and content may contain affiliate links that earn a commission when purchases are made.
Categories
Apple How To iphone Mobile News Privacy Protect Your Devices Quick Tips Safety Security

How to update your passcode on your iPhone

Have you ever stopped and thought, “Is my iPhone as secure as it could be?” Maybe your current passcode is a bit too easy to guess. The good news is that changing your iPhone’s passcode to something more robust is not only possible but pretty straightforward.  Here are some easy steps to give your iPhone an extra layer of security.


MORE: BEST ACCESSORIES FOR YOUR PHONE 


How to change the passcode on your iPhone

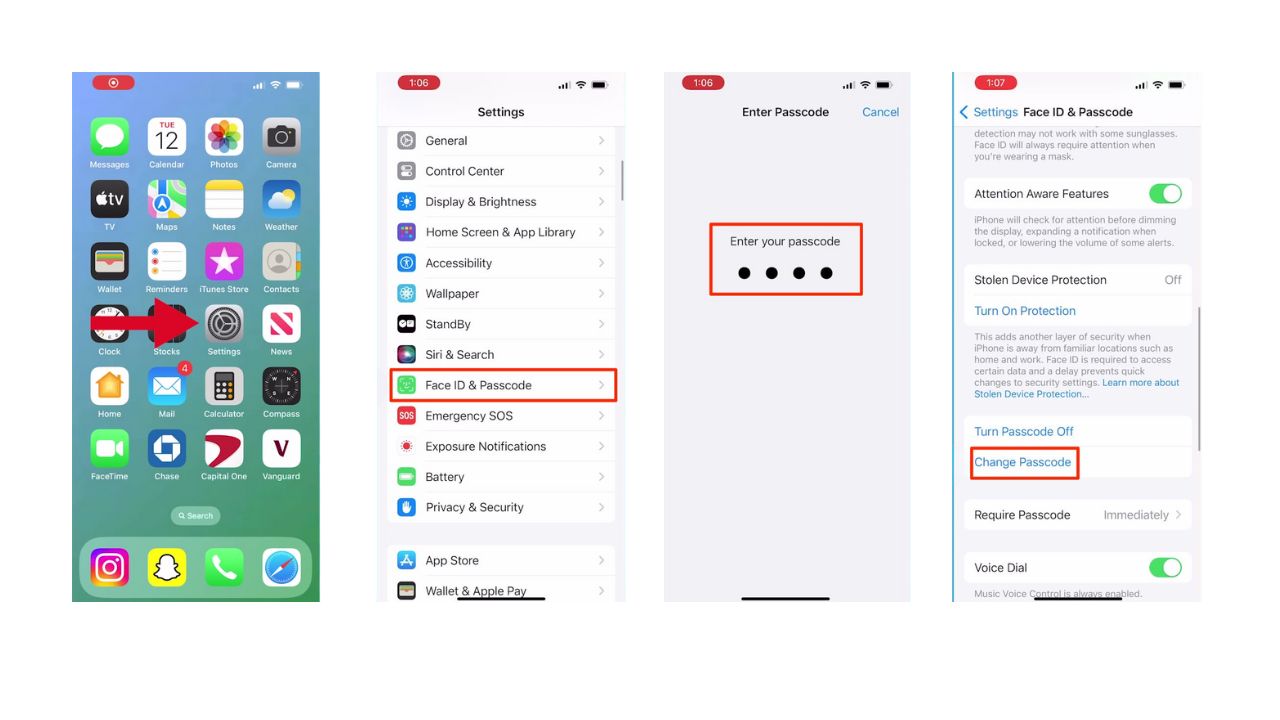
  • Open the Settings app
  • Then scroll down until you find Face ID & Passcode and tap it
  • When prompted, type in your current passcode
  • Then scroll down to Change Passcode and click on it

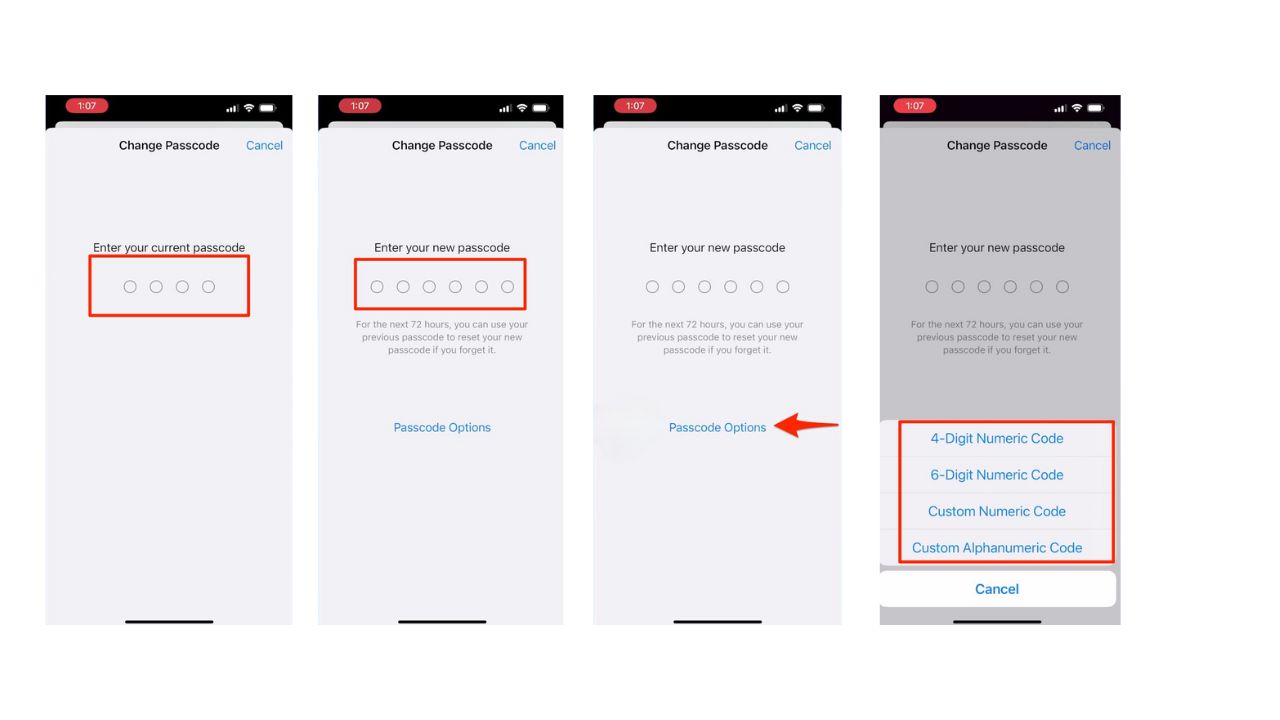
  • Type in your current passcode
  • Then, you’ll be prompted to type in a new passcode
  • Before you do this step, there’s an advanced option at the bottom of the screen called “passcode options” that will allow you to choose from:
  • 4-digit numeric Code
  • 6-digit numeric Code
  • Custom numeric Code
  • Custom Alphanumeric Code

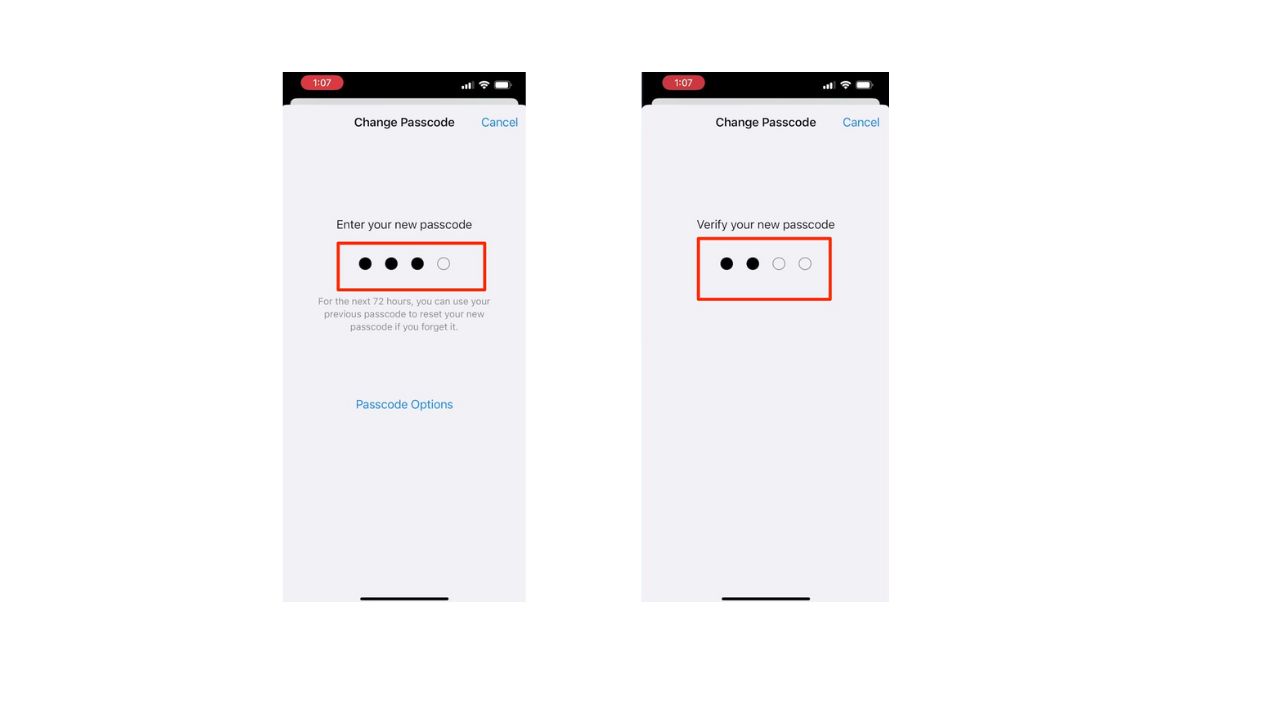
  • Once you choose what you want your passcode to be, type in your new passcode
  • To verify, type in your new passcode again

Remember, the longer and more complex your passcode, the tougher it is for prying eyes to sneak a peek as you type it in.  Also, consider investing in a privacy screen. These screen protectors limit the viewing angle of your display, making it difficult for anyone besides you to see what’s on your screen. This adds an extra layer of security, especially when you’re in public.


MORE: TOP AFFORDABLE CELL PHONE PLANS  


Use strong and unique passwords

While a strong passcode and privacy screen are great first steps, there’s more you can do to secure your iPhone. What about those complex passwords you created? Remembering them all can be a nightmare.  This is where password managers come in. Password managers take the burden off you. These apps generate strong, unique passwords for all your accounts and store them securely.  It will help you to create unique and difficult-to-crack passwords that a hacker could never guess. Second, it also keeps track of all your passwords in one place and fills passwords in for you when you’re logging into an account so that you never have to remember them yourself.  The fewer passwords you remember, the less likely you will be to reuse them for your accounts.

One of the best password managers out there is NordPass. NordPass is a secure and user-friendly password manager that uses zero-knowledge and military-grade XChaCha20 encryption to protect your data. It supports Windows, macOS, Linux, Android, iOS, and major browsers while offering unlimited password storage, secure sharing, password health reports, data breach monitoring, auto-fill, and emergency access. 

CyberGuy Exclusive NordPass Deal: Save 56% and get 3 extra months FREE with a 2-year plan. Try 30 days risk-free for only $1.29/month!

Get more details about my best expert-reviewed Password Managers here.


MORE: 8 WAYS TO LOCK UP YOUR PRIVATE STUFF ON YOUR IPHONE


Kurt’s key takeaways

With a stronger passcode and some extra tricks like a privacy screen, your iPhone can be a fortress of security. Don’t forget to check out the password manager recommendations too – remembering strong, unique passwords for everything is a pain, but these apps can do the heavy lifting for you.

Beyond passcodes and passwords, what do you consider the biggest security risks for your iPhone? Let us know in the comments below.

FOR MORE OF MY TIPS, SUBSCRIBE TO MY FREE CYBERGUY REPORT NEWSLETTER HERE


Copyright 2025 CyberGuy.com.  All rights reserved.  CyberGuy.com articles and content may contain affiliate links that earn a commission when purchases are made.
Categories
How To News Privacy Protect Your Devices Quick Tips Scams

The ‘Do Not Call’ list loophole: Why your phone still won’t stop ringing

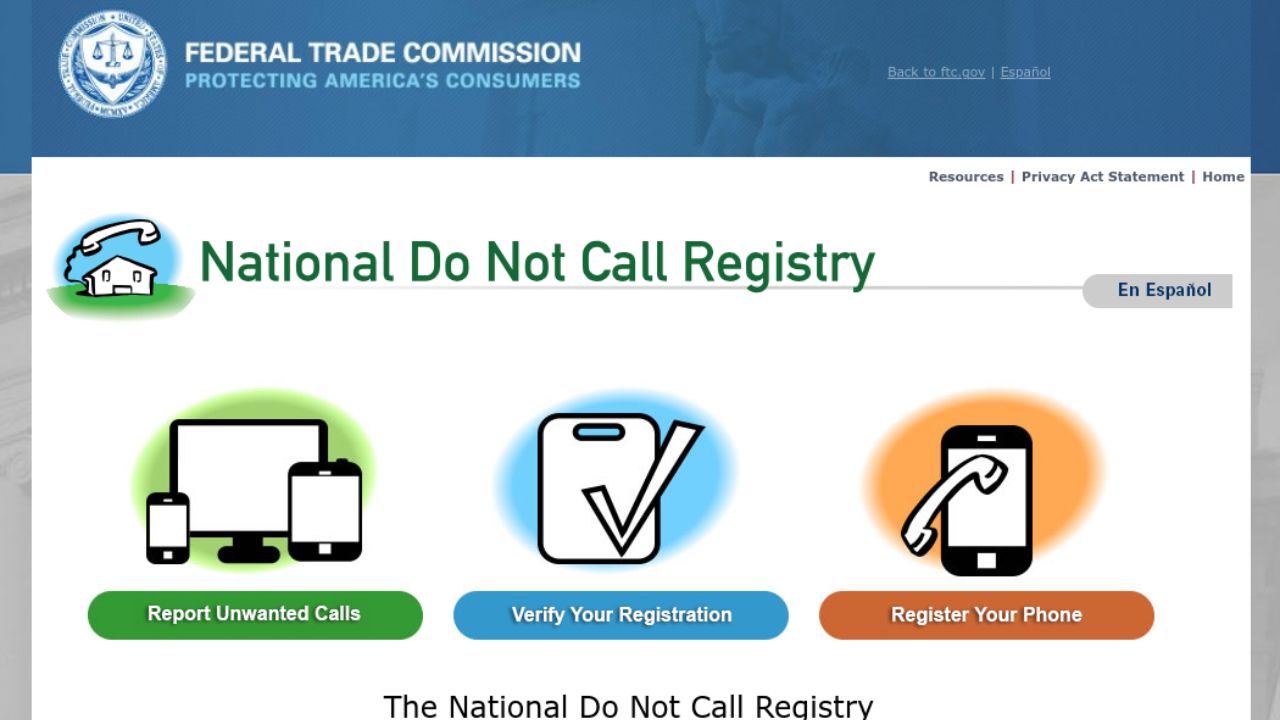
If you’ve taken the time to read our tips here at Cyberguy to keep phone scammers at bay, good for you. One of these tips is to put your phone number on the national and state “Do Not Call” list. However, you might find that you’re still getting calls from scammers. This is because the Do Not Call list primarily targets legitimate telemarketers and has limited effectiveness against scammers and illegal robocallers who often ignore the list.

This is what happened to one of our newsletter subscribers, who told us that even though she took the time to put her number on that list, she still receives many annoying calls. “I repeatedly tell them to remove my number and stop calling, but they continue to call.” She noted that the caller ID indicates that these phone calls are coming from spoofed phone numbers. Even though she blocked these numbers, too (another tip to ward off scammers), they’d call back from another number. So, why is this permitted? And, how come being on the “Do Not Call” list is not enough? Let’s thoroughly answer this once and for all.

GET SECURITY ALERTS, EXPERT TIPS – SIGN UP FOR KURT’S NEWSLETTER – THE CYBERGUY REPORT HERE

Credit: FTC


How scam calls get through the “Do Not Call” list

Receiving calls from scammers when you’ve gone out of your way to prevent them from calling you can be rather frustrating.

Unfortunately, despite being on the Do Not Call list, you may still receive unwanted calls due to a few reasons:

Some types of calls are exempt from the “Do Not Call” regulations. These include calls from political organizations, charities, and companies with whom you have an existing business relationship.  Of course, if the scammer spoofs a government phone number, they may appear to be exempt from the “Do Not Call” list, even though they are not actually a legitimate government entity.

Scammers often disregard the “Do Not Call list” and continue to make unsolicited calls. These individuals and organizations engage in illegal activities and are not bound by the regulations set forth by the FTC. After all, these scammers are not really one to follow the rules.

Sometimes, telemarketing companies or organizations may inadvertently call numbers on the “Do Not Call” list due to data errors or technical issues. Though, this is less likely.

Additionally, scammers can purchase phone numbers on the dark web, allowing them to target a wide range of individuals regardless of their registration on the “Do Not Call” list.

Again, because scammers can spoof phone numbers to make any number appear on the caller ID (even if it belongs to someone else), it’s much easier for them to bypass the “Do Not Call” list loophole.


HOW TO TRACE AND BLOCK ANONYMOUS CALLS 


How to keep scammers from calling you at all costs

While we’d like to think it’s enough to put your number on the national and state “Do Not Call” list, as we learned from this subscriber, it’s not a foolproof method. They can still find ways to get to you. That being said, don’t neglect putting your number on this list. Keeping scammers from calling you requires a combination of different strategies, and each one helps reduce the number of scam calls you’ll get over time.

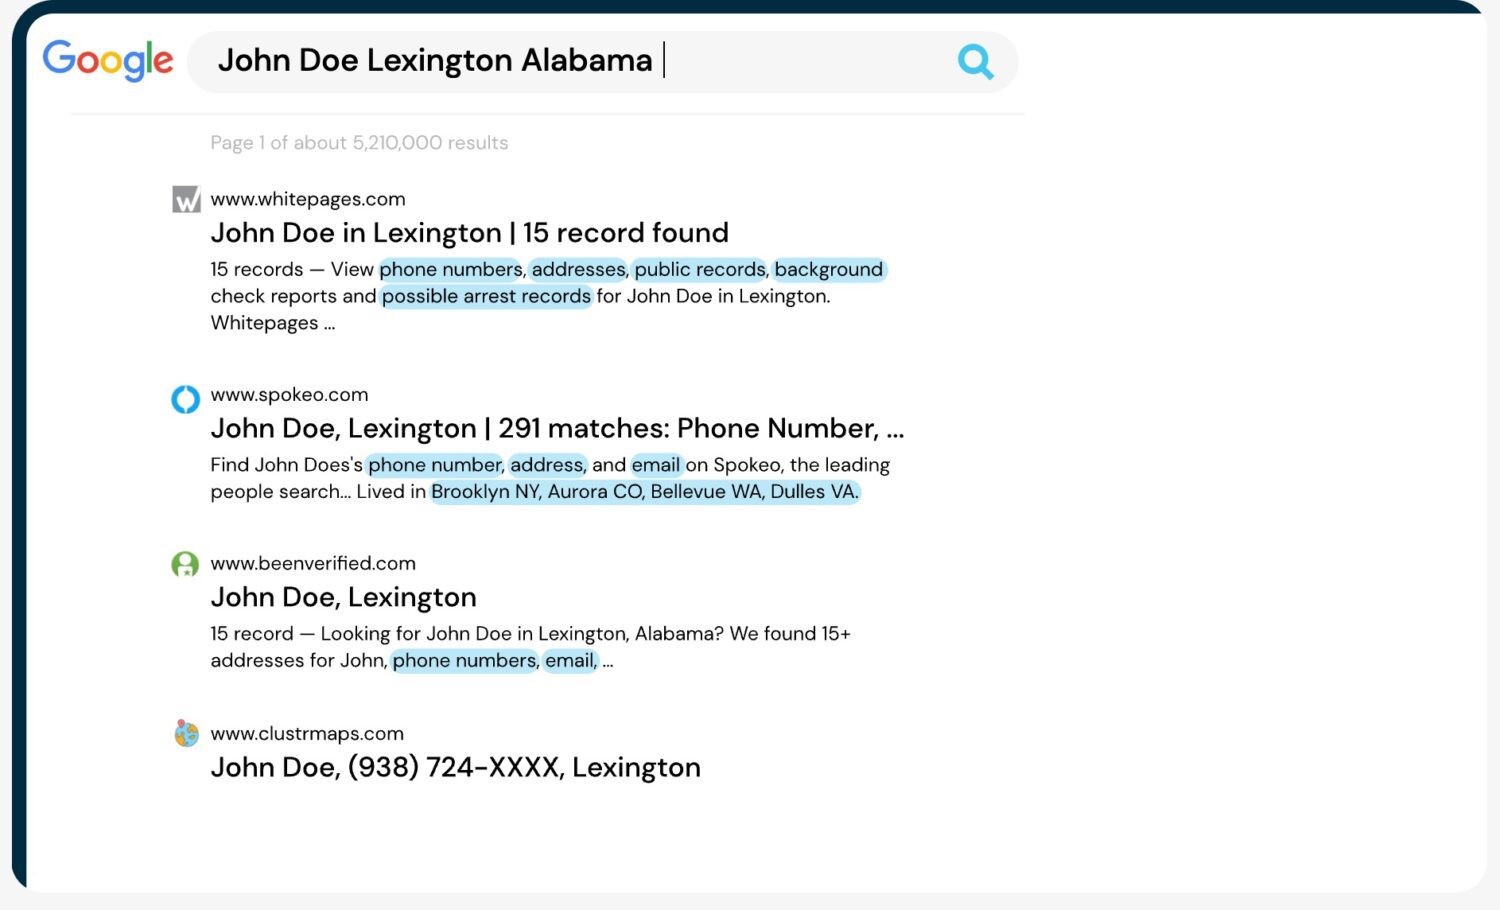
1) Invest in personal data removal services: While no service promises to remove all your data from the internet, having a removal service is great if you want to constantly monitor and automate the process of removing your information from hundreds of sites continuously over a longer period of time. 

A service like Incogni can help you remove all this personal information from the internet. It has a very clean interface and will scan 195 websites for your information and remove it and keep it removed.

Special for CyberGuy Readers (60% off):  Incogni offers A 30-day money-back guarantee and then charges a special CyberGuy discount only through the links in this article of $5.99/month for one person (billed annually) or $13.19/month for your family (up to 4 people) on their annual plan and get a fully automated data removal service, including recurring removal from 175+ data brokers.  You can add up to 3 emails, 3 home addresses and 3 phone numbers (U.S. citizens only) and have them removed from data-broker databases.  I recommend the family plan because it works out to only $4.12 per person per month for year-round coverage. It’s an excellent service, and I highly recommend at least trying it out to see what it’s all about.

Get Incogni here

Get Incogni for your family (up to 4 people) here


2) Check to see if any websites you have an account with may have had a data breach recently. Changing your passwords frequently can help prevent more damage from being done. Also, consider using a password manager to generate and store complex passwords.


3) Don’t answer calls from unknown numbers. Let them go to voicemail.


4) Use your phone’s spam blocker features.


5) Notify your mobile service provider about the calls and see what they can help you do.


6)
Never reply or call back a number you don’t recognize. If the area code is familiar to you but not the rest of the phone number, it could very well be a scammer who is intentionally phone spoofing someone’s number within the same area code, for the sole purpose that you’ll recognize it and feel more inclined to answer it.


7) Block robocalls and unknown numbers.


8) Report the unwanted calls to the FTC and your state attorney general’s office, especially if it’s a repeated number or person claiming to be from the same organization.


9) If the calls are still coming, consider changing your phone number.


10) Consult a Consumer Protection Attorney if the calls really don’t stop.


11) Remember never to provide your personal information over the phone. If anyone calls you to ask for your sensitive data, do not give it over, even as trusting the person might sound or as legitimate as the reason may seem. These days, because scams are so prevalent, there shouldn’t be any company calling you and asking you for this information over the phone. Always do your due diligence.


HOW TO BLOCK THOSE UNWANTED AND ANNOYING SPAM EMAILS


Kurt’s key takeaways

Putting your phone number on the “Do Not Call” list is a great step in keeping scammers away. But, it’s not the only way. It takes utilizing different strategies — and, keeping up with those strategies — to send the scammers elsewhere.

If you could design a new feature for smartphones to prevent scam calls, what would it be? Let us know in the comments below.

FOR MORE OF MY SECURITY ALERTS, SUBSCRIBE TO MY FREE CYBERGUY REPORT NEWSLETTER HERE

Categories
Android Apple Apps Home Tech How To Privacy Protect Your Devices Quick Tips Security Software Tech Tips & Tricks

How to update all of your devices and keep them safe

The New Year is a great time to ensure that all your devices are operating on the most up-to-date software and that your privacy is being protected.

With all this in mind, here’s a step-by-step guide to help you with these top priorities.


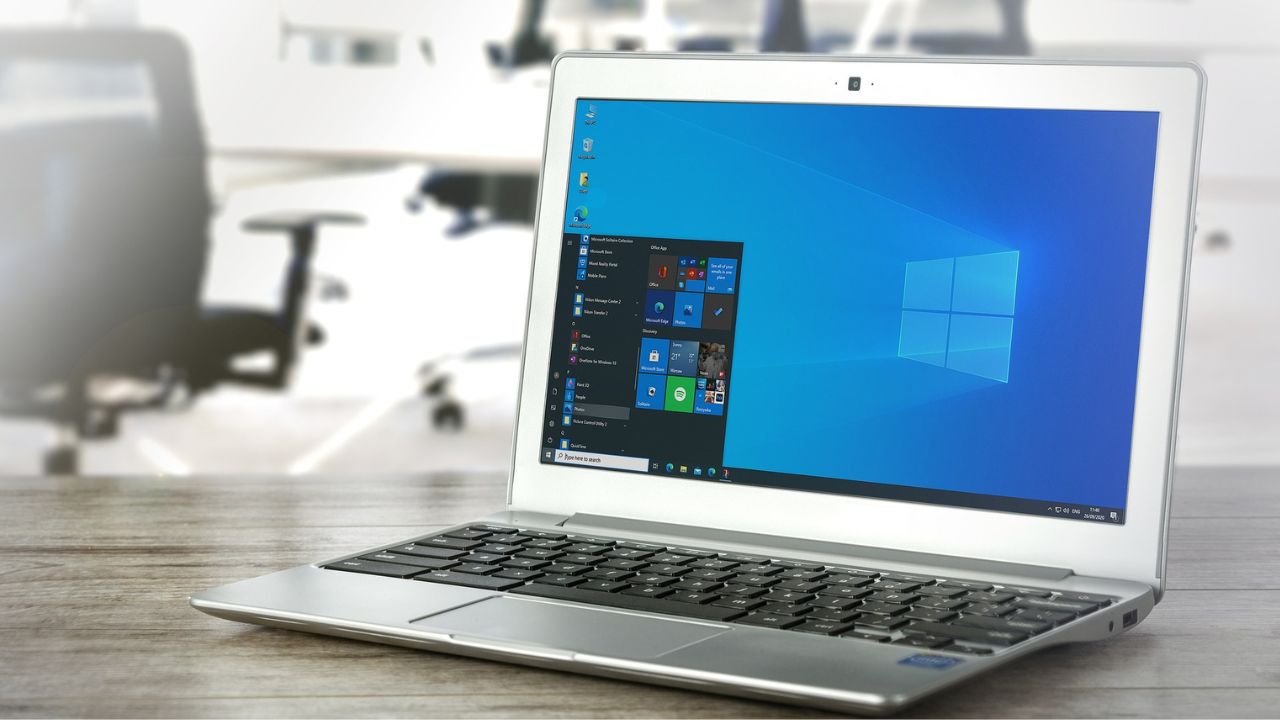
WINDOWS

https://pixabay.com/photos/laptop-computer-windows-screen-5603790/

How to keep your Windows devices up-to-date

  • Select Start
  • Click Settings
  • Click Windows Update
  • Click Check For Updates
  • If a feature update is available for your device, it will appear separately on the windows update page.
  • To install it, click Download and install now

You can also set your Windows to automatically update… But should you?

If you’re an individual who never remembers to update your computer, you may choose to set this option.  But sometimes automatic updates don’t play nicely with old programs.  So if you do decide to set this feature, be sure to always have your computer backed up as described here so you can restore if need be.


MAC

Macbook

How to keep your Mac devices up-to-date

  • Click The Apple menu
  • Click System Preferences
  • Click Software Update
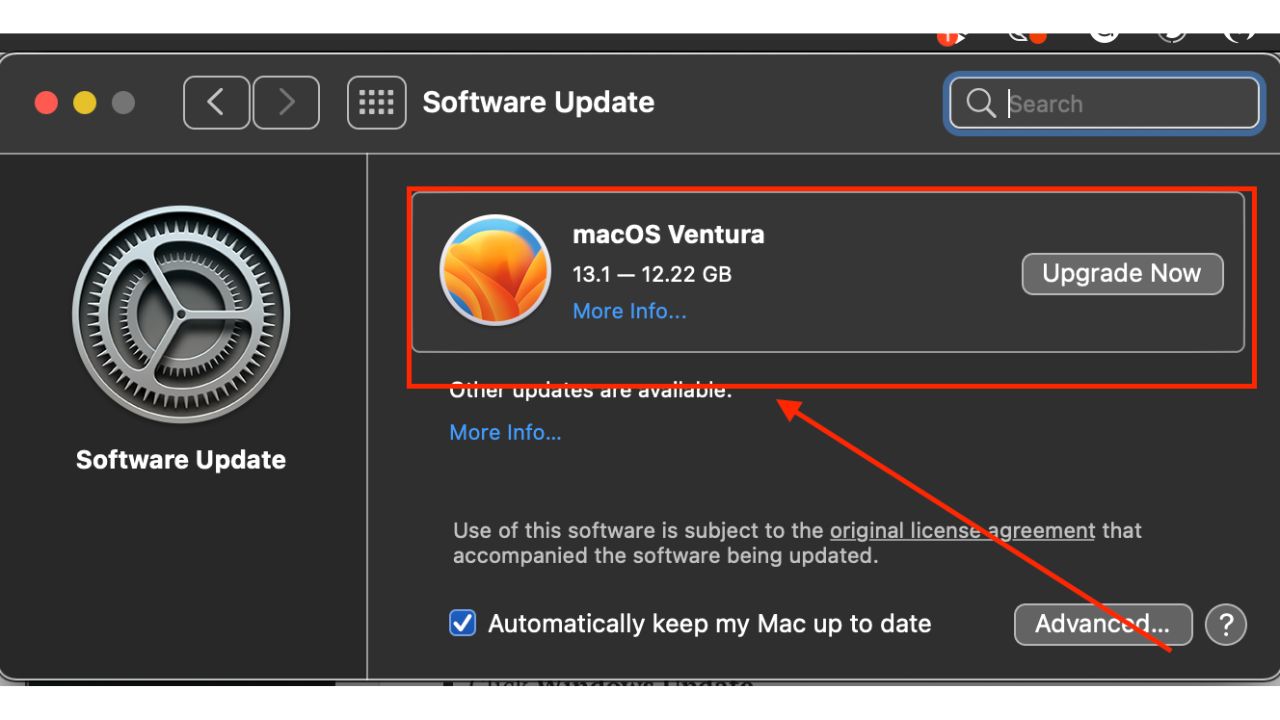
  • If a Software update is available, it will give you the option to update. You can do this by clicking the Upgrade Now button.

Mac screenshot

A word of caution: Often new operating systems offer new slicker interfaces and functionality.  If you have older programs on your computer, sometimes newer operating systems don’t always play nice with older programs.  That said, when it comes to installing new operating systems like you see below, be sure to always back up your computer just in case.  More about backing up your computer here.


You can also set your Mac to automatically download any relevant updates by… But should you?

If you’re an individual who never remembers to update your computer, you may choose to set this option.  But as mentioned above, sometimes automatic updates don’t play nicely with old programs.  So if you do decide to set this feature, be sure to always have your computer backed up as described here so you can restore it if need be.

How to keep your Mac automatically updated

  • Click The Apple menu
  • Click System Preferences
  • Click Software Update
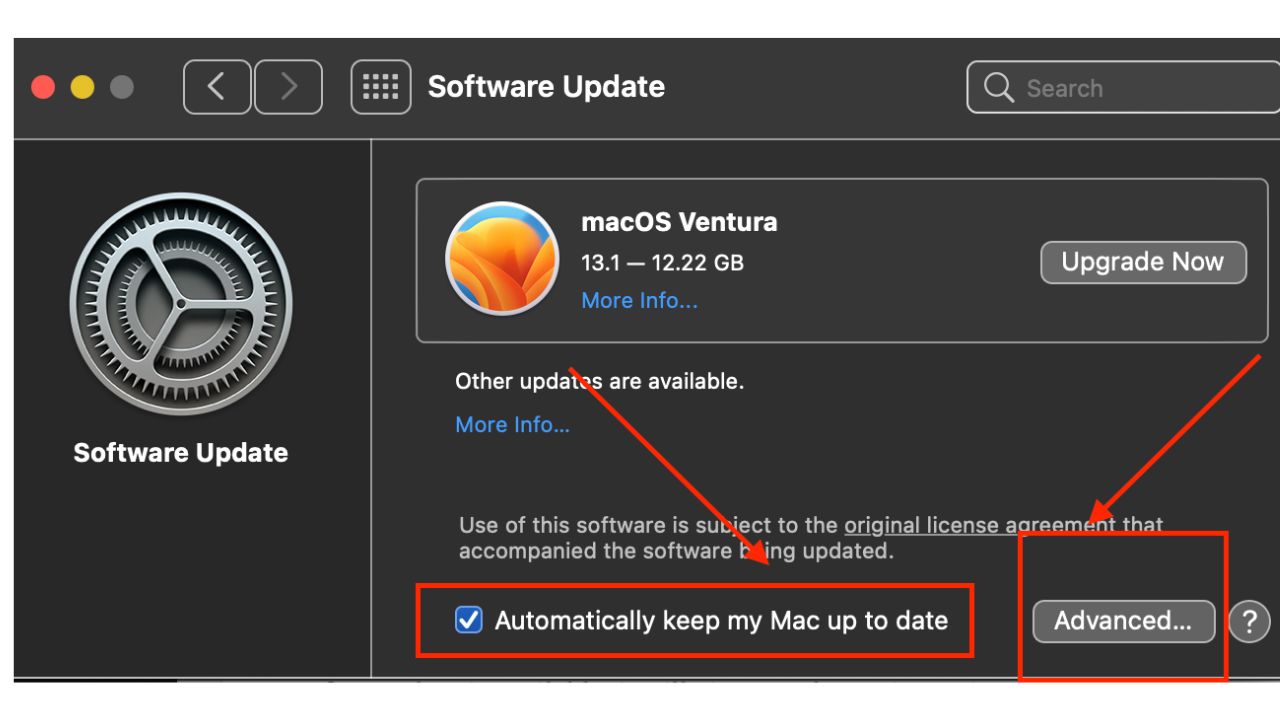
  • Check-off Automatically keep my Mac up to date
  • Click Advanced

Mac Screenshot

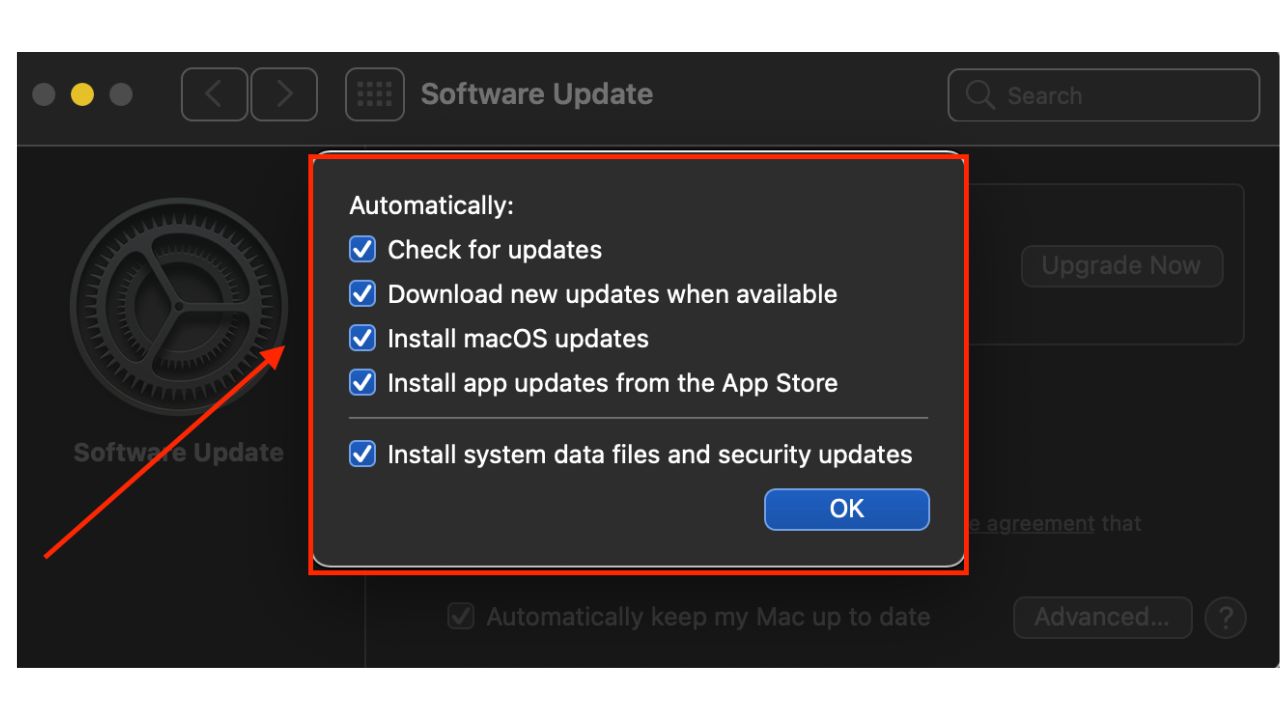
  • Check off all relevant services you wish to enable

Mac screenshot


ANDROID

https://pixabay.com/photos/android-samsung-samsung-galaxy-1814556/

How to make sure your Samsung and Android phone and tablets are up-to-date

Samsung

  • Tap Settings
  • Near the bottom, tap Software Update
  • Then, tap Download and install
  • You’ll be shown if there are any updates available and will be given the option of whether or not to update

Other Androids

Please note settings may vary depending on your Android phone’s manufacturer.

  • Tap Settings
  • Near the bottom, tap System
  • Then, tap System Update
  • You’ll be shown if there are any updates available and will be given the option of whether or not to update


iOS DEVICES

iPhone

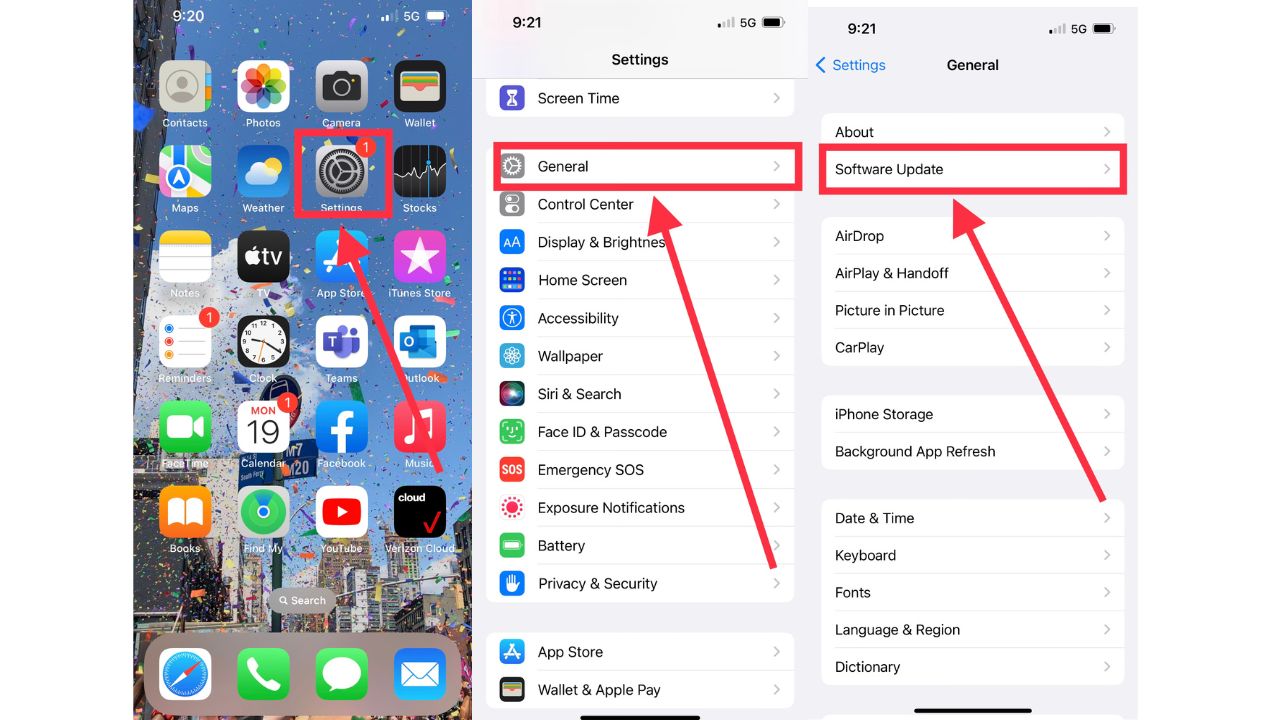
How to make sure your iPhone and iPads are up to date

  • Tap on Settings
  • Tap on General
  • Tap on Software Update
  • If an update is available, it will give you the option to download and install

Iphone screenshot

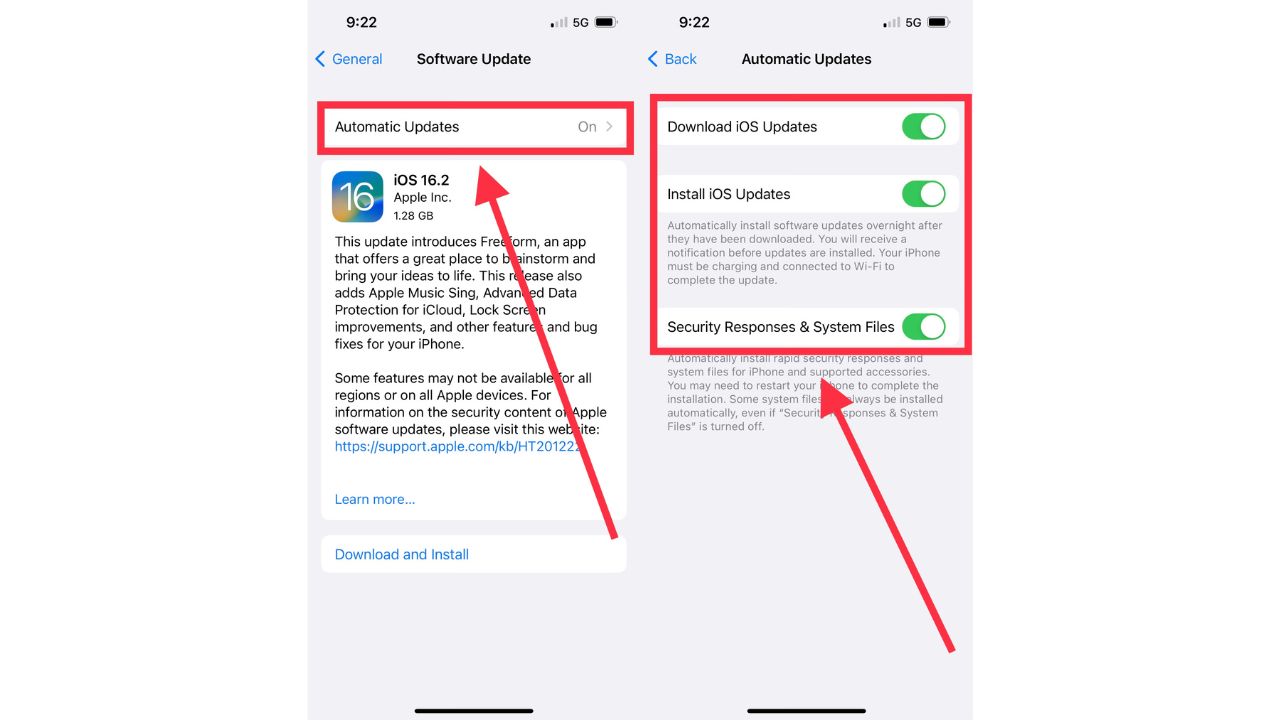
To keep your phone always up to date, you can turn on automatic updates by:

  • On the Software Update screen mentioned above, click the Automatic Updates row
  • Switching on all relevant services you wish to keep updated automatically

iPhone screenshot

A word of caution:  Always back up your phone just in case.  More about backing up and restoring your phone here.

How to make sure your Apple Watch is up to date

  1. Update Your iPhone:
    • Before updating your Apple Watch, update your iPhone to the latest version of iOS. Go to Settings > General > Software Update on your iPhone.
  2. Prepare Your Apple Watch:
    • Place your Apple Watch on its charger and ensure it has at least 50% battery.
    • Keep the Apple Watch in range of your iPhone.
  3. Start the Update from Your iPhone:
    • Open the Watch app on your iPhone.
    • Tap My Watch tab.
    • Go to General > Software Update.
    • If an update is available, tap Download and Install.
    • Enter your iPhone or Apple Watch passcode if prompted.
  4. Download and Install:
    • The download will start. It can take from a few minutes to an hour, depending on your internet speed.
    • After the download, the installation process will begin on your Apple Watch. This can also take some time. You’ll see a progress wheel on your Apple Watch.
  5. Wait for the Update to Complete:
    • Do not restart your Apple Watch or iPhone during the update.
    • Keep the Apple Watch on its charger until the update is complete.
  6. Completion:
    • Once the update is finished, your Apple Watch will restart.


BROWSER UPDATES

After you update your software, it’s also a good idea to ensure your web browser is up-to-date to fix any security issues which would help prevent hackers from getting into your computer, crashing programs and getting around your computer’s security systems.   While there are many browsers out there, below are a few of the more popular ones.


How to update your Chrome browser

Mac

  • Open Google Chrome browser
  • Select About Chrome from the Chrome menu
  • Allow it to scan from a most recent update
  • Click Relaunch to complete the update

Windows

  • Open
    Chrome browser
  • At the top right, click More 
  • Click Help, then About Google Chrome
  • Select Update Google Chrome
    Note: If you do not see the “Update Google Chrome” button, then your browser is already updated
  • Click Relaunch to complete

Android

  • From your phone or tablet, open the Google Play Store app
  • Tap the profile icon from the top right
  • Select Manage apps & device
  • Find Chrome located under “Updates available
  • Tap Update

iPhone & iPad

  • Launch Apple App Store
  • Tap Profile from the top right (it looks like you or a shape of a person)
  • Scroll down to “Available Updates” and search for Chrome
  • If you see Chrome on the list, tap Update
  • Enter your passcode or Apple ID password if prompted
  • Chrome will automatically update when finished downloading


How to update your Safari browser on a Mac

Safari is a built-in App on all Apple products and will automatically update alongside your device’s software.


How to update your Microsoft Edge browser

On Windows 

Microsoft Edge is programmed to update automatically every time you restart your browser.  You can, however, update Microsoft Edge manually:

  • Open the Microsoft Edge browser
  • Click Settings and More
  • Click Help and Feedback
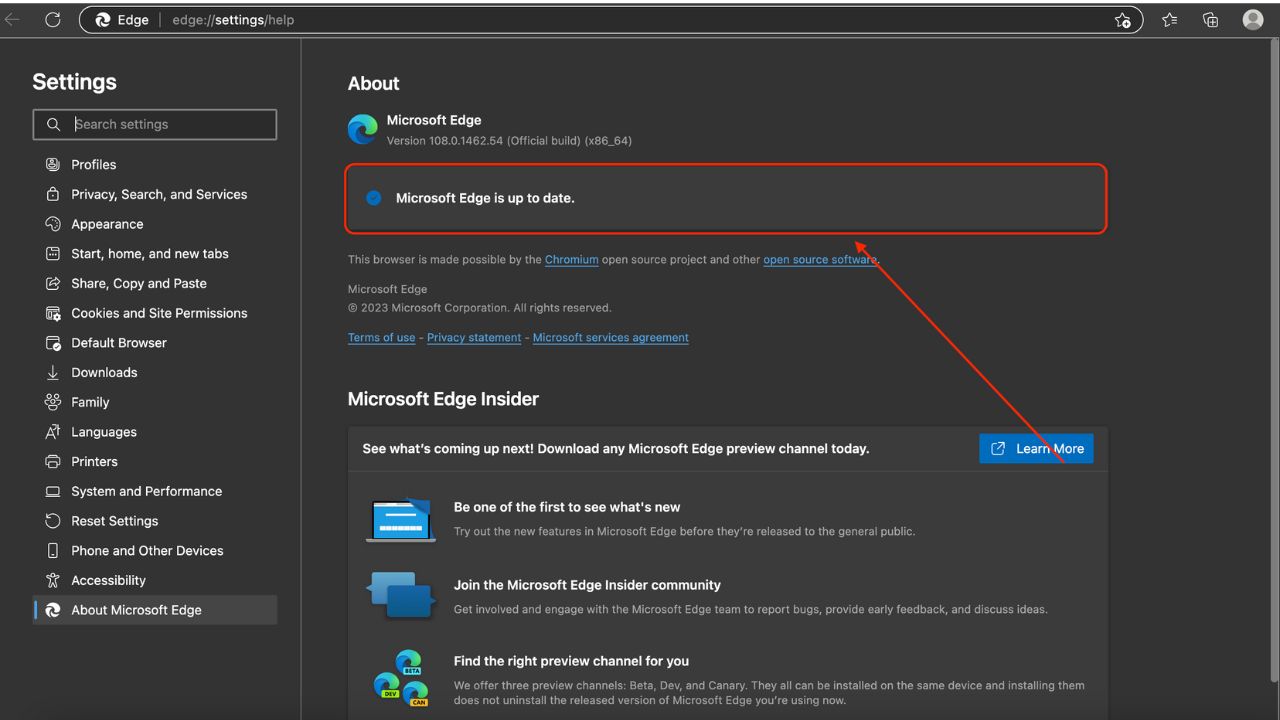
  • Click About Microsoft Edge

Here, it will tell you whether or not Microsoft Edge is up-to-date or if an update is available. If an update is available:

  • Click Download and Install
  • Click Restart


On a Mac

  • At Menu at top, click Microsoft Edge
  • Then click About Microsoft Edge 
  • Any available updates will be displayed

iPhone screenshot

Microsoft Edge is also available to download on iPhones, iPads, and Androids. To make sure it is up-to-date, follow the same steps above to update Microsoft Edge as you would to update Chrome on those devices


MICROSOFT PRODUCTS

On a PC

  • Open an Office App: Start by opening any Microsoft Office app, such as Word or Excel.
  • Go to File: Click on the “File” tab in the top-left corner.
  • Account: Select “Account” from the menu on the left.
  • Update Options: Click on “Update Options” and then select “Update Now”
  • Windows Update: Alternatively, you can update Office through Windows Update. Go to Settings > Update & Security > Windows Update and make sure the option “Receive updates for other Microsoft products when you update Windows” is turned on

On a Mac

  • Open an Office App: Start by opening any Microsoft Office app, such as Word or Excel.
  • Help Menu: Click on the “Help” menu at the top of the screen.
  • Check for Updates: Select “Check for Updates” to launch the Microsoft AutoUpdate tool
  • Update: Click “Update” to install any available updates. You can also check the box to “Automatically keep Microsoft Apps up to date”.
  • Mac App Store: If you downloaded Office from the Mac App Store, you can also update it by opening the App Store, clicking on “Updates” in the left sidebar, and then clicking “Update All” or the “Update” button next to individual apps


Be sure you’ve installed reliable antivirus software

While most devices come with free antivirus software installed, none of them are as effective at protecting your devices or preventing them from being infected with malware as they could be

It is important to make sure you have a reliable antivirus program installed and running on your devices. Our most recommended antivirus program is Total AV,  available for PC, Mac, Android and iPhone devices.  Their product is full of features to keep you safe from malware and protect you when browsing the internet, including ransomware protection, real-time antivirus protection, elimination of viruses and malware, a tool to free up your computer’s space, plus more.  Read our review here: Best Antivirus Protection.


Related: