Ever feel like your personal information is floating around the internet without your consent? Our data is more accessible than ever, often ending up in the hands of data brokers who collect, analyze, and sell it to marketers, recruiters, and even identity thieves. It can be overwhelming to think about just how much of our private information is out there and how little control we have over it. With breaches and data leaks happening almost daily, the risks are real and concerning.
That’s where data removal services come in. These services are designed to help you reclaim your privacy by removing your personal information from data brokers and people search sites. By automating the process of sending removal requests, they save you time and effort while enhancing your digital security.
One such service that stands out in this space is Incogni, which takes on the heavy lifting of protecting your personal data so you can focus on what truly matters.
GET SECURITY ALERTS, EXPERT TIPS – SIGN UP FOR KURT’S NEWSLETTER – THE CYBERGUY REPORT HERE
What is Incogni?
Incogni is a data broker removal service developed by Surfshark, a reputable VPN provider. It acts on your behalf to identify and contact data brokers who may have collected and stored your personal information. By leveraging privacy laws such as the CCPA and GDPR, Incogni compels these entities to remove your data from their databases.
Credit: Incogni
DATA BREACH EXPOSES OVER 56 MILLION CLOTHING STORE CUSTOMERS
How Incogni works
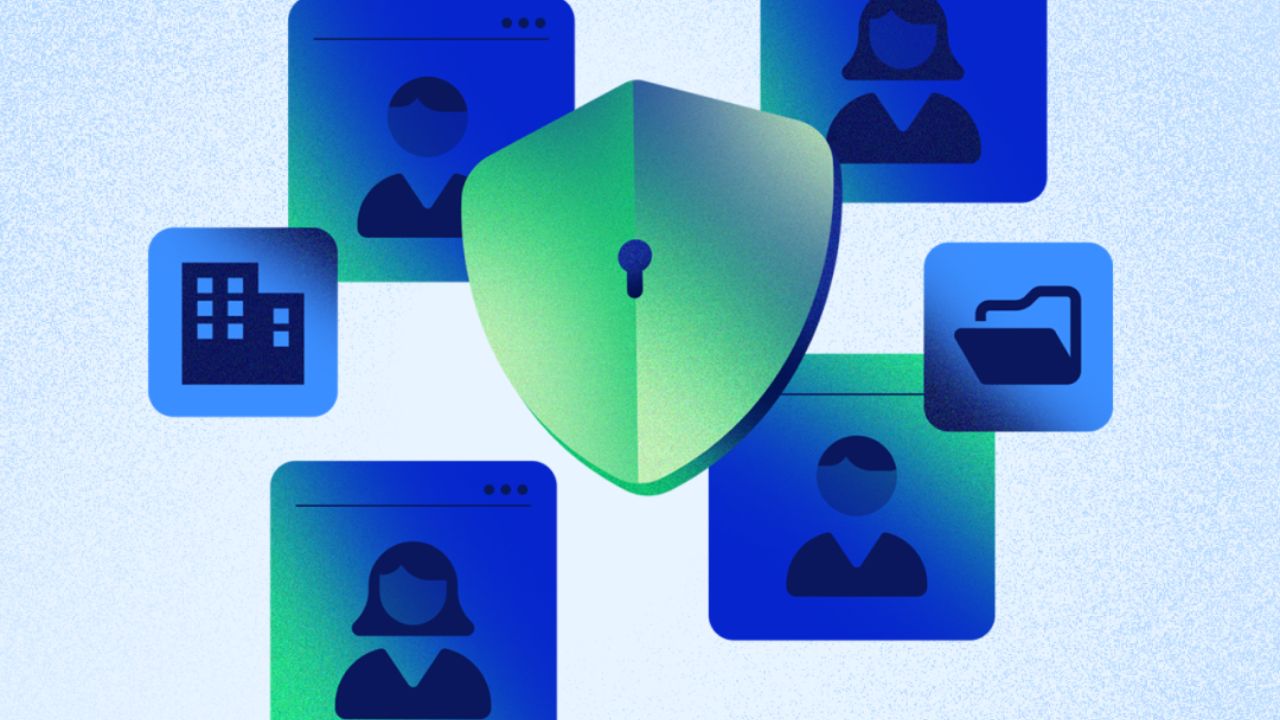
Incogni operates through a sophisticated process that begins with maintaining a comprehensive database of over 190 data brokers. The service then sends out automated removal requests to relevant data brokers on your behalf, leveraging key privacy laws like CCPA and GDPR to ensure compliance with data removal demands. Through continuous monitoring, Incogni periodically reviews and follows up on outstanding requests, guaranteeing a thorough and persistent approach to removing your personal information from digital databases.
Credit: Incogni
DATA BREACH VICTIMS SKYROCKET OVER 1,100%: HOW TO PROTECT YOURSELF
A breakdown of how Incogni’s automated data removal works
Initial scan (1-48 hours)
The process begins with a thorough scan of people search sites to locate your personal information. Incogni can find records, and then they immediately initiate removal requests.
Widespread removal requests
Incogni casts a wide net by sending automated removal requests to all data brokers in its extensive network who might have your personal data. This ensures no stone is left unturned in protecting your privacy.
Continuous monitoring and removal (30-60 days depending on the broker)
Privacy protection is an ongoing process. Incogni regularly re-scans and sends new waves of removal requests to prevent data brokers, and people search sites from accumulating and selling your information.
Expanding protection
Incogni’s team is constantly on the lookout for new data brokers, and people search sites. By continually adding to its list, they ensure that your level of protection improves over time.
Transparent reporting
To keep you informed and in control, Incogni provides regular privacy reports. These updates allow you to track our progress and understand the steps we’re taking to protect your personal data.
HOW SCAMMERS USE YOUR PERSONAL DATA FOR FINANCIAL SCAMS AND HOW TO STOP THEM
Why you should care
Protecting your privacy is more important than ever, as data brokers collect and sell your personal information, potentially exposing you to identity theft, fraud, and unwanted marketing. Incogni addresses this concern while saving you valuable time; manually contacting data brokers could consume up to 300 hours, but Incogni automates this process efficiently. The service’s team brings essential legal expertise to navigate complex data removal processes, ensuring your rights are protected.
Moreover, Incogni offers comprehensive coverage by targeting various types of data brokers, including people search sites, recruitment platforms, and financial information databases, providing a thorough approach to safeguarding your personal data across multiple sectors.
Pricing and guarantees
Special for CyberGuy Rea
ders (60% off): Incogni offers A 30-day money-back guarantee and then charges a special CyberGuy discount only through the links in this article of $5.99/month for one person (billed annually) or $13.19/month for your family (up to 4 people) on their annual plan and get a fully automated data removal service, including recurring removal from 200+ data brokers. I recommend the family plan because it works out to only $4.12 per person per month for year-round coverage. It’s an excellent service, and I highly recommend at least trying it out to see what it’s all about.
Get Incogni here
Get Incogni for your family (up to 4 people) here
How to set up and use Incogni
Step 1 – Sign up and create your profile
- Visit the Incogni website and register for an account.
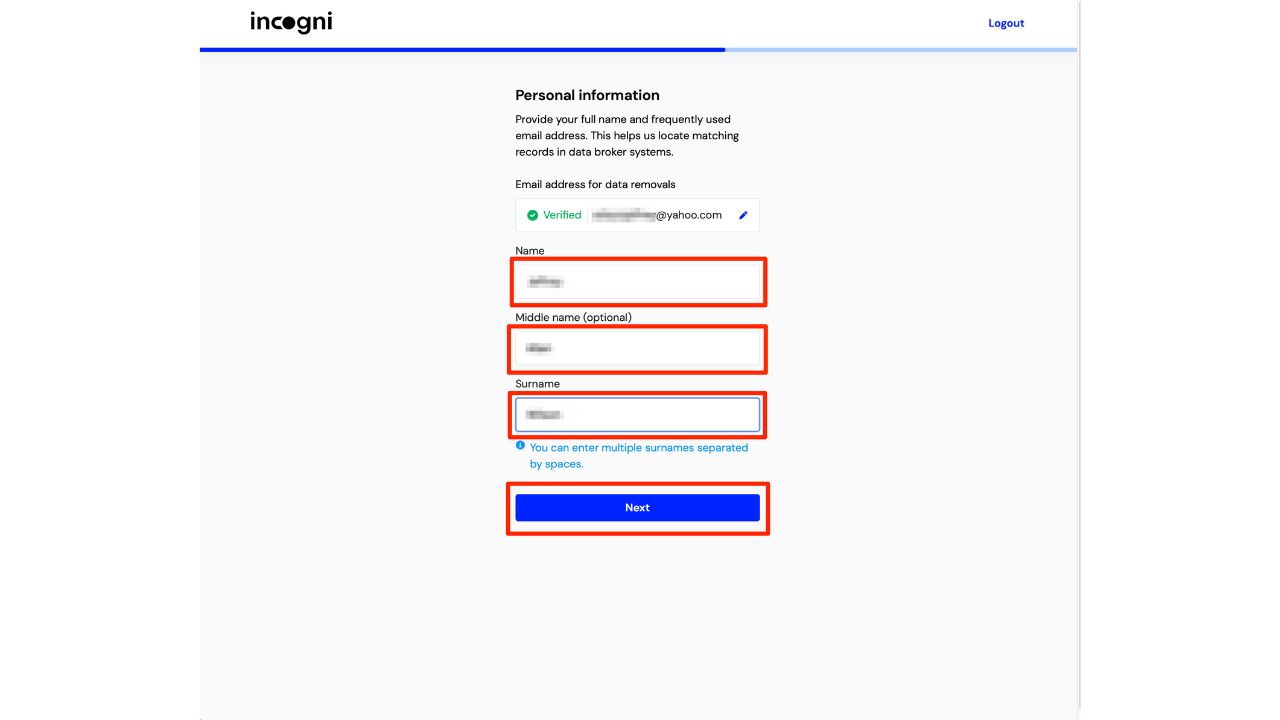
- Provide your first name, middle name (optional), and Surname.
- Then click Next at the bottom of the screen.
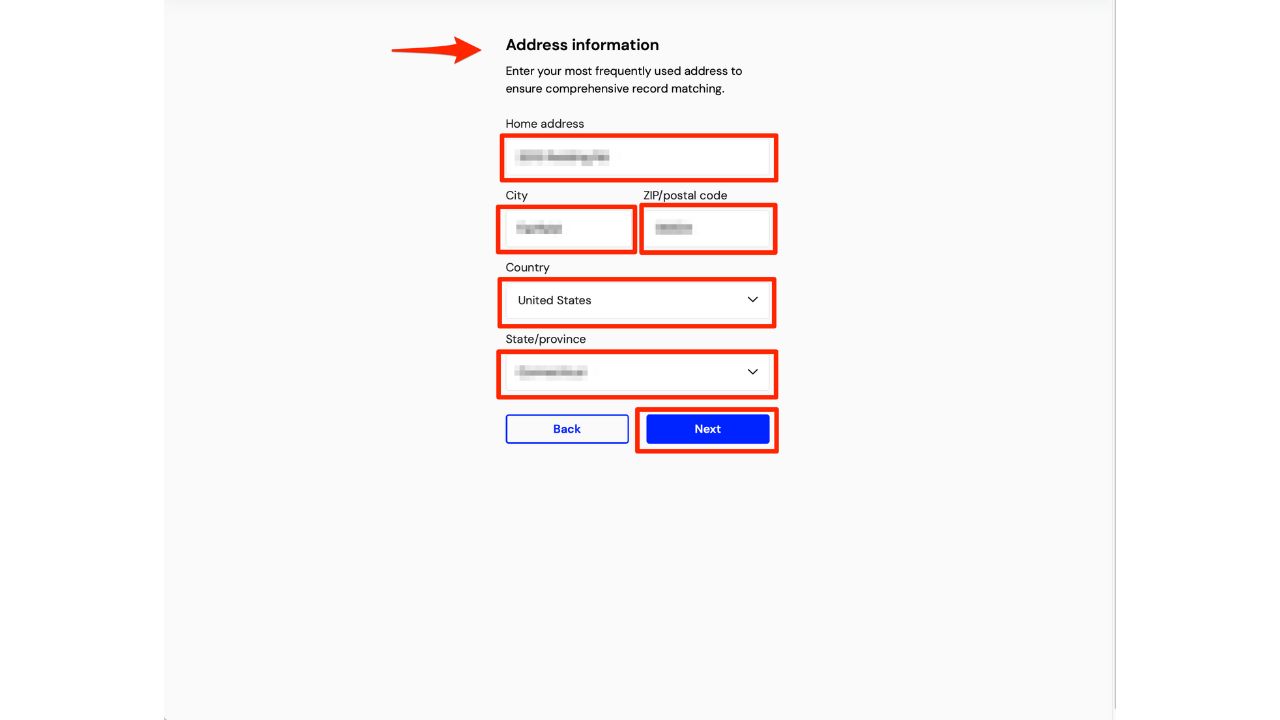
- Then type in your home address, including City, ZIP/Postal code, and select country and State.
- Then, click Next.
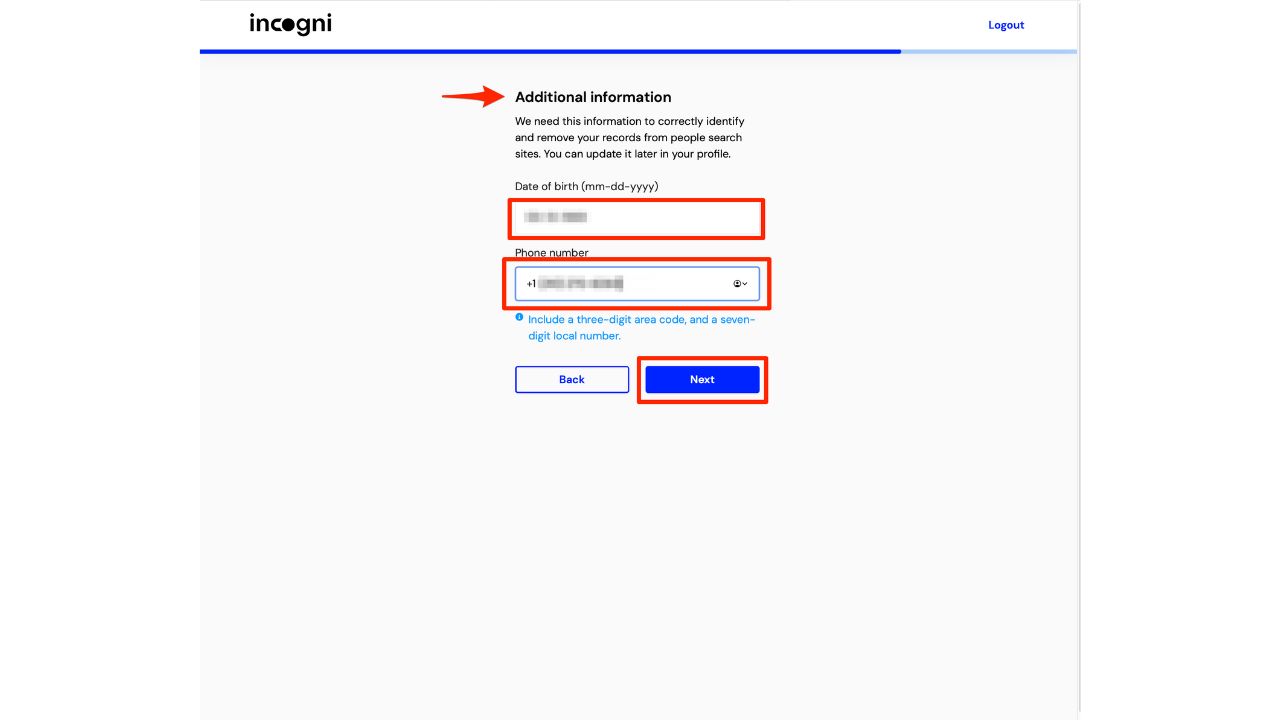
- Now, you’ll be asked to provide additional information. Incogni needs this information to correctly identify and remove your records from people search sites. You can update it later in your profile.
- Type your date of birth and phone number.
- Then click Next.
Step 2 – Grant authorization
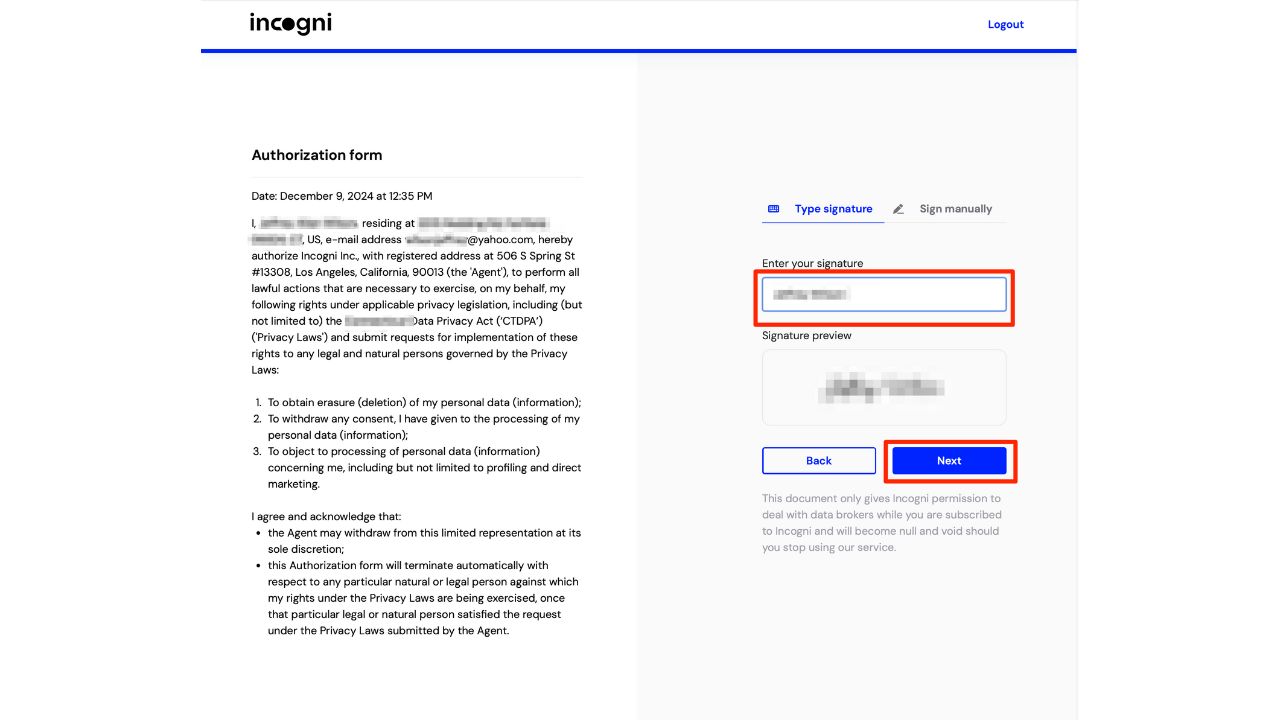
- This document empowers Incogni to advocate for your privacy rights.
- Sign the online authorization form, allowing Incogni to act on your behalf.
- To do this, click where it says “type signature” or “sign manually.”
- Then, enter your signature where it says to do so. You’ll see a signature preview of it.
- Then click Next.
Step 3 – Review the information you provided
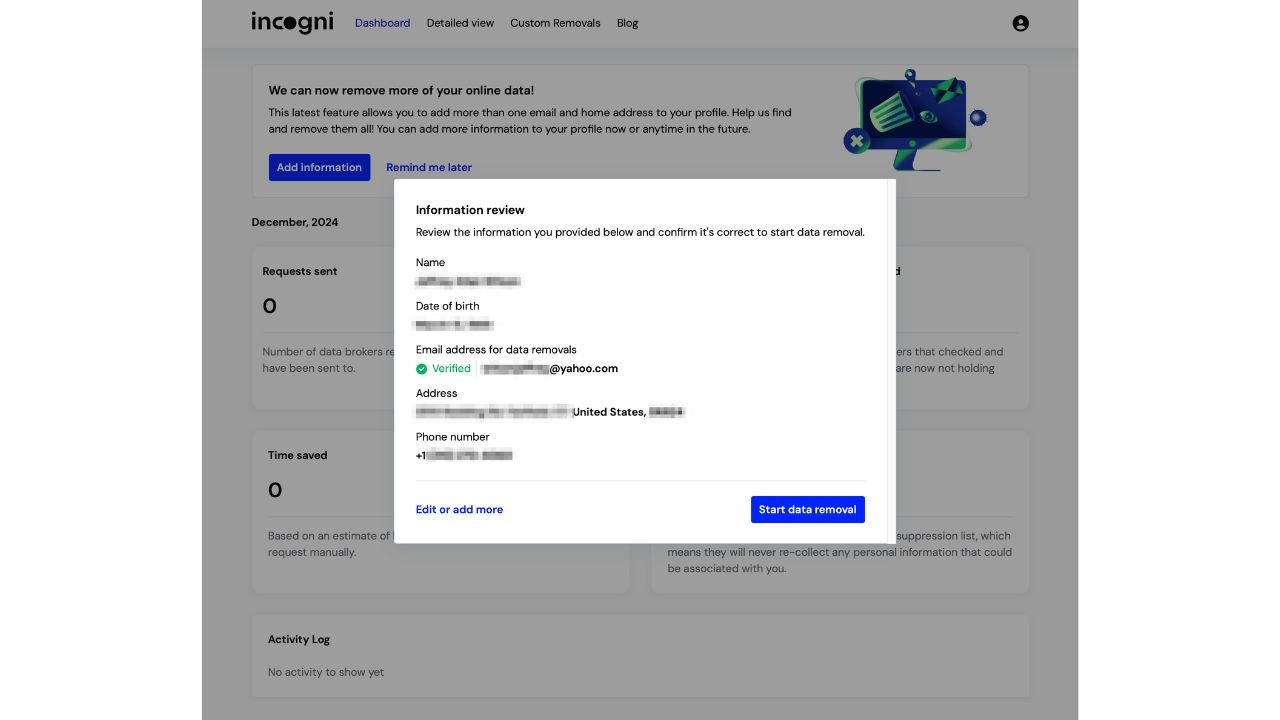
- You will then be taken to your dashboard.
- A pop-up will appear in the middle of the screen, asking you to review the information you provided below and confirm it’s correct to start data removal.
- Then, you can click “Edit or add more” if you want to correct or add any more details or click “Start data removal” to begin the process of removing your data from the data brokers.
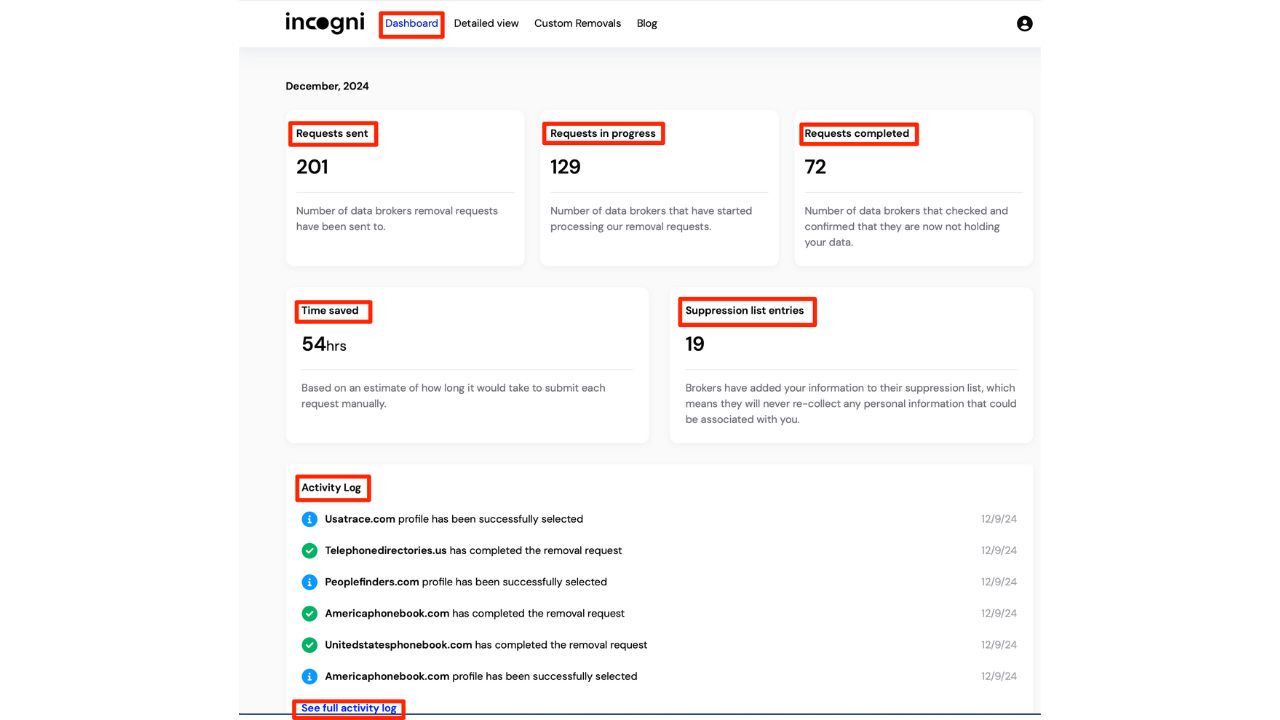
Step 4 – Monitor progress
- Access your dashboard to track the removal progress.
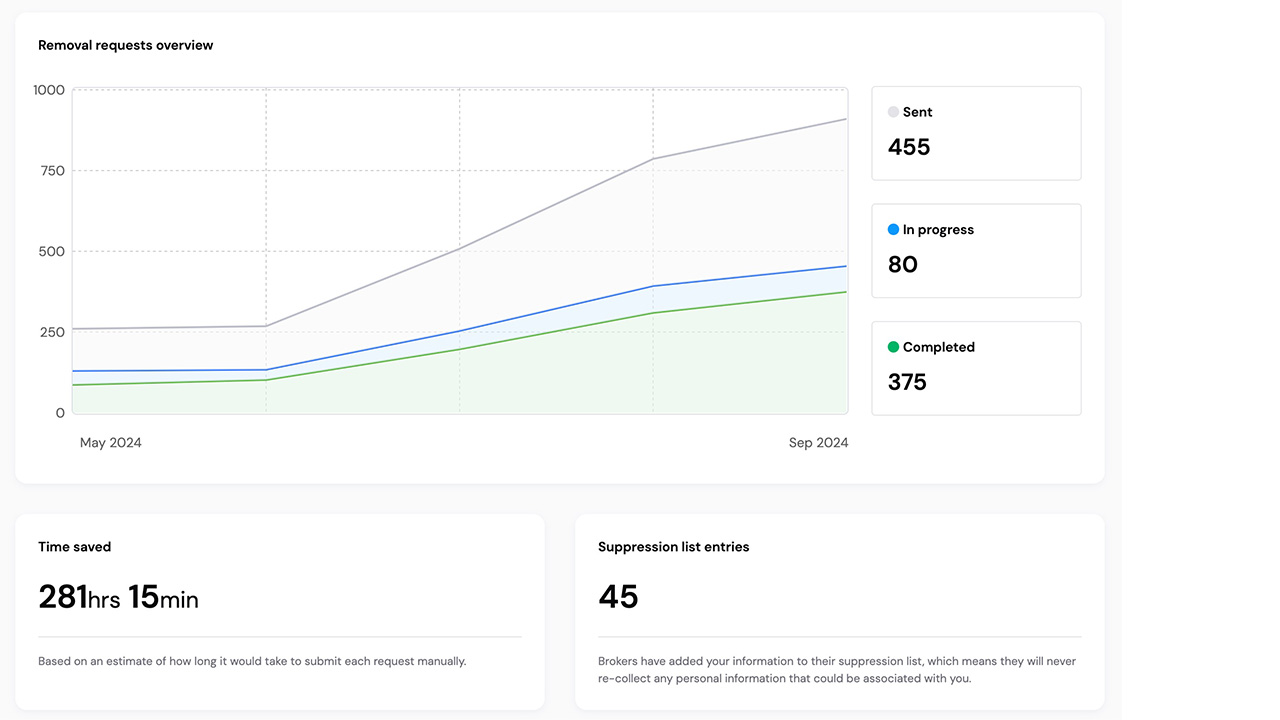
- Here, you will see Requests sent, Requests in progress, Requests completed, Time saved, Suppression list entries, Activity log and you can click where it says “See full activity log” to see the full list.
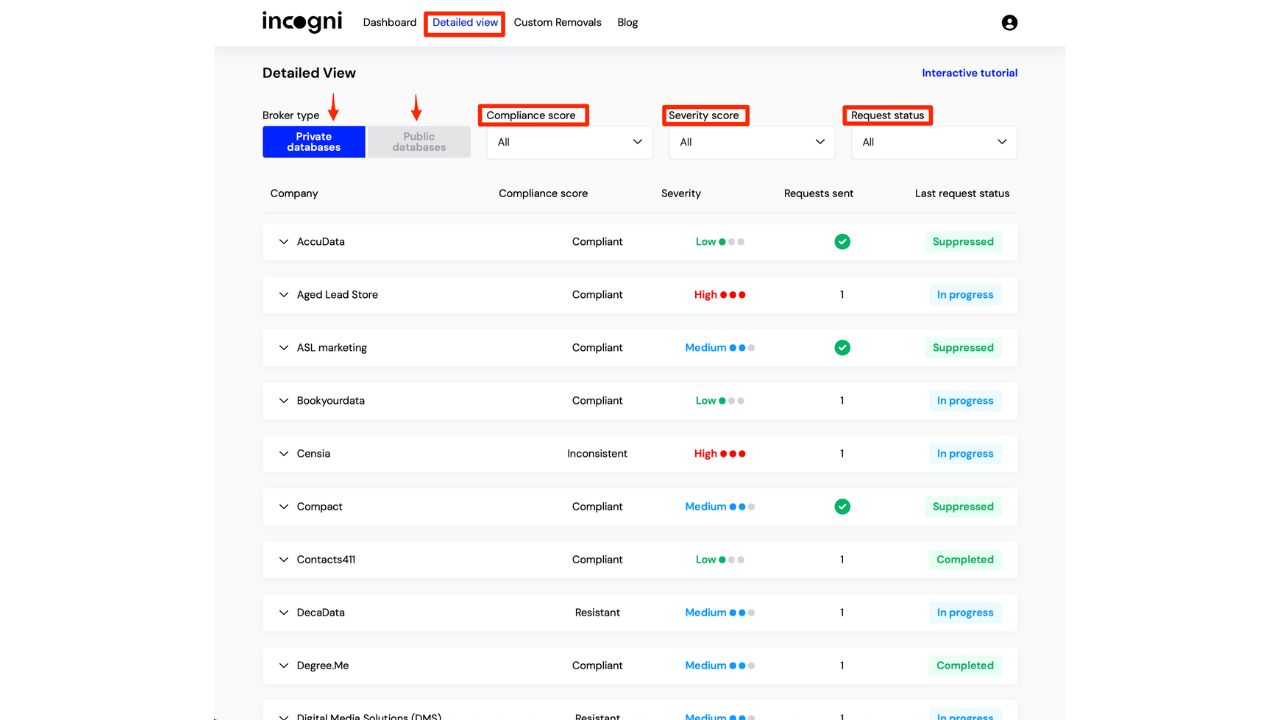
- You can also click Detailed View at the top of the screen.
- Then, select between Broker type by clicking Private databases or Public databases.
- You can also adjust where it says Compliance score, Severity score, and Request status.
How to add friends and family members to my Incogni account
1. First, be sure you purchased the friends and family option.
2. Log in to Your Incogni Account:
- Access the Incogni website and log in to your account.
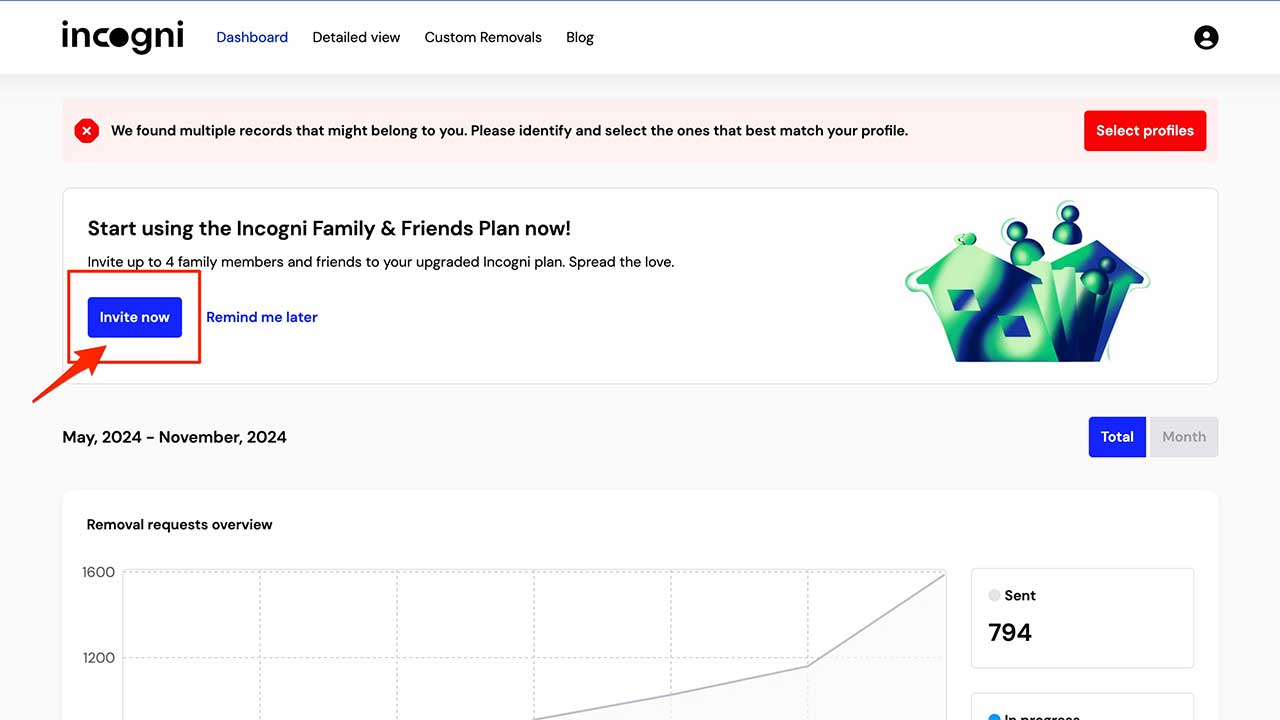
3. Navigate to the Family & Friends Plan Section:
- You should see a banner at the top of the screen inviting you to start using the Family & Friends plan. Click the green button labeled “Invite Now.”
4. Generate an Invitation Link:
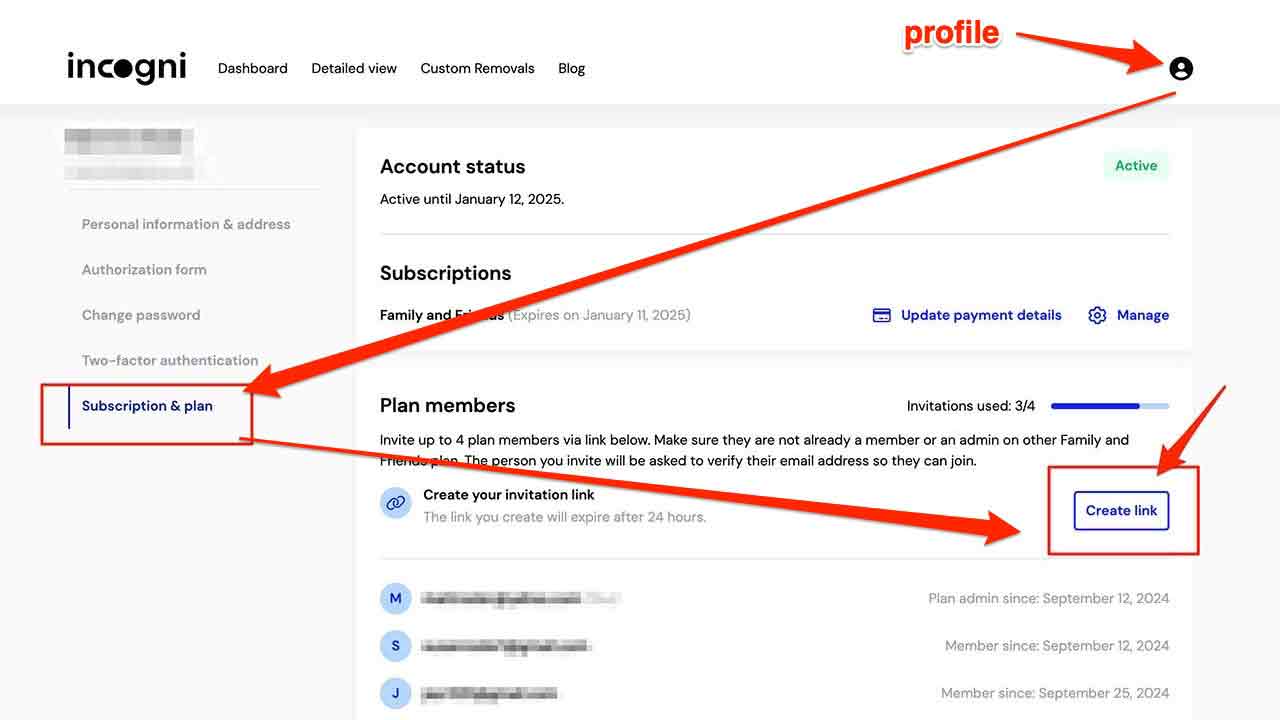
- Alternatively, you can generate invitation links from the “Subscription & Plan” tab in your profile. To access it:
-
- Click the profile icon in the upper-right corner.
- Select “Profile” from the drop-down menu.
- From the menu on the left, select “Subscription & Plan.”
- You’ll see the remaining number of invitations there. Click “Create Link” to generate an invitation link.
5. Share the Link:
-
- Share the generated link with your family member or friend via email, SMS, or a messaging app. The links are valid for 24 hours from the moment you click “Create Link.” If the link expires, you can generate a new one by clicking “Create New Link.”
By following these steps, you can easily add your spouse or any other family member to your Incogni Family & Friends plan.
What to expect next
Here’s what to expect as a new member of Incogni:
Monthly progress reports: Each month, you will receive a report detailing the progress of your data removal efforts. If you’re eager to check your status more frequently, you can log into your personal dashboard anytime to view real-time updates and specific details regarding your data removal.
Ongoing data protection: Throughout your subscription, Incogni will actively manage your personal data to keep it off the market. This includes conducting monthly scans of people search sites and sending ongoing requests to data brokers to ensure your information remains protected.
Profile confirmation alerts: Occasionally, Incogni may discover multiple profiles that match your information. In such cases, they will need your confirmation on which profiles to remove. If this happens, you will be notified via email and will see an “action required” banner when you log into your profile.
Service enhancements: Incogni’s commitment to improving your experience means that it will periodically add new data brokers to its network. This expansion allows Incogni to increase the number of removal requests sent on your behalf, enhancing the overall effectiveness of its service.
By signing up for Incogni, you’re taking a proactive step towards safeguarding your personal inform
ation from unwanted exposure online.
Pricing and guarantees
Special for CyberGuy Readers (60% off): Incogni offers A 30-day money-back guarantee and then charges a special CyberGuy discount only through the links in this article of $5.99/month for one person (billed annually) or $13.19/month for your family (up to 4 people) on their annual plan and get a fully automated data removal service, including recurring removal from 200+ data brokers. I recommend the family plan because it works out to only $4.12 per person per month for year-round coverage. It’s an excellent service, and I highly recommend at least trying it out to see what it’s all about.
Get Incogni here
Get Incogni for your family (up to 4 people) here
Kurt’s key takeaways
Let’s face it: in today’s world, our personal data is more vulnerable than ever, and it can be pretty daunting to think about how much of it is out there for anyone to exploit. That’s why using a service like Incogni can be a smart move. It takes the hassle out of removing your information from data brokers by automating the whole process, which means you can save a ton of time and energy. Plus, it gives you back control over your personal information, allowing you to feel more secure online.
What are your biggest concerns regarding data privacy, and have you taken any steps to safeguard your information online? Share your thoughts and experiences with us in the comments below.
TO GET MORE OF MY SECURITY ALERTS, SUBSCRIBE TO MY FREE CYBERGUY REPORT NEWSLETTER
Copyright 2025 CyberGuy.com. All rights reserved. CyberGuy.com articles and content may contain affiliate links that earn a commission when purchases are made.


