Categories
Android Apple guide How To ios Waze

Does Waze App Detect Flooded Roads? Answered!

Navigation apps have become essential in our daily lives. Whether finding a route to a new location or spotting traffic jams, navigation apps such as Waze help us during our ride. However, these apps aren’t just for that; they offer much more.

For example, the Waze app allows adding multiple stops during our trip and even detects speed cameras and police checkpoints. Also, if you live in an area prone to flash floods and are a regular user of the app, you must have thought about whether Waze detects flooded cities or roads.

Well, that’s what we are here to explain. We’ll also talk about how to check flooded cities and roads in the Waze app, and how accurate its flood detection is. So, without wasting further time, let’s jump right into it.

Does the Waze app detect floods?

In short, YES, Waze can detect floods. Until the end of 2021, the Waze app had a feature that could warn drivers of floods along the route.

However, that feature relied on a crowdsourcing engine that powered all other notifications within the app back then. In other words, drivers on the same route as you had to report or flag a location for a flood before you could get alerts for flooded roads or locations.

Fast forward to January 2022, a partnership between the Google-owned RISE organization and FloodMapp made the whole thing work pretty in a straightforward manner. The latter developed a forecasting system that analyzes tidal, riverine, and rainfall data to estimate where exactly flooding can occur in real time. 

This ensured that the Waze app delivered accurate flood warnings without the help of any drivers on the road. However, Waze then asked all users to confirm if the flood was indeed happening at the marked location. That’s simply because the technology was new and Waze wanted to make it foolproof before it could roll out the flood alerts feature to another region. 

How to check for flooded cities and roads in the Waze app?

Currently, the Waze app continues to rely on reports to show flooded locations or roads. The app displays flood warnings to you through visual and audio notifications. If a flooded area exists on your route, the Waze app will perform a re-route to keep you safe. 

Now that you know the Waze app offers alerts or warnings for flooded locations or roads, it’s time to learn how to check such warnings. Here’s how to check flooded cities and roads in the Waze app.

1. First of all, open the Waze app.

2. Now, search for your destination.

3. If there’s any flood occurring on your route, you’ll see a pop-up on the map as seen in the image below.

Waze flood alerts (1)Waze flood alerts (1)
Image credit: FloodMapp

4. That’s not all, Waze will display an alternative route to keep you safe from elevated water levels or flooded areas.

Similarly, when searching for an area, you’ll see a flood icon indicating areas with elevated water levels. The image below is an example of what you’ll see when searching for a city with plenty of flooded spots.

Waze flood alertsWaze flood alerts
Image credit: 13News Now

The Waze app has been useful during past flooding occurrences across the US

The Waze app has been quite a lifesaver for users in past flood occurrences across different states in the US. Last year, citizens in Norfolk, Virginia were advised by the authorities to use the Waze app to avoid flooded roadways.

Norfolk advises citizens to get floood alerts on the Waze appNorfolk advises citizens to get floood alerts on the Waze app
Image credit: City of Norfolk Official Website

That’s just one example, Waze has helped thousands of its users with this feature when weather was not in their favor. Honestly, the Waze app continues to deliver, and has been a go-to choice for anyone living in coastal communities worldwide.

Is Waze’s flood detection better than Google Maps / Apple Maps?

Waze is undoubtedly one of the best navigation apps and stands neck to neck with the likes of Google Maps and Apple Maps. However, since Waze relies mostly on user-reported alerts and warnings for floods along a route, it can sometimes be confusing.

It’s entirely possible that a small road block might be flooded while the drivers passing by report the whole area as flooded. On the other hand, Google Maps and Apple Maps not only use user reports to detect and display flood alerts, but they are also backed by various sources, including meteorological agencies and satellite imagery.

Therefore, it’s more reliable. That said, Waze isn’t useless. Despite most of its features being crowdsourced, it does the job pretty well and has been quite useful.

Explore More:
Categories
Gadget Gadgets News

10 Tips and Tricks for Mastering the iPhone Mail App

iPhone Mail App

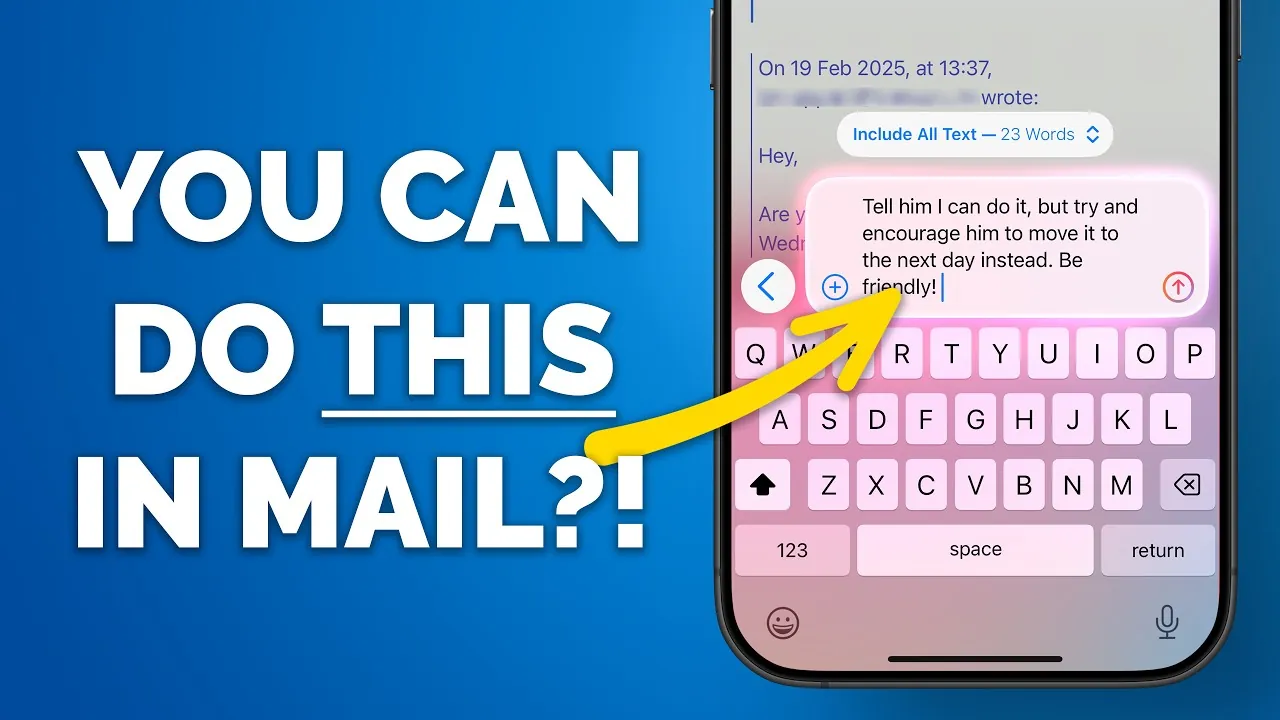
The iPhone Mail app is a versatile and powerful tool for managing your emails effectively. With its advanced features, supported by Apple Intelligence, it enables you to streamline your inbox, enhance productivity, and tailor your email experience to your specific needs. By using these features, you can take full control of your email management and make the most of this essential app. In the video below, Proper Honest Tech shows us ten practical tips and tricks to help you unlock its full potential.

1. Organize Emails with Automatic Categorization

The Mail app’s automatic categorization feature is designed to simplify email organization. It automatically sorts your emails into predefined categories such as Primary, Transactions, Updates, and Promotions. This feature helps you focus on important messages while keeping less critical emails neatly organized. You can toggle between the categorized view and the traditional list view, depending on your preference. Additionally, for greater control, you can manually reassign emails to different categories, making sure your workflow remains efficient and personalized.

2. Customize Badge Notifications

Badge notifications can be customized to display only the information that matters most to you. For instance, you can choose to see the count of unread emails across all categories or limit notifications to just the Primary inbox. This customization reduces distractions, allowing you to concentrate on high-priority messages without being overwhelmed by less urgent updates. Adjusting these settings ensures that your notifications align with your priorities.

3. Simplify Conversations with Group by Sender

The “Group by Sender” feature consolidates all emails from a single sender into one thread, making it easier to track conversations and locate specific messages. This feature is particularly useful for managing ongoing discussions or frequent correspondences. If you prefer to view emails individually, you can disable this feature for specific threads, offering flexibility to adapt the app to your communication style. Streamlining conversations in this way can save time and reduce clutter in your inbox.

4. Correct Mistakes with Undo Send Delay

The Undo Send Delay feature provides a safety net for email errors. By setting a delay of 10, 20, or 30 seconds, you gain a brief window to cancel or edit an email before it is sent. This feature is invaluable for catching typos, revising your message, or rethinking your response before it reaches the recipient. It’s a simple yet effective tool for making sure your emails are polished and accurate.

5. Streamline Scheduling with Calendar Integration

The Mail app integrates seamlessly with the Calendar app, allowing you to create events directly from email content. For example, if an email contains a meeting date or event details, you can add it to your calendar with a single tap. Additionally, linked emails can be accessed directly from calendar events, making sure you have all relevant information readily available. This integration simplifies scheduling and keeps your plans organized without switching between apps.

6. Turn Emails into Tasks with Reminders Integration

With Reminders integration, you can transform emails into actionable tasks. This feature allows you to create reminders from email content or link entire emails to reminders for easy follow-up. Whether you use Siri voice commands or drag-and-drop functionality, this integration ensures you stay on top of your responsibilities. By turning emails into tasks, you can manage deadlines effectively and never miss an important follow-up.

7. Stay on Track with Follow-Up Suggestions

The Follow-Up Suggestions feature uses Apple Intelligence to remind you about emails that haven’t received a reply. This automated prompt helps you stay on top of your communications, making sure no important message is overlooked. If you find this feature unnecessary, it can be easily disabled in the app’s settings. Staying proactive with follow-up suggestions can improve your responsiveness and communication efficiency.

8. Save Key Emails with Notes Integration

For users who frequently rely on the Notes app, the Mail app offers a convenient integration. You can drag and drop emails into Notes as hyperlinks, allowing you to reference important messages while brainstorming or working on related projects. This feature keeps your ideas and information connected in one place, making it easier to organize your thoughts and collaborate effectively.

9. Use Apple Intelligence for Smarter Email Management

Apple Intelligence enhances the Mail app with features like inbox-level email summaries, which provide quick previews of message content. You can also pin priority emails at the top of your inbox for better visibility. These tools help you manage your inbox more efficiently. Additionally, ChatGPT integration allows you to draft email replies using customizable prompts, saving time and streamlining communication. These intelligent features make the Mail app a powerful tool for both personal and professional use.

10. Personalize Your Experience with Customization Options

The Mail app offers a variety of customization options to suit your preferences. You can adjust email summaries, prioritize specific messages, and enable or disable features to create a setup that works best for you. These options ensure the app adapts to your needs, providing a personalized email management experience. By tailoring the app to your workflow, you can maximize its functionality and efficiency.

Summary

By applying these ten tips and tricks, you can transform the iPhone Mail app into a powerful productivity tool. From automatic email categorization to seamless integrations with Calendar, Reminders, and Notes, the app is designed to simplify your email management. With advanced features like Follow-Up Suggestions and ChatGPT-assisted drafting, the Mail app enables you to stay organized, save time, and communicate more effectively. Explore these features today to take full control of your inbox and enhance your email experience.

Explore further guides and articles from our vast library that you may find relevant to your interests in iPhone Mail App Tips.

Source & Image Credit: Proper Honest Tech

Filed Under: Gadgets News

Latest Geeky Gadgets Deals

Disclosure: Some of our articles include affiliate links. If you buy something through one of these links, Geeky Gadgets may earn an affiliate commission. Learn about our Disclosure Policy.

Categories
AI Computing How To PC windows Windows 11

How to Erase Objects in Windows 11 Photos app using AI

Microsoft’s Paint and Photos apps are at the forefront of AI adoption. Microsoft has been improving the Photos app with essential features like Blur and minor edits for some time, and now it can erase objects with precision.

You must have multiple photos ruined by someone in the background and want to hide that. Other use cases can include hiding sensitive information from an image so it isn’t visible to the other person.

Photos app’s Generative Erase can remove the selected area in an image and even offers precise controls over the chosen location. Let’s explore the feature in detail.

Removing Objects with Generative Erase in Photos App

The Photos app is the default image viewer on Windows 11. So, double-click on any photo in the File Explorer to open it. Then click on the Edit button. A new window will launch with all the relevant editing options in the app.

Click on the Erase option. The first thing you must do is to adjust the brush size. It’ll help cover the area precisely. I kept it around 50 because I wanted to wipe a big area. There are also masking options, but you don’t need them for basic erase.

I tested it with a basic Windows 11 OOBE page image and selected the top text and button.

Since the tool is set to auto-apply, it quickly hid the text and the button as if nothing was there. Pretty neat?

I tried it with other screenshots of the OS, like this black background Settings app page. Here, I got mixed results.

When I erased the icon next to the Windows Update text, it left a blue spot and failed to hide the color difference completely. I repeatedly applied the erase effect on that area, but the result looked more or less the same.

However, when I erased the icon above the Cloud Storage text, it effectively blended the colors as if the icon was never there. So, you’ll have mixed results with different color backgrounds.

The last leg of the tests was a group photo I downloaded from Pexels. At first, I tried removing the person in the blue pants on the extreme left. After ten or so attempts, I ended with a distorted background look. Next, I tried removing the glass from the hand, and it took a few attempts to hide the glass.

Even after so much effort, the result wasn’t near perfect. It shows a cupped hand but with half-visible glass. Clearly, that wasn’t the outcome I was hoping for. It is the same for all the other image erase that I tried.

Verdict

I wouldn’t use Photos Generative Erase for complex images with multiple colors and objects intertwined with each other, like the person holding a glass. A Generative Fill option might work better to replace the glass with an open hand or something. But that is something only reserved for Copilot+ PCs at the moment.

Microsoft won’t add Generative Fill to Photos for free because it’s already charging for Image Creator in Paint and bundling it with a Microsoft 365 subscription. I believe these options will work better in combination. You’ll have to use Photoshop for picture-perfect erase that looks like the object was never there.

Still, it’s great to have a native erase option in Photos to hide details and remove objects from the images. Note that the Paint app has a similar Generative Erase option but with more granular control over the selection area.

Explore More: