Categories
Android How To iphone Mobile Quick Tips Tech Tips & Tricks

How to associate a ringtone with one of your contacts on your phone

Do you ever wish you could know who is calling you without having to actually look at who’s calling you? If you are like me, you probably have a lot of contacts on your phone, and sometimes it can be hard to remember who is who.

Maybe you have a friend who always calls you with good news, a family member who needs your help, or a boss who expects you to answer right away. Wouldn’t it be nice if you could tell who is calling just by the sound of your phone ringing?

Well, guess what? You can. Both iPhone and Android devices have a feature that lets you set a custom ringtone for any contact on your phone. This way, you can assign a different sound to each person and recognize them instantly when they call.


How to set custom ringtones on iPhone

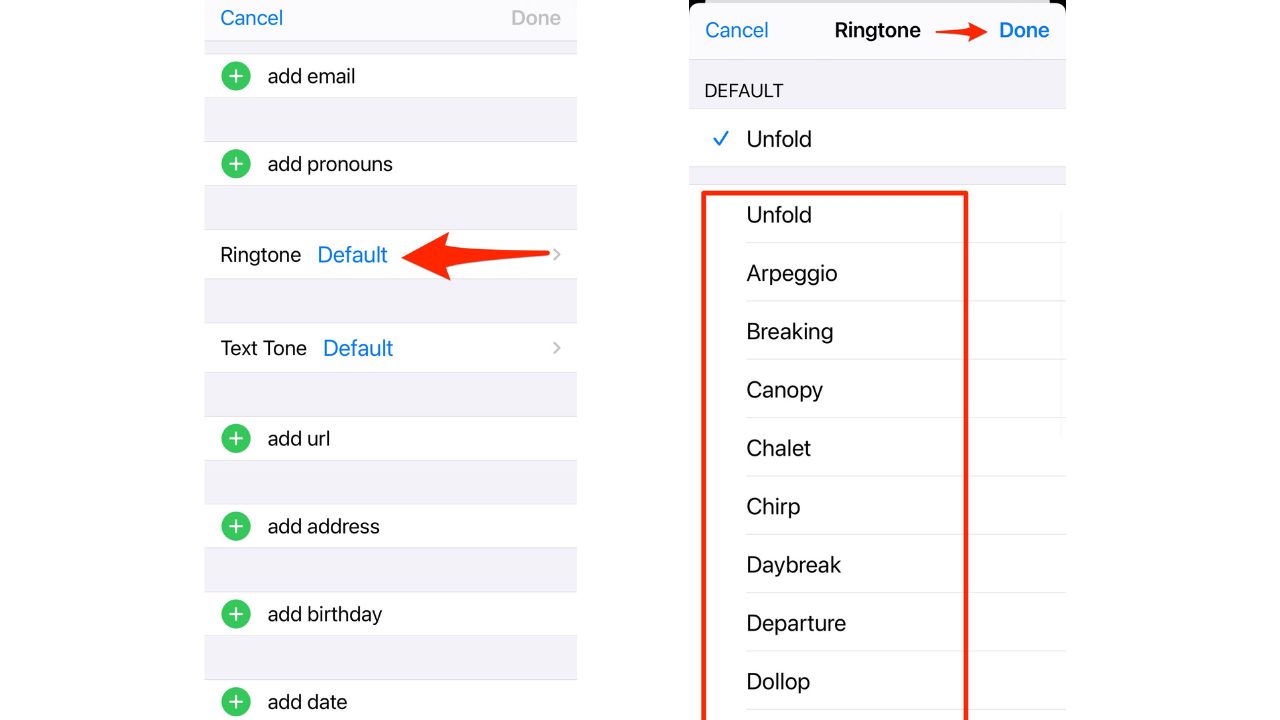
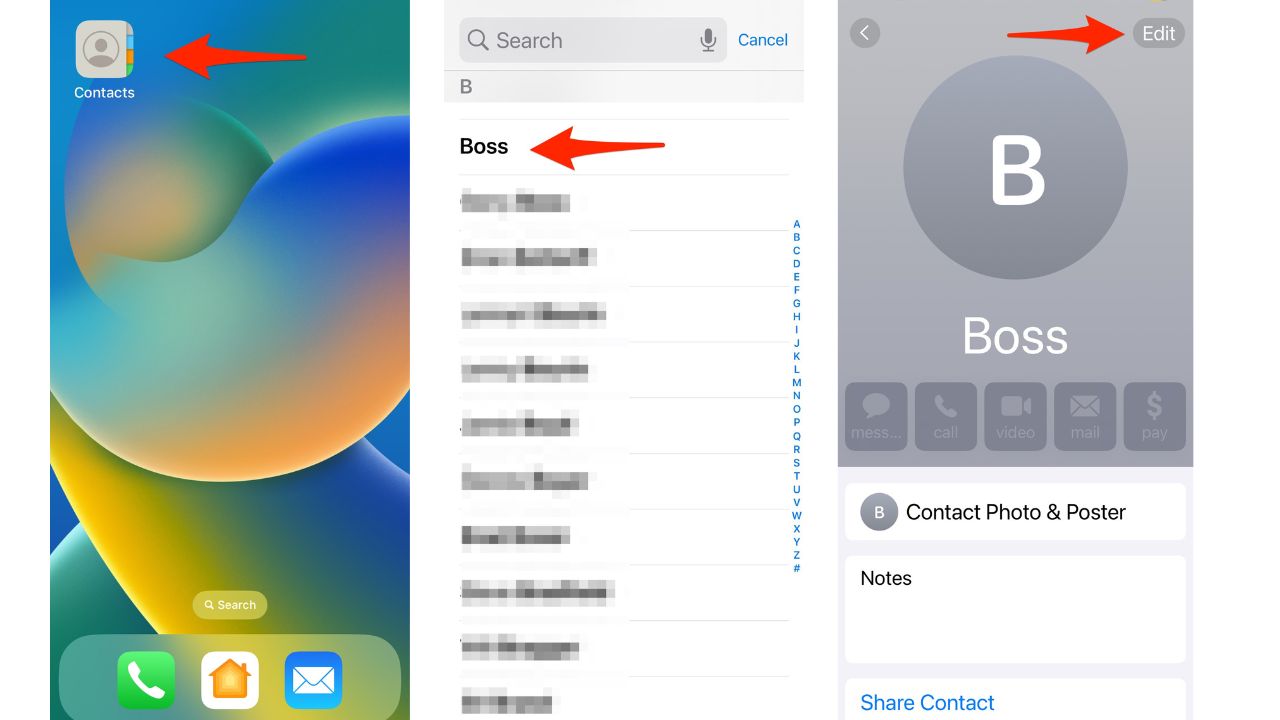
  • Go to Contacts
  • Tap on a person’s name
  • Then in the upper right corner tap Edit

  • Next, tap Ringtone
  • Then choose a new sound
  • Click Done


MORE: NEVER MISS A CALL AGAIN EVEN WHEN YOUR PHONE’S IN ANOTHER ROOM  


How to set custom ringtones on Android

 Settings may vary depending on your Android phone’s manufacturer 

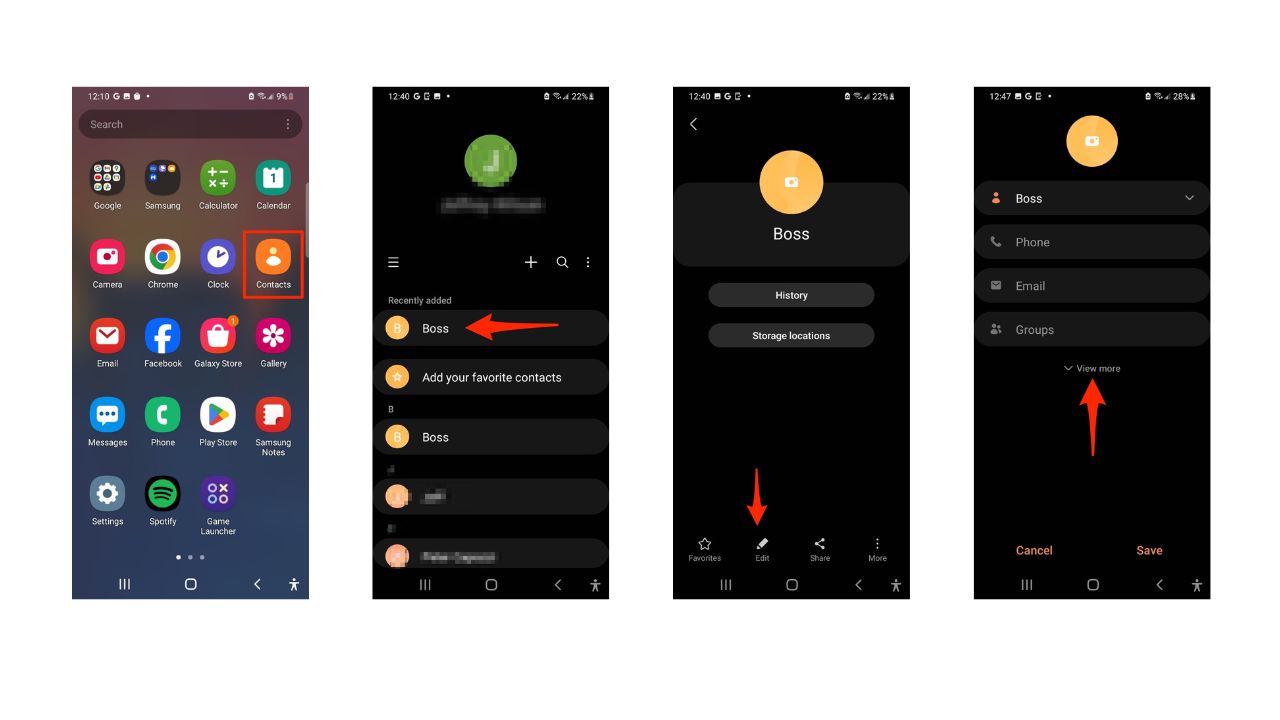
  • Go to the Contacts app
  • Tap on a person’s name
  • Tap Edit
  • Then click View more

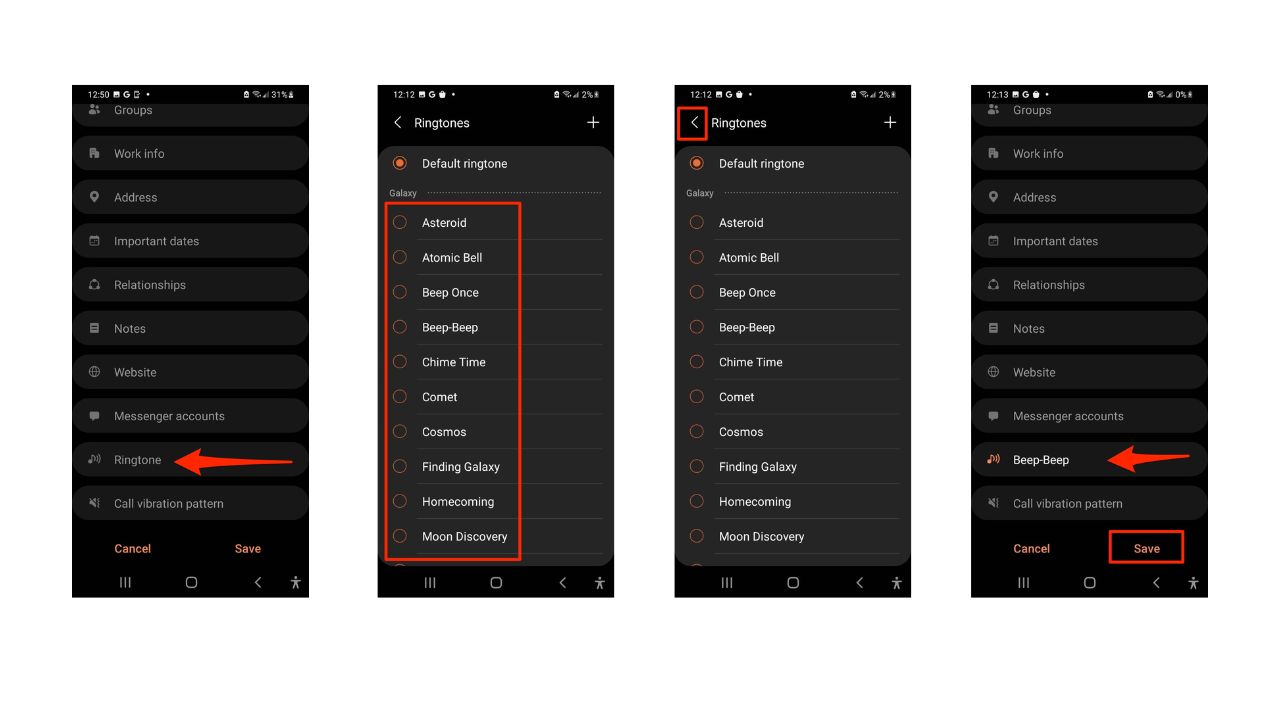
    • Scroll down and tap Ringtone
    • From here you can pick from a variety of sounds
    • Then tap the in the top left of your screen
    • Click Save

MORE: HOW TO QUICKLY SILENCE YOUR RINGER ON YOUR PHONE 


How to buy ringtones from online stores

If you don’t want to use the default ringtones that come with your phone, or if you want to have more variety and options, you can also buy ringtones from online stores. Depending on the type of your phone, you can access different online stores that offer a wide range of ringtones for different prices.


For iPhone users, the most convenient way to buy ringtones is through the iTunes Store. To buy ringtones from the iTunes Store, you need to have an Apple ID and a valid payment method. Frankly, with all the new ringtones in the latest iOS 17 and later software, you shouldn’t need to spend a dime unless you are looking to go big on customizing what you hear when certain people call. 

To buy ringtones from the iTunes Store on your iPhone

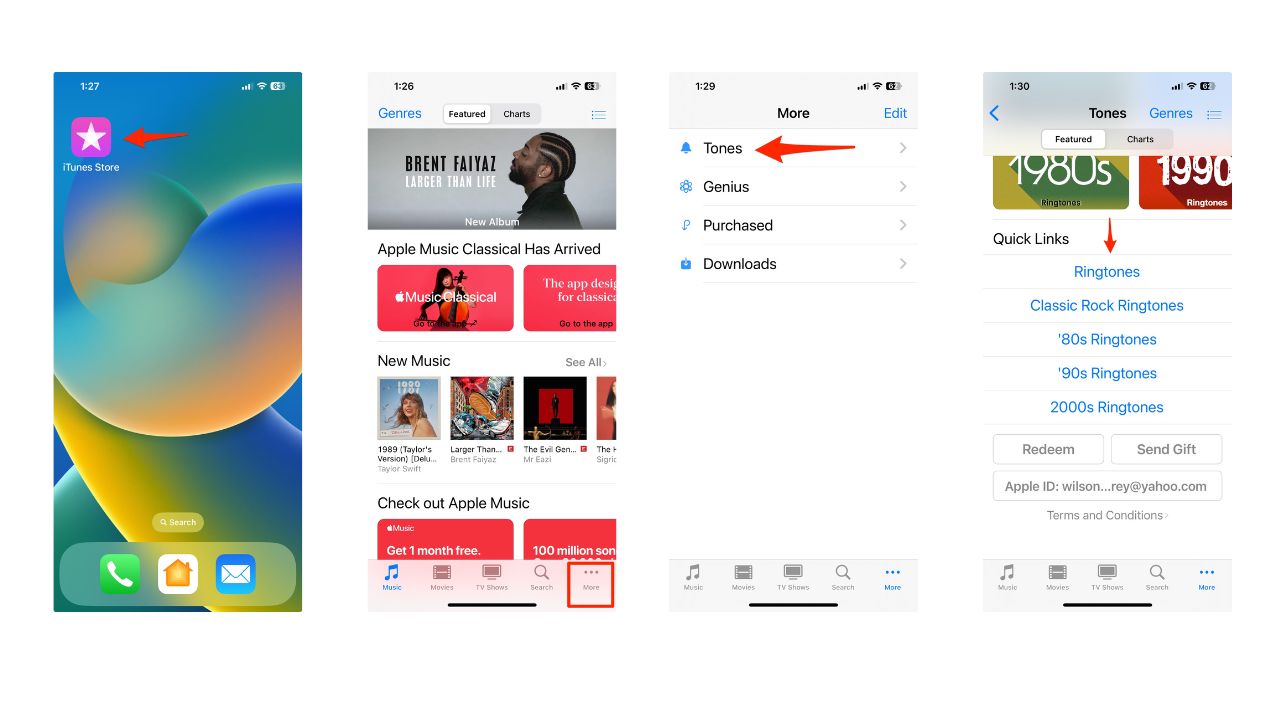
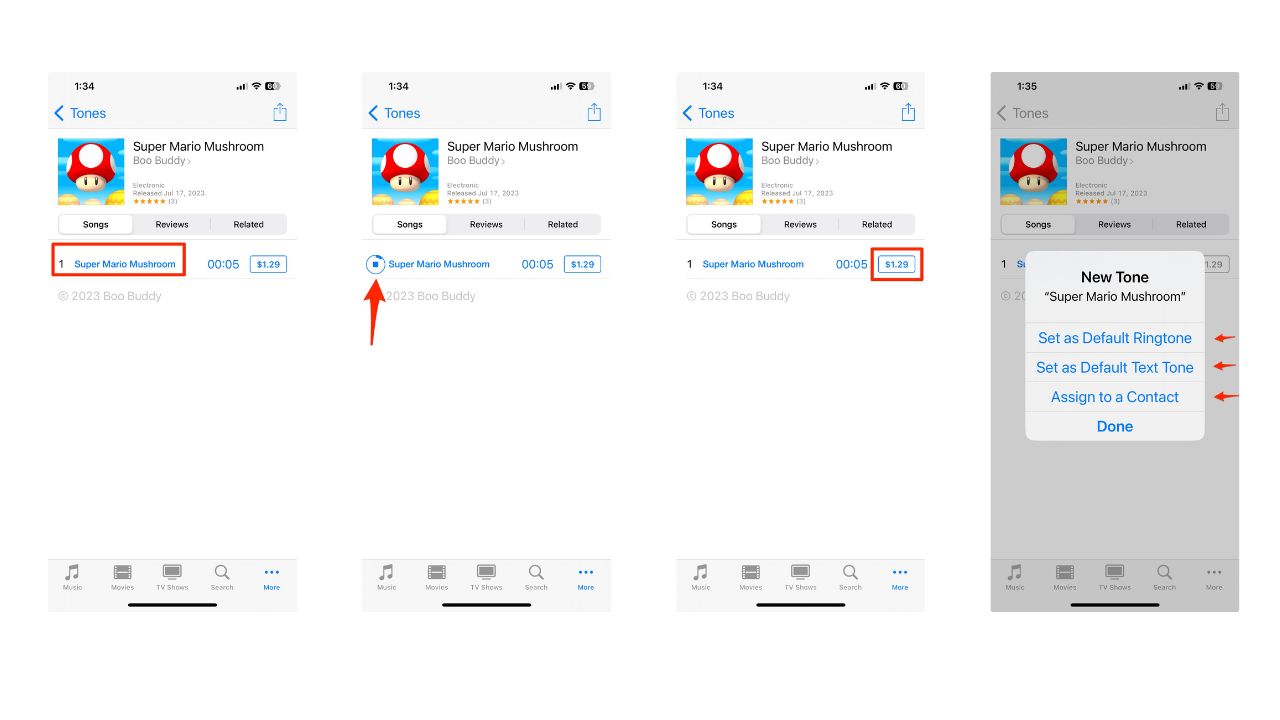
  • Open the iTunes Store app on your iPhone
  • Tap More at the bottom right corner of the screen
  • Tap Tones
  • Browse or search for the ringtone that you want to buy

  • You can preview the ringtone by tapping the Ringtone, then click the name of the Ringtone and it will play
  • Tap the price of the ringtone to buy it. You will be asked to either Set as Default Ringtone, Set as Default Text Tone, or Assign to Contact 

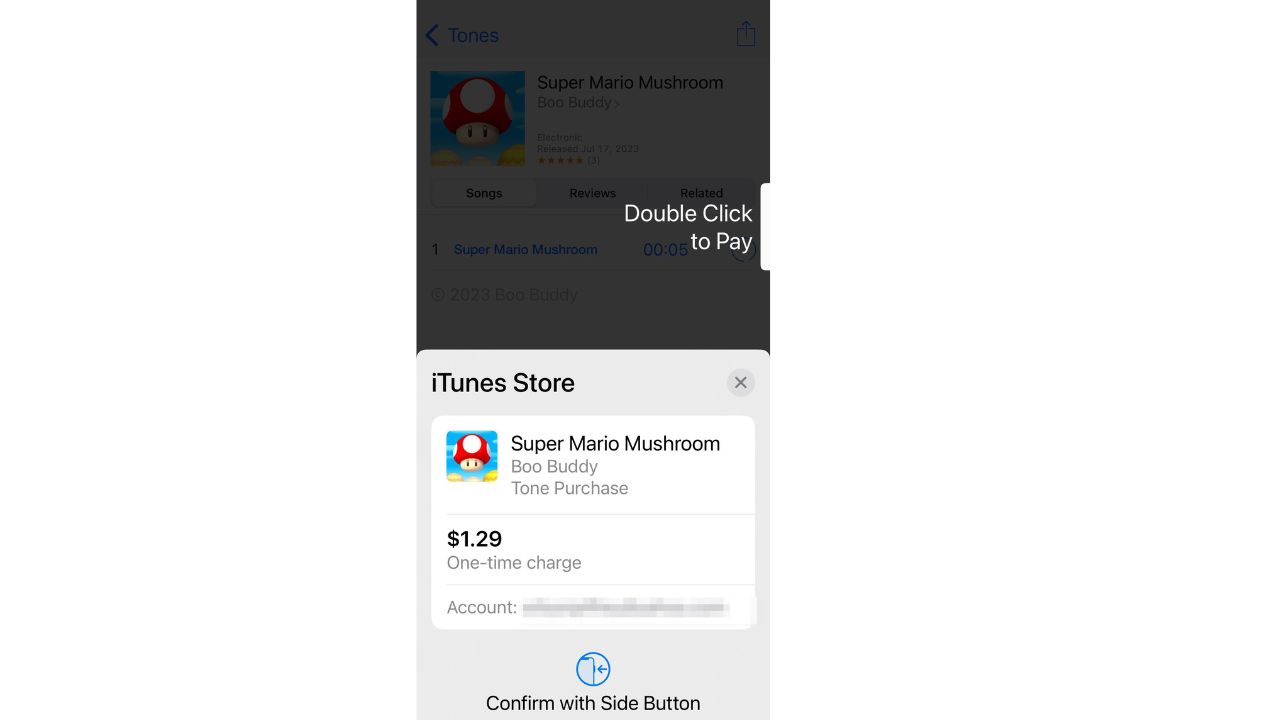
  • Then you will be asked to confirm your purchase

For Android users, there are several online stores that offer ringtones for Android devices. Some of the most popular ones are Google Play Store, Zedge, and Verizon Tones. You can access these online stores from your Android phone or tablet or from your web browser on your computer.

To buy ringtones from these online stores, you need to have a Google account and a valid payment method for the Google Play Store, or a Zedge account and a valid payment method for Zedge, or a Verizon account and a valid payment method for Verizon Tones.


MORE: HOW TO ADD A CUSTOM RINGTONE TO YOUR PHONE


To buy ringtones from online stores on your Android

Settings may vary depending on your Android phone’s manufacturer

  • Open the online store app on your Android phone. If you don’t have the app installed, you can download it from the Google Play Store.
  • Browse or search for the ringtone that you want to buy. You can preview the ringtone by tapping the play button next to it
  • Tap the price of the ringtone to buy it. You may be asked to sign in with your account and password or use biometric authentication to confirm your purchase
  • The ringtone will be downloaded to your Android phone and added to your library

Buying ringtones from online stores is a quick and easy way to get new sounds for your phone. However, you should be aware that some online stores may charge you extra fees or subscriptions for using their services. You should also check the compatibility and quality of the ringtones before buying them.


MORE: BEST WEBSITES TO DOWNLOAD FREE RINGTONES


Kurt’s key takeaways

Now when someone you never want to miss calls, you’ll know immediately, even when your phone is across the room. Setting custom ringtones for your contacts is a simple way to personalize your phone. You can also have fun with it and choose ringtones that match the personality or mood of each person.

What are some of the ringtones that you have assigned to your contacts and why? Let us know by commenting below.

FOR MORE OF MY TECH TIPS & SECURITY ALERTS, SUBSCRIBE TO MY FREE CYBERGUY REPORT NEWSLETTER HERE


Categories
How To News Privacy Protect Your Devices Quick Tips Scams

The ‘Do Not Call’ list loophole: Why your phone still won’t stop ringing

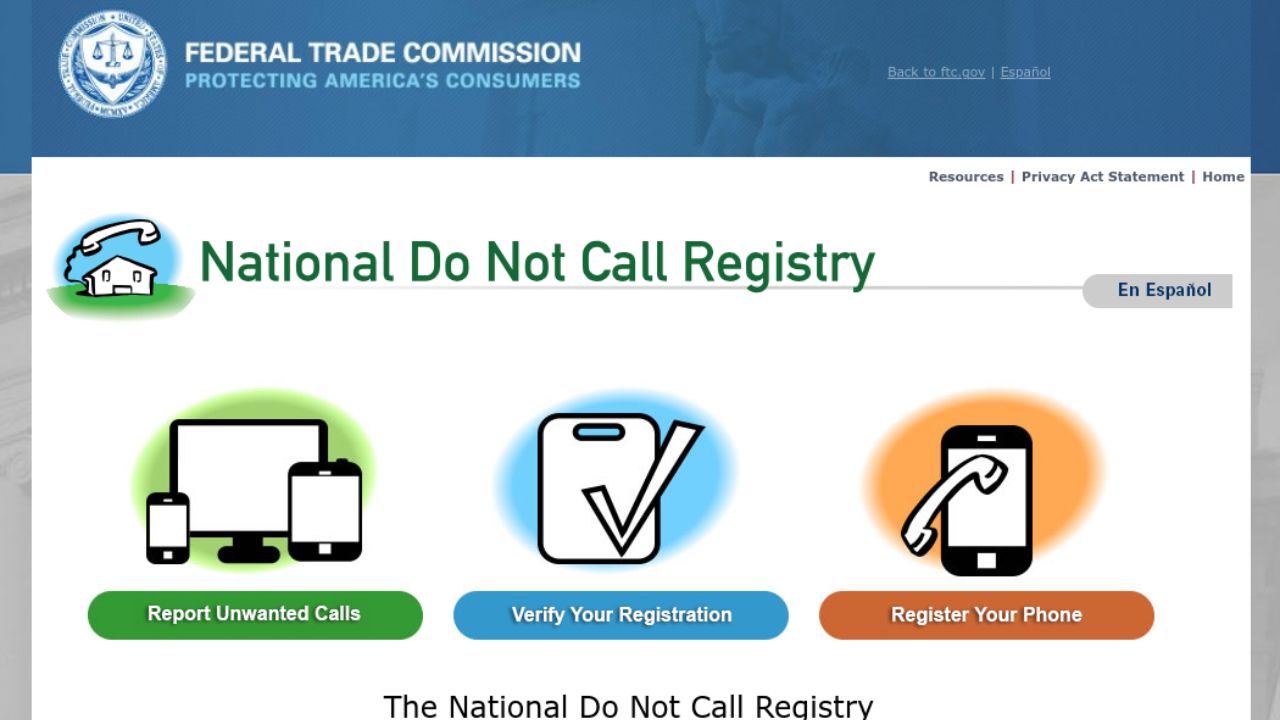
If you’ve taken the time to read our tips here at Cyberguy to keep phone scammers at bay, good for you. One of these tips is to put your phone number on the national and state “Do Not Call” list. However, you might find that you’re still getting calls from scammers. This is because the Do Not Call list primarily targets legitimate telemarketers and has limited effectiveness against scammers and illegal robocallers who often ignore the list.

This is what happened to one of our newsletter subscribers, who told us that even though she took the time to put her number on that list, she still receives many annoying calls. “I repeatedly tell them to remove my number and stop calling, but they continue to call.” She noted that the caller ID indicates that these phone calls are coming from spoofed phone numbers. Even though she blocked these numbers, too (another tip to ward off scammers), they’d call back from another number. So, why is this permitted? And, how come being on the “Do Not Call” list is not enough? Let’s thoroughly answer this once and for all.

GET SECURITY ALERTS, EXPERT TIPS – SIGN UP FOR KURT’S NEWSLETTER – THE CYBERGUY REPORT HERE

Credit: FTC


How scam calls get through the “Do Not Call” list

Receiving calls from scammers when you’ve gone out of your way to prevent them from calling you can be rather frustrating.

Unfortunately, despite being on the Do Not Call list, you may still receive unwanted calls due to a few reasons:

Some types of calls are exempt from the “Do Not Call” regulations. These include calls from political organizations, charities, and companies with whom you have an existing business relationship.  Of course, if the scammer spoofs a government phone number, they may appear to be exempt from the “Do Not Call” list, even though they are not actually a legitimate government entity.

Scammers often disregard the “Do Not Call list” and continue to make unsolicited calls. These individuals and organizations engage in illegal activities and are not bound by the regulations set forth by the FTC. After all, these scammers are not really one to follow the rules.

Sometimes, telemarketing companies or organizations may inadvertently call numbers on the “Do Not Call” list due to data errors or technical issues. Though, this is less likely.

Additionally, scammers can purchase phone numbers on the dark web, allowing them to target a wide range of individuals regardless of their registration on the “Do Not Call” list.

Again, because scammers can spoof phone numbers to make any number appear on the caller ID (even if it belongs to someone else), it’s much easier for them to bypass the “Do Not Call” list loophole.


HOW TO TRACE AND BLOCK ANONYMOUS CALLS 


How to keep scammers from calling you at all costs

While we’d like to think it’s enough to put your number on the national and state “Do Not Call” list, as we learned from this subscriber, it’s not a foolproof method. They can still find ways to get to you. That being said, don’t neglect putting your number on this list. Keeping scammers from calling you requires a combination of different strategies, and each one helps reduce the number of scam calls you’ll get over time.

1) Invest in personal data removal services: While no service promises to remove all your data from the internet, having a removal service is great if you want to constantly monitor and automate the process of removing your information from hundreds of sites continuously over a longer period of time. 

A service like Incogni can help you remove all this personal information from the internet. It has a very clean interface and will scan 195 websites for your information and remove it and keep it removed.

Special for CyberGuy Readers (60% off):  Incogni offers A 30-day money-back guarantee and then charges a special CyberGuy discount only through the links in this article of $5.99/month for one person (billed annually) or $13.19/month for your family (up to 4 people) on their annual plan and get a fully automated data removal service, including recurring removal from 175+ data brokers.  You can add up to 3 emails, 3 home addresses and 3 phone numbers (U.S. citizens only) and have them removed from data-broker databases.  I recommend the family plan because it works out to only $4.12 per person per month for year-round coverage. It’s an excellent service, and I highly recommend at least trying it out to see what it’s all about.

Get Incogni here

Get Incogni for your family (up to 4 people) here


2) Check to see if any websites you have an account with may have had a data breach recently. Changing your passwords frequently can help prevent more damage from being done. Also, consider using a password manager to generate and store complex passwords.


3) Don’t answer calls from unknown numbers. Let them go to voicemail.


4) Use your phone’s spam blocker features.


5) Notify your mobile service provider about the calls and see what they can help you do.


6)
Never reply or call back a number you don’t recognize. If the area code is familiar to you but not the rest of the phone number, it could very well be a scammer who is intentionally phone spoofing someone’s number within the same area code, for the sole purpose that you’ll recognize it and feel more inclined to answer it.


7) Block robocalls and unknown numbers.


8) Report the unwanted calls to the FTC and your state attorney general’s office, especially if it’s a repeated number or person claiming to be from the same organization.


9) If the calls are still coming, consider changing your phone number.


10) Consult a Consumer Protection Attorney if the calls really don’t stop.


11) Remember never to provide your personal information over the phone. If anyone calls you to ask for your sensitive data, do not give it over, even as trusting the person might sound or as legitimate as the reason may seem. These days, because scams are so prevalent, there shouldn’t be any company calling you and asking you for this information over the phone. Always do your due diligence.


HOW TO BLOCK THOSE UNWANTED AND ANNOYING SPAM EMAILS


Kurt’s key takeaways

Putting your phone number on the “Do Not Call” list is a great step in keeping scammers away. But, it’s not the only way. It takes utilizing different strategies — and, keeping up with those strategies — to send the scammers elsewhere.

If you could design a new feature for smartphones to prevent scam calls, what would it be? Let us know in the comments below.

FOR MORE OF MY SECURITY ALERTS, SUBSCRIBE TO MY FREE CYBERGUY REPORT NEWSLETTER HERE

Categories
Gadget Gadgets News Top News

TinyEdge Titanium Mini Shaver That Connects to Your Phone for Power

TinyEdge pocket shaver showcasing its compact design

Life moves fast, and keeping up with your grooming routine can sometimes feel like an afterthought. Whether you’re rushing to a meeting, packing light for a trip, or just trying to simplify your daily routine, finding a grooming tool that’s as versatile and on-the-go as you are can be a fantastic option. That’s where the TinyEdge pocket shaver steps in. Compact, efficient, and cleverly designed, this little device promises to make grooming effortless, no matter where life takes you.

Imagine having a shaver so small it fits in your pocket, yet powerful enough to handle everything from a quick beard trim to nose hair touch-ups. The TinyEdge isn’t just about convenience—it’s about rethinking how we approach grooming altogether. With its battery-free operation, durable titanium blades, and waterproof design, it tackles the everyday challenges of personal care with ease. Whether you’re tired of lugging around bulky gadgets or constantly worrying about dead batteries, this innovative tool offers a fresh, no-fuss solution.

The TinyEdge Pocket Shaver: Compact and Efficient Grooming

Early bird backing offers are now available for the inventive project from roughly $69 or £55 (depending on current exchange rates), offering a considerable discount of approximately 36% off the normal retail price, while the Kickstarter crowd funding is under way.

Key Specifications :

  • Compact and lightweight design (68 grams) for easy portability, ideal for travel or daily use.
  • Battery-free operation with Type-C connection for power from smartphones, power banks, or laptops.
  • Titanium blades with 7,000 RPM high-speed motor and 0.07mm mesh for precise, irritation-free shaving.
  • IPX7 waterproof rating, magnetic assembly, and easy cleaning for versatile wet or dry shaving.
  • Includes NFC functionality and doubles as a nose hair trimmer for added convenience and innovation.

The TinyEdge pocket shaver provides a compact, durable, and efficient solution for modern grooming needs. Designed with portability and practicality in mind, this device caters to individuals seeking convenience without compromising on performance. Whether at home, traveling, or on the go, the TinyEdge delivers a seamless grooming experience through its thoughtful design and advanced features.

TinyEdge shaver connected via Type-C for battery-free operation

If and when the TinyEdge campaign successfully raises its required pledge goal and the project progresses smoothly, worldwide shipping is expected to take place sometime around April 2025. To learn more about the TinyEdge tiny pocket shaver that attaches to your phone for power project browse the promotional video below.

Weighing just 68 grams and smaller than most headsets, the TinyEdge is exceptionally lightweight and easy to carry. Its minimalist design allows it to fit effortlessly into a pocket or bag, making it an ideal companion for travel or daily commutes. Despite its small size, the shaver features a sturdy, integrated body that combines durability with a sleek, unobtrusive appearance. This balance of portability and reliability makes it a practical choice for those who value efficiency in their grooming tools.

Innovative Power and Blade Technology

One of the standout features of the TinyEdge is its battery-free operation. Instead of relying on traditional rechargeable batteries, it uses a Type-C connection to draw power directly from devices such as smartphones, power banks, or laptops. This plug-and-play functionality eliminates concerns about battery life or carrying additional chargers. Whether you’re in a rush or packing light, the TinyEdge ensures a hassle-free grooming experience, always ready to perform when needed.

Waterproof TinyEdge pocket shaver ideal for wet and dry shavingWaterproof TinyEdge pocket shaver ideal for wet and dry shaving

The device is equipped with titanium blades, known for their durability and resistance to rust. These blades maintain sharpness over time, making sure a precise and comfortable shave. Paired with a high-speed motor capable of 7,000 revolutions per minute, the TinyEdge delivers smooth and efficient results. Its 0.07mm mesh ensures close contact with the skin, minimizing irritation and enhancing the overall shaving experience. Additionally, the shaver doubles as a nose hair trimmer, adding versatility to its functionality and making it a comprehensive tool for personal grooming.

Ease of Use and Practical Features

The TinyEdge is designed with user convenience in mind. Its magnetic structure allows for quick assembly and disassembly, simplifying maintenance. The device’s IPX7 waterproof rating ensures safe operation in wet conditions, making it suitable for both wet and dry shaving preferences. Cleaning is straightforward—simply rinse the shaver under running water. An automatic sharpening mechanism further enhances its practicality by maintaining blade performance over time, reducing the need for frequent replacements and making sure consistent results.

Modern Integration and Versatility

The inclusion of NFC functionality adds a modern touch, allowing the shaver to pair with compatible gadgets for additional features or settings. This integration reflects the TinyEdge’s commitment to innovation and adaptability. Whether preparing for a meeting, navigating airport security, or freshening up during a long day, the shaver adapts to various scenarios with ease and reliability.

Titanium blades of the TinyEdge shaver ensuring precise groomingTitanium blades of the TinyEdge shaver ensuring precise grooming

The TinyEdge pocket shaver combines compact design, durable construction, and advanced technology to offer a versatile and dependable grooming solution. With its portability, innovative features, and user-friendly design, the TinyEdge ensures you can maintain a polished appearance wherever life takes you.

For a complete list of all available early bird specials, stretch goals, extra media and advanced features for the tiny pocket shaver that attaches to your phone for power, jump over to the official TinyEdge crowd funding campaign page by proceeding to the link below.

Source : Kickstarter

Disclaimer: Participating in crowd funding campaigns such as those found on Kickstarter and Indiegogo, involves inherent risks. While many projects successfully meet their goals, others may fail to deliver due to numerous challenges. Always conduct thorough research and exercise caution when pledging your hard-earned money.

Filed Under: Gadgets News, Top News

Latest Geeky Gadgets Deals

Disclosure: Some of our articles include affiliate links. If you buy something through one of these links, Geeky Gadgets may earn an affiliate commission. Learn about our Disclosure Policy.

Categories
Android Apple How To Quick Tips

How to dictate text on your phone, computer, and more the easy way

Typing with your voice –  AKA dictating text – has become an extremely common way to communicate.  Better yet, you don’t even need a stenographer. (Now I’m dating myself)

I recently watched a friend quietly mumbling into his iPhone while replying to email.   He explained that its become incredibly accurate and far easier to speak his replies rather than reach for his glasses and fumble with the virtual keyboard.

Thanks to recent features on both phones and websites, you’re able to dictate your messages or documents.  Whether you don’t have an extra free hand to type something, are on the run and need to quickly respond to a text, or find dictating helpful for a personal reason, check out the helpful ways to use the talk-to-text features on different devices below.

Plus, we do have one major warning if you use the dictating features on any tech now.


Dictating and Talk-to-text on devices

You can use this feature in most apps that allow you to type – including Messages, Email, Safari, Docs, Pages, Notes, and even dating apps and more. Before you get to dictating on any of your devices, be sure to follow this helpful tip to type the most accurate message.

How to use specific commands to include punctuation and formatting.

In the recent iOS 16 update, iPhone now supports automatic punctuation if you’ve got a more current model the A12 bionic chip onboard.  Even though I’ve got the most current model, I find myself dictating the old-fashioned way since the new auto-punctuation option doesn’t seem to work all of the time.

Here’s the tried and true proven method to add punctuation on iPhone.

If you want to end your sentence with a period, exclamation point, or question mark, you’ll want to include that in your dictation.  For example, if you wanted to type this in a message:

I am well. How are you?

You would dictate:

“I am well period how are you question mark”

You can also sometimes add formatting, including saying “new line” or “new paragraph.” I’ll give some additional command examples later on depending on the device at hand.


How to dictate on your iPhone

Setting aside the not-so-thrilling auto-punctation feature on newer iPhone, here’s what works really well.   If you have an Apple iPhone or iPad, your on-screen keyboard will give you the option to dictate or “talk to text” with a simple tap.  For iPhone 6s or later or iPad, you can even use this feature without the internet.

Here’s how to use your voice to type on iPhone or iPad:

Whenever you open an app and go type something, this keyboard will appear:
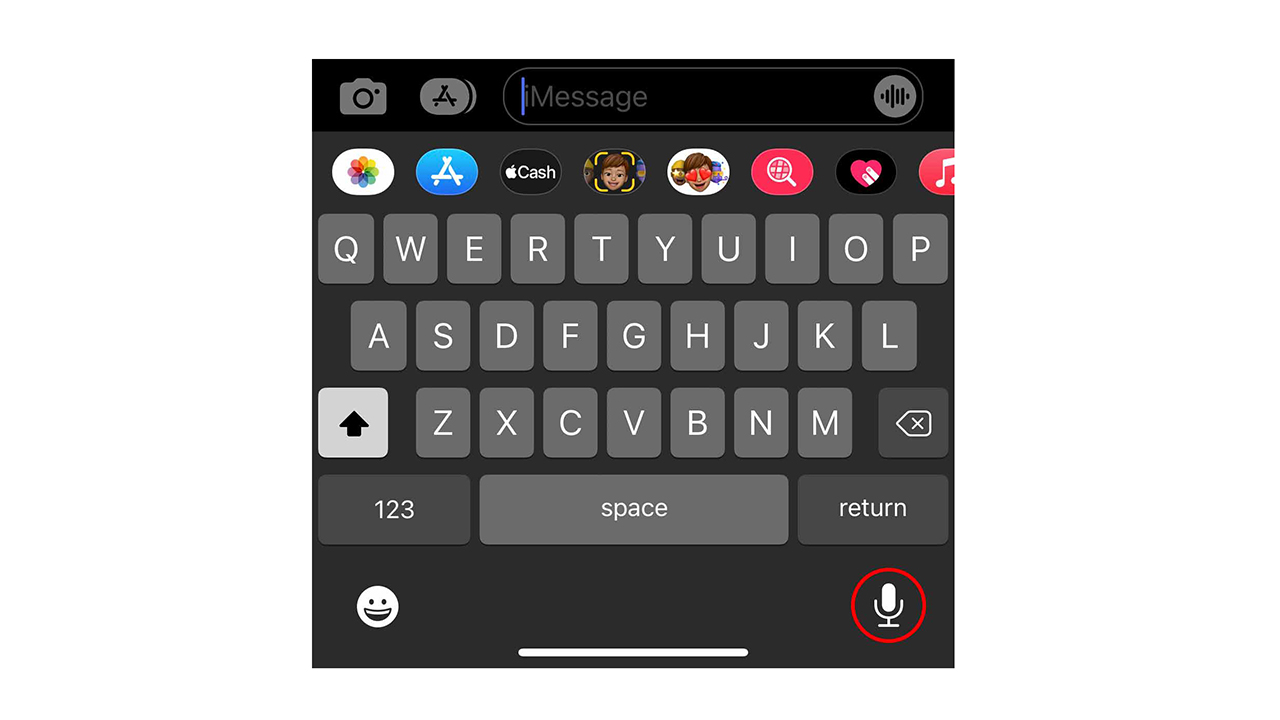
phone-keyboard-microphone

To dictate a message – skip the button with sound waves next to the text box. That will allow you to record your actual voice in a message.

Instead, tap the microphone button on the bottom right of your keyboard.

apple-iphone-microphone-button

As soon as you tap the microphone button, you can begin dictating your message. You’ll see text appear momentarily as you speak, and it often corrects itself as you continue to speak.

To change the language you’re dictating in, hold down the microphone button and click another language if you have it set up in your keyboards. To add a new language keyboard, after holding down the microphone tap Dictation Settings, tap Keyboards, and click Add New Keyboard…


Extra iPhone commands for talking to text:
  • “Quote” and “end quote” for when you want your text to appear between quotation marks
  • “New paragraph”
  • “New line”
  • “Cap” to capitalize the next word
  • “Caps on” and “Caps off” to capitalize the first letter of each word
  • “Smiley” will insert a smiley face
  • “Frowny” will insert a frowny face
  • “Winky” will insert a winky face
  • As with other dictations, always include punctuation like period, exclamation point, comma, question mark, etc.


How to dictate on your Android

Just like iPhone, your Android phone or tablet keyboard will provide the option to dictate instead of type in most apps where you’re able to type.  If your phone doesn’t have this, another option is to download and install the Gboard app from the Google Play Store and you’ll have loads more typing capabilities (including the swipe text feature which is one of my 5 favorite Android tricks.  You can learn more about other Android tips by typing in the web address CyberGuy.com and searching the word ‘Android’.

Here’s how to use your voice to type on an Android phone or tablet:

Whenever you open an app and go type something, a keyboard will appear typically on the top right of your keyboard:
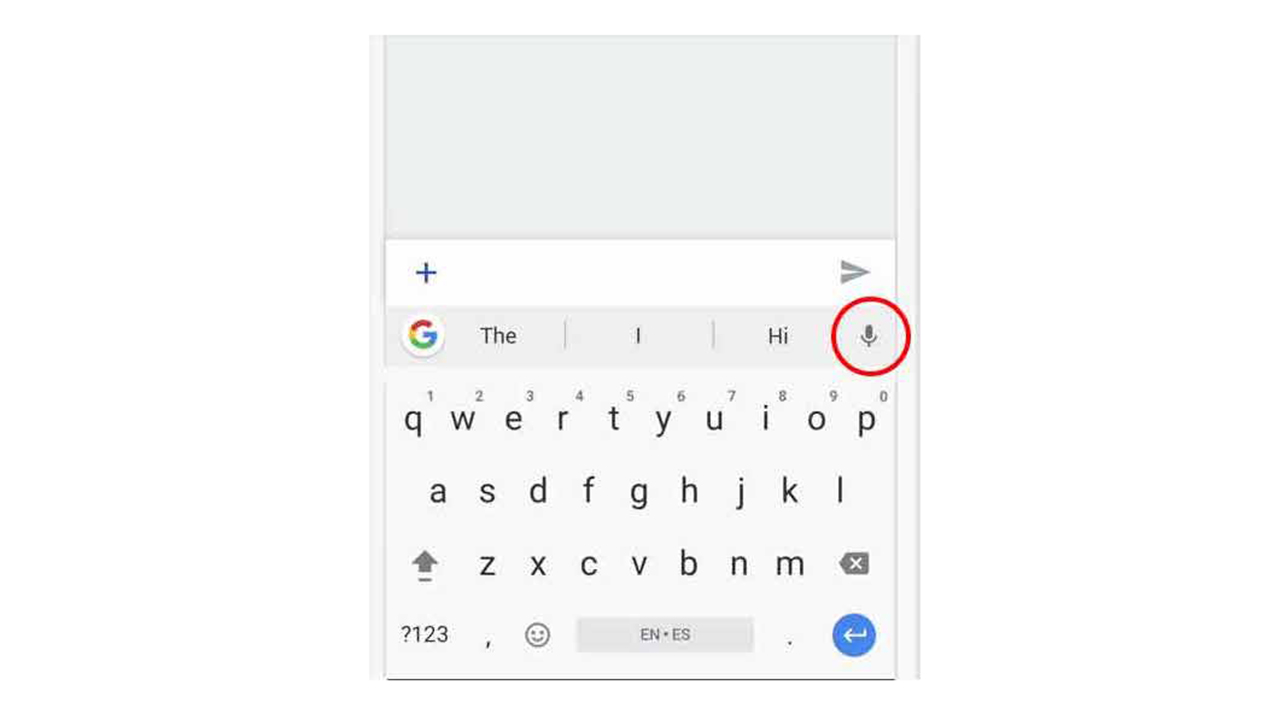
samsung-keyboard-microphone

When the words “Speak now” appear, start dictating what you’d like to type. Your words will convert to text and appear as you continue your message.


Extra Android commands for talking to text:
  • “Full stop” for period
  • “Enter” for a line space


How to dictate on your computer or any device

If you want to create a document and dictate into that document onto any device, including Macs, PCs, iPhones and Androids, we suggest you try Google Docs.

Google Docs is free to use with a Gmail or Google account. If you don’t use Gmail, you can use any email address to create a Google Account (which gives you access to not only Google Docs, but also other Google programs and Youtube).

Follow these steps to dictate using Google Docs.


How to use Google Docs to dictate text with Google Chrome

1. Before you use Google Docs on the Chrome browser, make sure your device’s microphone is turned on.

On a Mac, you’ll want to visit System Preferences and on a PC you’ll visit the Control Panel. When you first use this feature, you may need to make sure your computer has given Google Chrome access to your Microphone. Follow the pop-ups on your screen to allow your microphone to be used in the app.

2. Open Google Docs in your Chrome browser, and either open a document you’re working on or create a new Blank one.

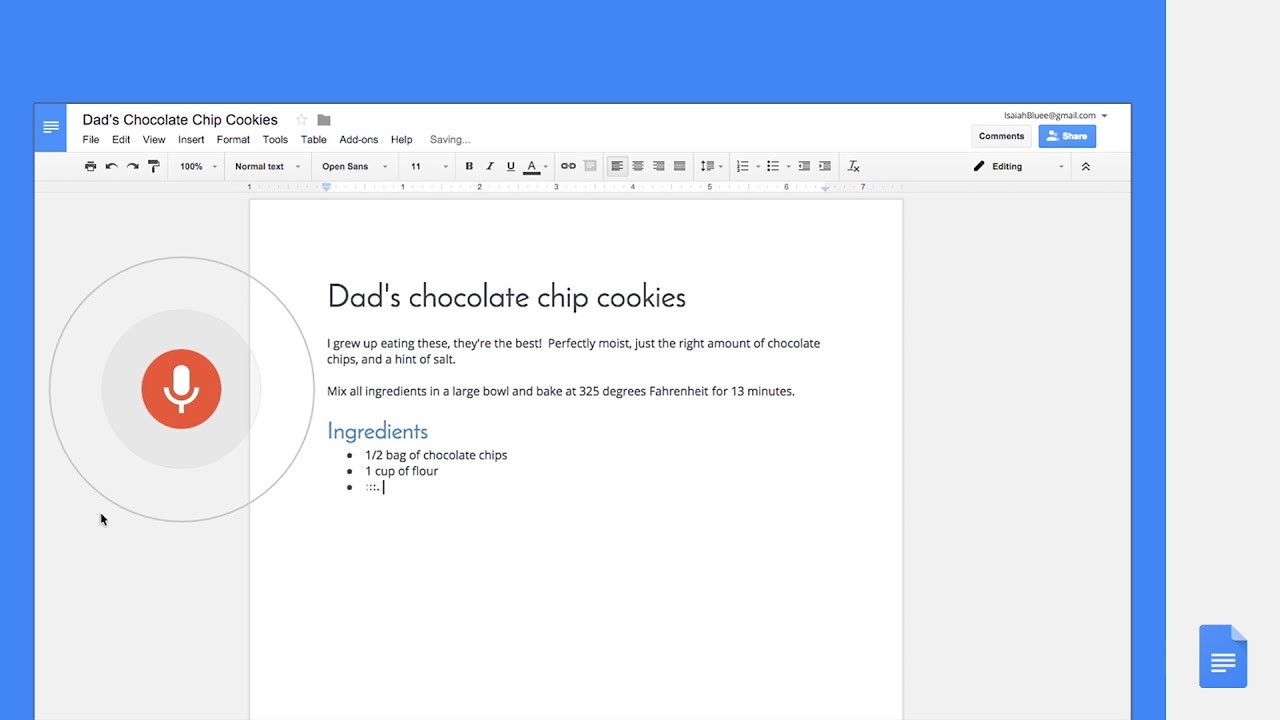
3. Click Tools along the options on top, and tap Voice Typing.

4. A pop-up with a microphone button will appear over your document. Click it to use your voice to dictate.

google-docs-microphone-dictate

5. When the microphone turns red, you can speak anything you want converted to text.

6. If you make a mistake, you can use your cursor to fix it without disabling the microphone. Then move the cursor back to where you’d like to continue to talk-to-text.


Extra commands for talking to text on Google Docs on Chrome:

Google Docs by far has the longest list of commands you can use to edit text as you speak. These commands are only available if you’re using English.

  • “Select paragraph” to select an entire paragraph
  • “Select _____” you can select a word, multiple words, phrase, list, line, and more
  • “Italics” or “Italicize” to add italics to selected text
  • “Bold” to add bold to selected text
  • “Strikethrough,” “underline,” “subscript,” and “superscript” are some of the other formatting options
  • “Titlecase” or “lowercase” to change your text case options
  • “Text color” “Highlight” “Highlight [color],” “Remove highlight” are some of your color options
  • “Increase font size” or “decrease font size” or even say what number font size you’d like between 6-400
  • Format your paragraph with commands like “Increase indent” for an indented paragraph, “Line spacing double” or “center align” “align left” “align right”
  • Create lists with “create bulleted list” or “create numbered list” and then update your list with “insert bullet” or “insert number”

How to dictate on Google Docs on other devices

If you’re using Google Docs on an internet browser that isn’t Google Chrome on a computer, you’ll need to turn your computer’s dictation function on.


On Mac

1. Open System Preferences

2. Click Keyboard

3. Tap the Dictation tab

4. Next to Dictation:, press On

5. Use the default shortcut setting or choose your own

6. Now when you’re typing elsewhere, you can use this shortcut


On PC

If you have Windows 10 or above, you can use this. In addition, Windows 11 introduced a dedicated Dictation toolbar you can access in your settings.

Windows 10

1. When you go to type, press the Windows logo key + H to open the dictation toolbar

2. This will start your dictating function automatically, so speak as you would normally

3. Say “Stop dictation” to disable the function

Windows 11 

1. Press Windows logo key + H on a hardware keyboard. Press the microphone key next to the Spacebar on the touch keyboard

2. Either click the microphone button to stop, or say “stop listening” or “stop dictation” to turn off dictation. You can also pause dictation by saying “pause voice typing” or “pause dictation.”


On iPhone or Android

You can dictate in Google Docs just like any other app following the same steps as you would for both iPhone and Android. While in the Google Docs app, use the built-in microphone on your keyboard to dictate as you wish.


For more ways to dictate using Google Docs, check out this simple video:

YouTube player


Our major warning for dictating talk-to-text

The number one warning we can offer you if you use these features is to look over your text before sending any messages.  Whether you’re dictating a text message, email, or even a list – glance over your text before sending it off or using it anywhere!  There are plenty of texts we’ve all received where the message isn’t quite right!

The most common mistake with dictate features has to do with autocorrect. While talk-to-text tech is pretty accurate, mistakes happen. Autocorrect has been known to mishear words and replace them with humorous or sometimes inappropriate words. Checking your dictated text is always the safest way to ensure a correct message.


Have you ever used talk-to-text features on any of your devices and had it turn into a misunderstood train wreck? Keep it clean and comment below. : )


Related:


MORE:

Best transcription tools to easily convert audio to text

Best transcription tools to easily convert audio to text
 

Categories
Android Android 15 Motorola News

Think twice before updating your Motorola phone to Android 15

In the past few days, you may have come across numerous reports suggesting not to update Motorola phones to Android 15, particularly the Motorola Razr 2023 models. This is because there are major issues affecting a substantial number of users.

Many users are complaining about the various issues they’re encountering on their Motorola devices after the Android 15 update and are now regretting their decision. Although the update is fine for many users on various Motorola devices, Motorola Razr 2023 users are particularly frustrated with the numerous problems it’s causing.

Users are experiencing various random issues rather than a single specific problem. Based on feedback from various users, they are encountering issues like boot loop, apps crashing, third party launchers not working, eSIM network issues and more.

The major problem observed across various devices, including the Razr+ (2023), Edge 50 Fusion, Edge 50 Neo, and ThinkPhone 25, is the stock launcher crashing abruptly, preventing users from doing anything on their phones. While some users were able to change to third-party launchers, it automatically revert to the stock launcher for some users. Basically, these devices became essentially unusable after the update.

Some Motorola users are also enjoying the Android update without any issues. However, it’s not worth trying to update your Motorola device, especially the Motorola Razr 2023. The Android 15 update doesn’t bring any significant improvements to the Razr 2023 lineup, so its not worth updating given the risks. So, it’s best to wait a few weeks and let the updates fix these issues first and then update your phone.

There are some fixes that users have shared with those who have encountered issues after the Android 15 update on their Motorola device. A full factory reset is said to be effective in fixing the bugs listed above for most users.

Since a Factory Reset wipes all data from your device, it’s important to take a backup of your phone before updating to Android 15. If you’ve missed this step, make sure to backup your phone before performing a Factory Reset.

Despite paying a premium price, users are facing issues that leave their devices unresponsive, making them hesitant to update. First it was display issues like the green line, and now these major software problems are causing frustration. If you have a Motorola phone and see the Android 15 update, it might be wise to wait a few weeks and monitor user feedback before updating.

Also Check:

Source 1 | Source 2 | Source 3