Categories
Gadget Gadgets News

10 Tips and Tricks for Mastering the iPhone Mail App

iPhone Mail App

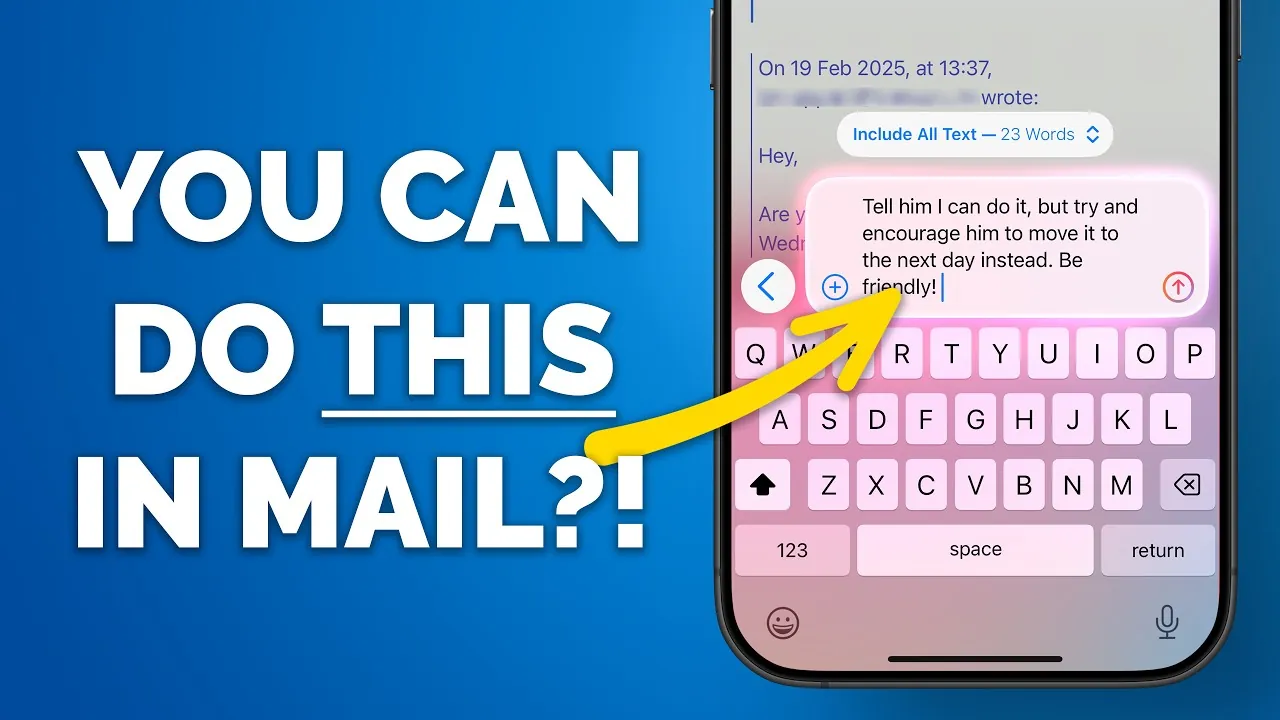
The iPhone Mail app is a versatile and powerful tool for managing your emails effectively. With its advanced features, supported by Apple Intelligence, it enables you to streamline your inbox, enhance productivity, and tailor your email experience to your specific needs. By using these features, you can take full control of your email management and make the most of this essential app. In the video below, Proper Honest Tech shows us ten practical tips and tricks to help you unlock its full potential.

1. Organize Emails with Automatic Categorization

The Mail app’s automatic categorization feature is designed to simplify email organization. It automatically sorts your emails into predefined categories such as Primary, Transactions, Updates, and Promotions. This feature helps you focus on important messages while keeping less critical emails neatly organized. You can toggle between the categorized view and the traditional list view, depending on your preference. Additionally, for greater control, you can manually reassign emails to different categories, making sure your workflow remains efficient and personalized.

2. Customize Badge Notifications

Badge notifications can be customized to display only the information that matters most to you. For instance, you can choose to see the count of unread emails across all categories or limit notifications to just the Primary inbox. This customization reduces distractions, allowing you to concentrate on high-priority messages without being overwhelmed by less urgent updates. Adjusting these settings ensures that your notifications align with your priorities.

3. Simplify Conversations with Group by Sender

The “Group by Sender” feature consolidates all emails from a single sender into one thread, making it easier to track conversations and locate specific messages. This feature is particularly useful for managing ongoing discussions or frequent correspondences. If you prefer to view emails individually, you can disable this feature for specific threads, offering flexibility to adapt the app to your communication style. Streamlining conversations in this way can save time and reduce clutter in your inbox.

4. Correct Mistakes with Undo Send Delay

The Undo Send Delay feature provides a safety net for email errors. By setting a delay of 10, 20, or 30 seconds, you gain a brief window to cancel or edit an email before it is sent. This feature is invaluable for catching typos, revising your message, or rethinking your response before it reaches the recipient. It’s a simple yet effective tool for making sure your emails are polished and accurate.

5. Streamline Scheduling with Calendar Integration

The Mail app integrates seamlessly with the Calendar app, allowing you to create events directly from email content. For example, if an email contains a meeting date or event details, you can add it to your calendar with a single tap. Additionally, linked emails can be accessed directly from calendar events, making sure you have all relevant information readily available. This integration simplifies scheduling and keeps your plans organized without switching between apps.

6. Turn Emails into Tasks with Reminders Integration

With Reminders integration, you can transform emails into actionable tasks. This feature allows you to create reminders from email content or link entire emails to reminders for easy follow-up. Whether you use Siri voice commands or drag-and-drop functionality, this integration ensures you stay on top of your responsibilities. By turning emails into tasks, you can manage deadlines effectively and never miss an important follow-up.

7. Stay on Track with Follow-Up Suggestions

The Follow-Up Suggestions feature uses Apple Intelligence to remind you about emails that haven’t received a reply. This automated prompt helps you stay on top of your communications, making sure no important message is overlooked. If you find this feature unnecessary, it can be easily disabled in the app’s settings. Staying proactive with follow-up suggestions can improve your responsiveness and communication efficiency.

8. Save Key Emails with Notes Integration

For users who frequently rely on the Notes app, the Mail app offers a convenient integration. You can drag and drop emails into Notes as hyperlinks, allowing you to reference important messages while brainstorming or working on related projects. This feature keeps your ideas and information connected in one place, making it easier to organize your thoughts and collaborate effectively.

9. Use Apple Intelligence for Smarter Email Management

Apple Intelligence enhances the Mail app with features like inbox-level email summaries, which provide quick previews of message content. You can also pin priority emails at the top of your inbox for better visibility. These tools help you manage your inbox more efficiently. Additionally, ChatGPT integration allows you to draft email replies using customizable prompts, saving time and streamlining communication. These intelligent features make the Mail app a powerful tool for both personal and professional use.

10. Personalize Your Experience with Customization Options

The Mail app offers a variety of customization options to suit your preferences. You can adjust email summaries, prioritize specific messages, and enable or disable features to create a setup that works best for you. These options ensure the app adapts to your needs, providing a personalized email management experience. By tailoring the app to your workflow, you can maximize its functionality and efficiency.

Summary

By applying these ten tips and tricks, you can transform the iPhone Mail app into a powerful productivity tool. From automatic email categorization to seamless integrations with Calendar, Reminders, and Notes, the app is designed to simplify your email management. With advanced features like Follow-Up Suggestions and ChatGPT-assisted drafting, the Mail app enables you to stay organized, save time, and communicate more effectively. Explore these features today to take full control of your inbox and enhance your email experience.

Explore further guides and articles from our vast library that you may find relevant to your interests in iPhone Mail App Tips.

Source & Image Credit: Proper Honest Tech

Filed Under: Gadgets News

Latest Geeky Gadgets Deals

Disclosure: Some of our articles include affiliate links. If you buy something through one of these links, Geeky Gadgets may earn an affiliate commission. Learn about our Disclosure Policy.

Categories
Altcoin Altcoins Crypto ETFs News Solana

Solana Crypto Secures Fresh Boost as Sol Strategies Welcomes New Milestone

On February 20, Sol Strategies announced that it had been selected as a staking provider for Tetra Trust. This is a notable achievement for the firm, known as Canada’s first licensed digital asset trust company. This alliance could significantly boost the Solana (SOL) crypto ecosystem.

As a result of this new development, institutional clients, including 3iQ’s upcoming Solana Staking ETF, can now access secure, regulated services via Solana.

The Sol Strategies Update

Solana may enter the season of more institutional adoption with this new partnership between Sol Strategies and Tetra Trust.

Sol Strategies will provide its validator infrastructure directly through Tetra’s custody platform as an approved staking provider for the firm.

Leah Wald, CEO of Sol Strategies, acknowledged the integration, citing that.

“Being selected as a staking provider for Tetra’s platform marks another significant milestone in institutional Solana adoption. This integration creates a seamless experience for institutional clients seeking secure, regulated access to Solana staking.”

Generally, Tetra Trust is known for delivering custody solutions to several of Canada’s leading digital asset investment products.

– Advertisement –

It allegedly has a proven track record of providing institutional staking infrastructure across several regions. This feature endeared it to Tetra Trust, according to Didier Lavallée, the company’s CEO.

Tetra Trust admits that integration is core to the continuity of its services, particularly in providing comprehensive crypto offerings to its institutional clients.

Solana Crypto Price and Future Outlook

One of the most thriving sectors on Solana is the memecoin niche which may experience a sizable push due to this latest development. In the last few weeks, the altcoin has followed a downward trend, losing much of its gain.

From trading above $250, analysts are already predicting that SOL may drop to $125. This projected price level is tied to the potential coin’s inability to sustain the $160 support.

It is worth noting that market trader ‘best_analysts’ recently highlighted the $200 resistance level as a key rejection zone.

This revelation further reinforces the SOL’s bearish outlook. Overall, there is selling pressure in the SOL ecosystem, and concerns about further downside risks have been raised.

However, in the meantime, the coin has recorded a slight recovery, probably triggered by the Sol Strategies and Tetra Trust partnership.

At press time, SOL price traded at $174.01, corresponding with a 2.33% increase in the last 24 hours.

Solana ETF Advantage

On the one hand, the prospect for Solana ETF approval remains high

Franklin Templeton submitted one of the most recent filings for this product with the US Securities and Exchange Commission (SEC). The firm officially registered the Franklin Solana Trust entity to launch its spot Solana ETF.

The SEC recently confirmed Canary Capital’s Solana ETF proposal after financial institutions demonstrated a growing interest in SOL ETF.

The approval of a Solana ETF could mark a vital turning point as it can potentially increase institutional capital flows.

Solana crypto can also mirror the performance of Bitcoin and Ethereum ETFs. This could validate SOL as a true financial asset that may attract hedge funds, pension funds, and retail investors.

More than the previous $250 price levels, this ETF may bring SOL on the road to reaching $500 price mark. However, this forecast hinges on the outlook of the broader crypto industry moving forward.

Categories
Computing guide How To PC windows Windows 11

How to Remove Recommended Section from File Explorer on Windows 11

Microsoft introduces interesting updates to its Windows 11 operating system. However, the File Explorer app for Windows 11 has also received updates that have given it a new look. One of the new elements added to the File Explorer is the Recommended section. The Recommended section shows all the files that have been recently accessed or modified.

Don’t get me wrong, this is a great feature for those who like to keep updated about their files. But, not everyone is a fan of such clutter showing up in the File Manager app. So, what’s to be done? Well, you can choose to disable it. Here is our guide on how you can do that.

Remove the Recommended Section from File Explorer on Windows 11

Step 1: First off, open the File Explorer app on your Windows PC.

Step 2: Now, click on the three dots that you see on the menu bar.

How to Remove Recommended Section from File Explorer on Windows 11

Step 3: From the fly-out menu, click on Options.

Step 4: The Folder Options window will now open up.

Step 5: Keeping the General tab selected, un-tick the Show Recently Used Files option under Privacy.

How to Remove Recommended Section from File Explorer on Windows 11How to Remove Recommended Section from File Explorer on Windows 11

Step 6: You can also uncheck the box that says Show Recently Used Folders.

Step 7: Finally, click on the Apply button followed by the OK button.

You should no longer be seeing any recommended and recently used files in the File Explorer screen.

Closing Thoughts

This concludes the guide on how you can get rid of the Recommended section that displays your recently used files or folders on the home screen of the File Explorer app.

The best part about this is you simply do a few clicks, and you are good to go. There is no need to dig into the Registry Editor to make these changes.

Related Articles:

Categories
How To Privacy Protect Your Devices Security Tech Tips & Tricks

How to remove yourself from the Internet

I don’t know about you, but I am so sick and tired of seeing deeply personal and identifiable private details about my family online.   Despite all that I do to remove myself from the Internet, private stuff pops up once in a while such as my home address or a photo that I made sure was set to private.


There’s hope to get your private stuff off the Internet

With so much of our data shared on social media and over the internet in general, it is not hard to imagine how much personal data about you is available for others to find. What’s scarier and harder to imagine, however, is someone showing up at your residence and/or workplace after googling your first and last name to find the exact address.


How to scrub yourself off the web

Though it is nearly impossible to scrub all your data online, it is important to understand what information is available about you to then figure out a manageable strategy to take the most impactful information offline as well as prevent future leakages.

how to remove yourself from the internet

Image credit: OneRep

The primary offender in spilling your personal information online are data broker sites aka “People Search”, which allows you to input the name of any person, often for a fee, and receive their contact information such as phone numbers and addresses; age; birthdate, work history, etc.  WebFX reported in 2019 alone that there are more than 4,000 data broker sites collecting data on over 500 million consumers.

That data point alone can make you feel ready to give up before you start. But it is your right to secure your privacy, and increasingly more vital to your security. Instead of focusing on the enormity of the task at hand, below are strategic ways to effectively and efficiently REDUCE the amount of information about you out there.

How much of your private information is already out there?

> Jump down to how to automate the process of removing yourself from the internet.


#1  Google Yourself

When’s the last time you tried to search yourself?  Before you launch into a campaign to reach out to all data broker sites, stop to check what and which sites have information about you already online.

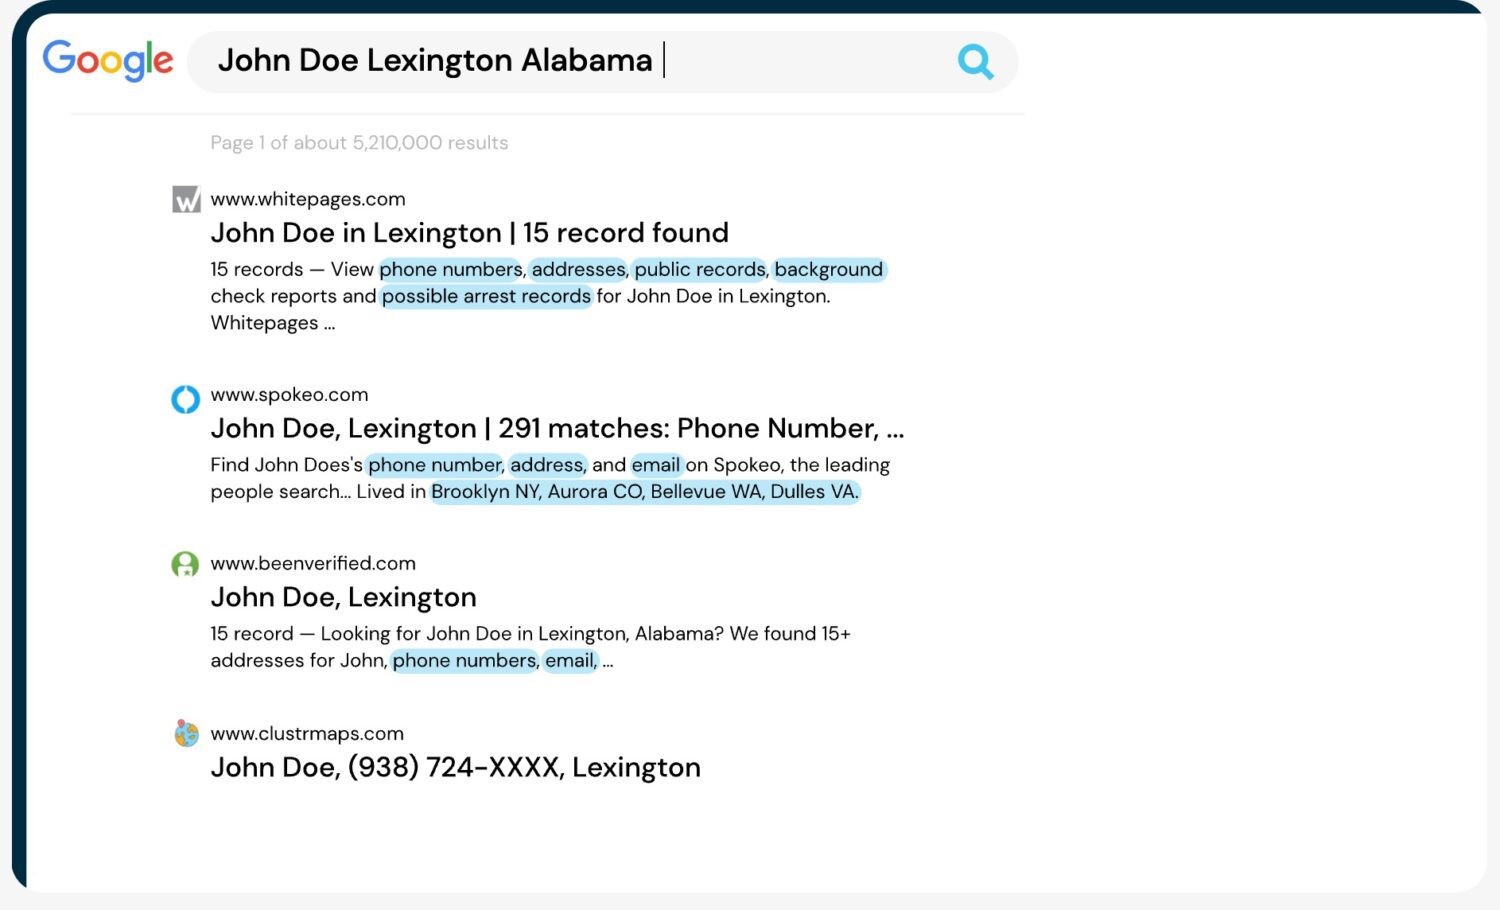
Log out of your own Google account then google yourself: search your first and last name on google.com. This is the most accurate way to see how an average user finds information about you via Google. Arguably the largest search engine online, it is the likeliest source most would go to glean information about you.

How much of your private information is already out there?

> Jump down to how to automate the process of removing yourself from the internet.


#2 Make yourself unsearchable

There is data collection from companies and compromises by hackers, but there is also a huge risk if a random or potentially dangerous individual arrives at your doorstep with the information found on Google or other search engines.

It is happening more and more.  Because Google and other search engines are continually aggregating information, if you have publicly available social media or website presence, you cannot completely prevent your name from appearing on search results. These, however, are some key ways to make your information less likely to show up when searching your name.

How to change search engine settings

We’re going to focus on Google as it is the largest and most used search engine online.

  • Log on to your Google account on your desktop
  • On the upper right-hand corner of the page, there should be a dial pad icon
  • Click the icon for a drop-down menu
  • Click the  ‘Account’ icon
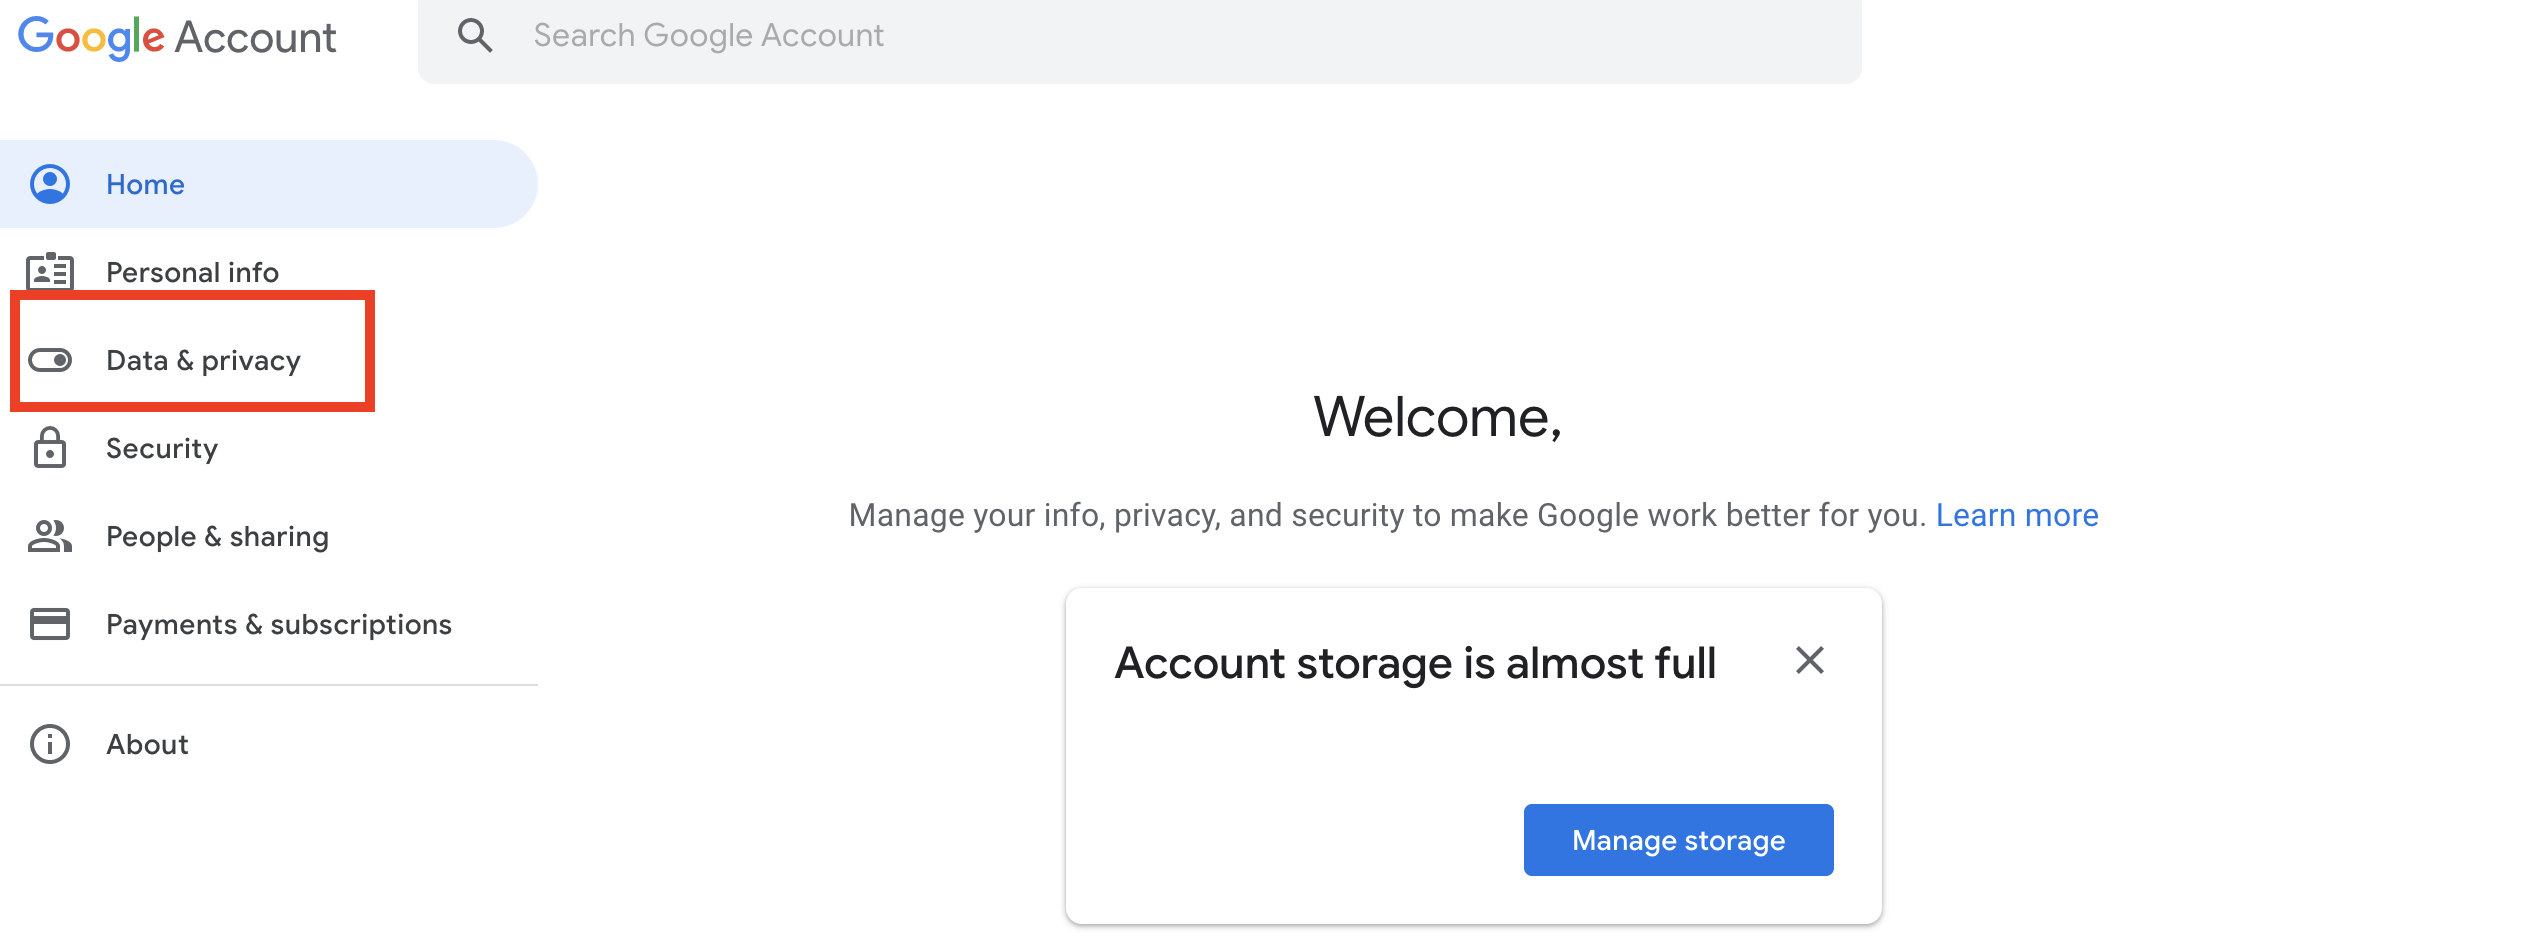
  • Click ‘Data & Privacy on the left-side menu

Google Activity Control

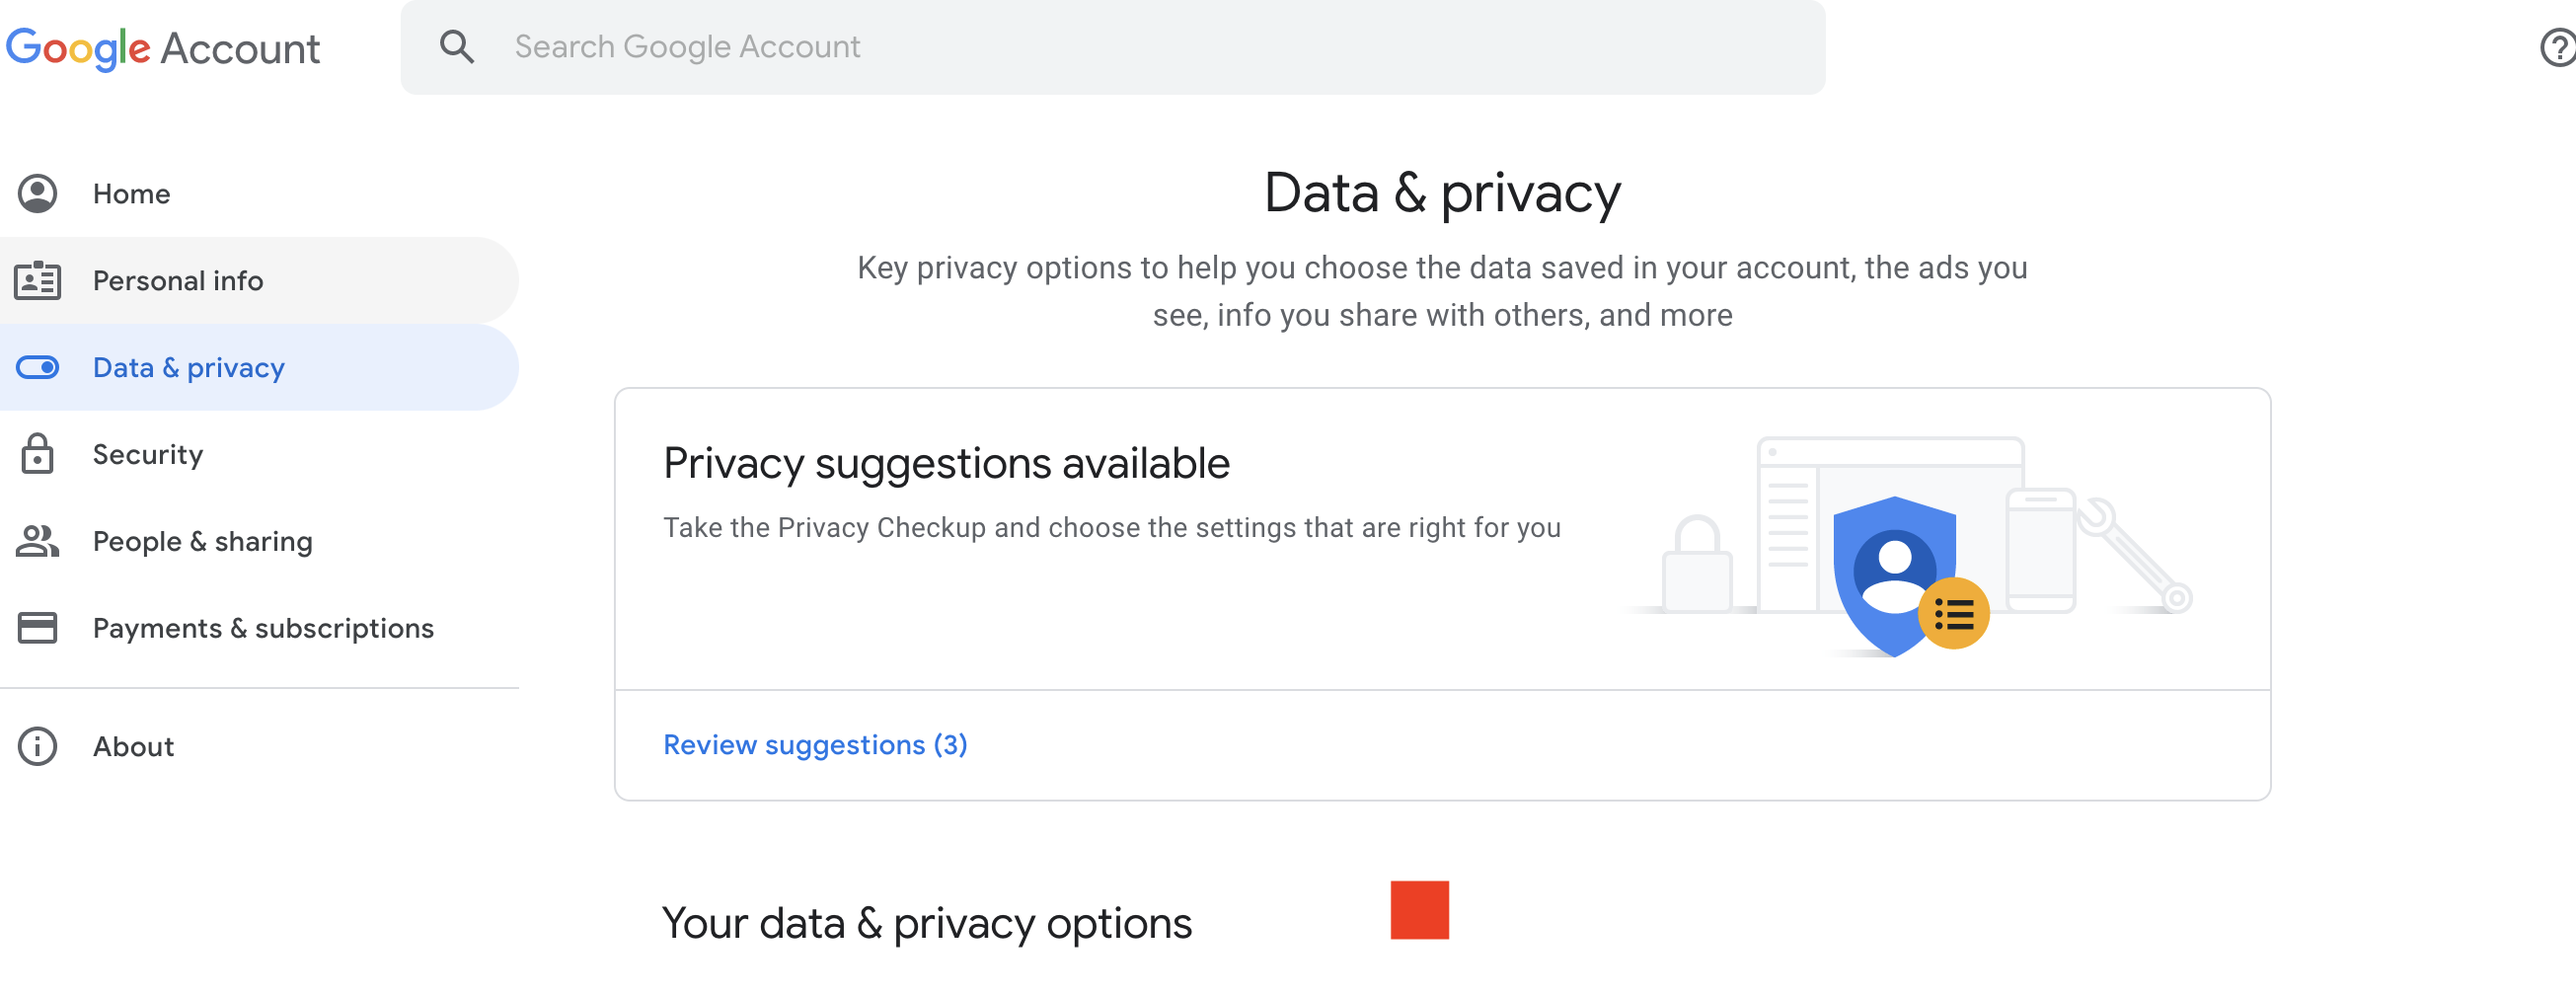
  • On the ‘Data & Privacy’ page, scroll down to the ‘History Setting’ options

Google Activity Control

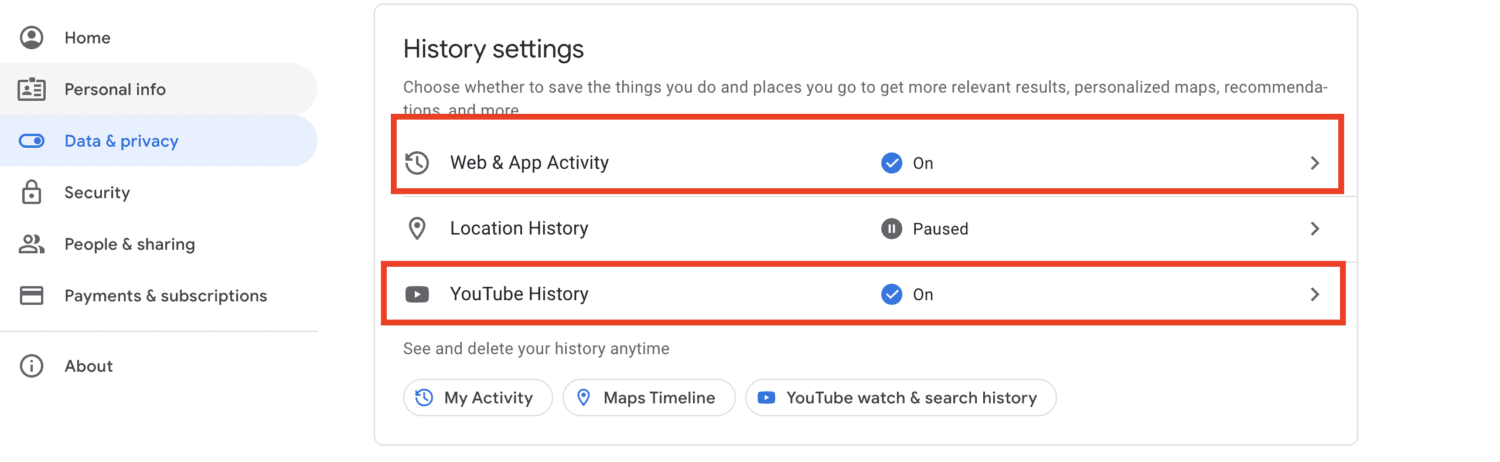
  • Under ‘History Settings’, click on ‘Web & App Activity’

Google Activity Control

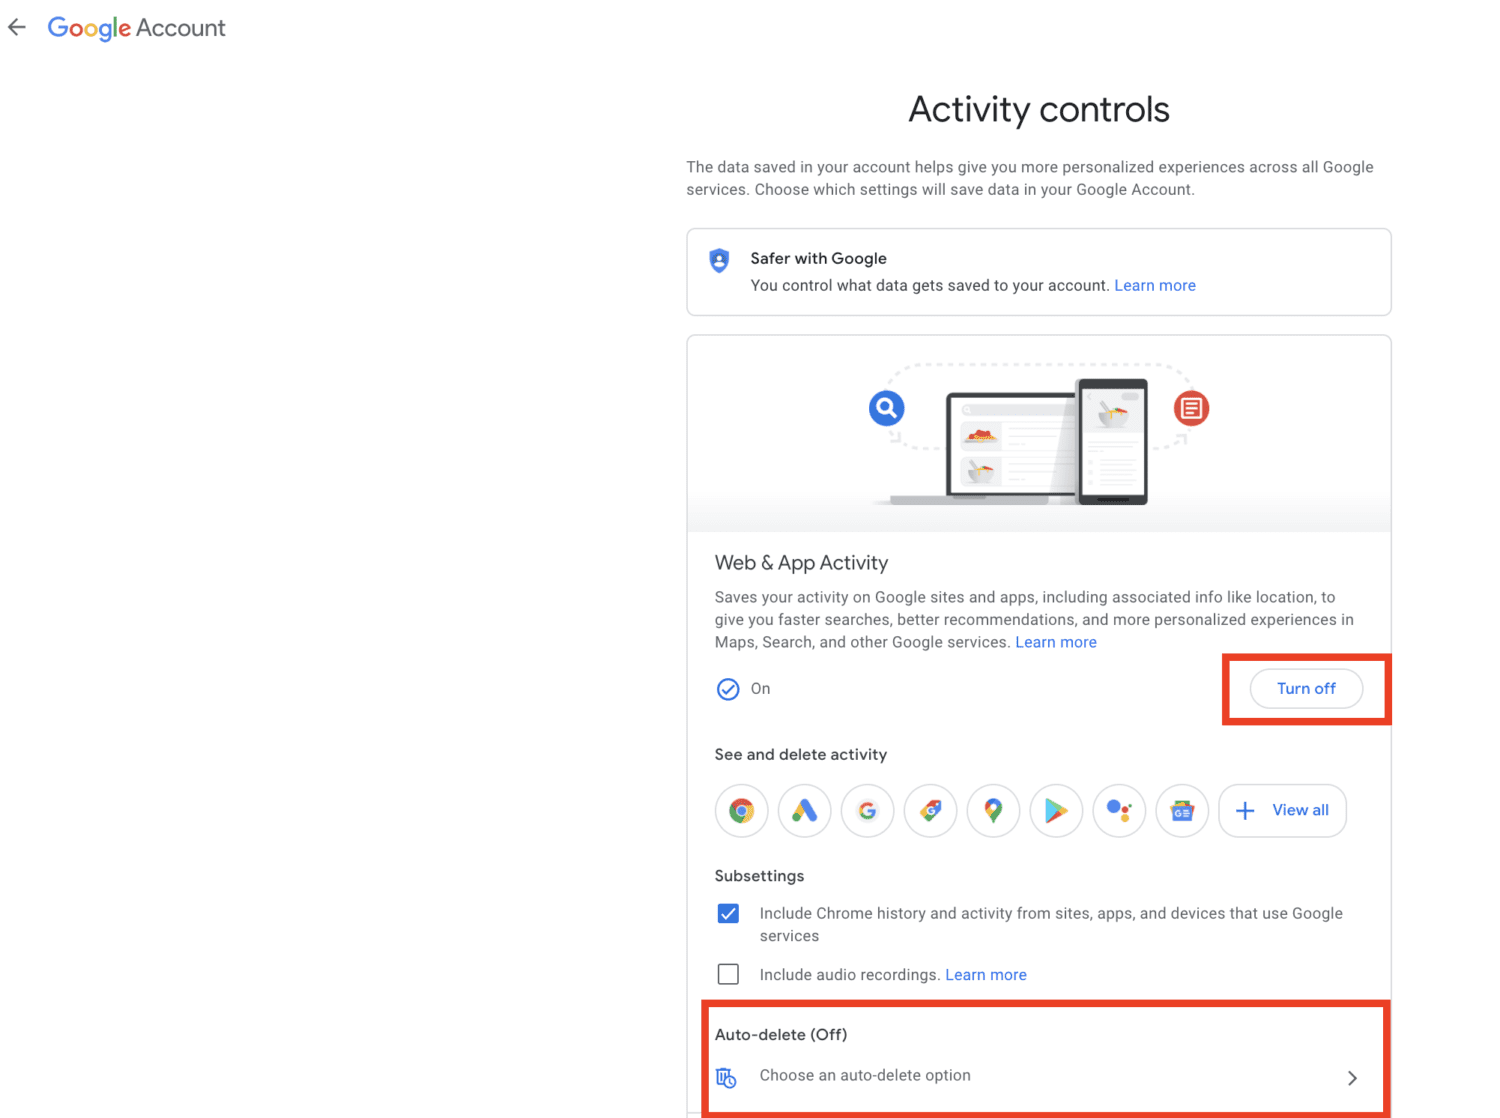
  • Under ‘Activity Controls’, click ‘turn off’ so it’ll stop aggregating information from your google services and sites. Or if you’d prefer to keep it on, you can ‘turn on’ auto-delete so that it periodically deletes this information. You can repeat these steps for your ‘YouTube History’.

Google Activity Control


How much of your private information is already out there?

> Jump down to how to automate the process of removing yourself from the internet.


#3 Invest in Removal Services (best outcome)

In addition to the sheer number of data broker sites hocking your data, the unfortunate truth is that many of these sites keep gathering information on you both from public record and online usage even after you’ve had data removed previously.  It never stops.

While it is possible for you to go to each site and manually request your information be removed, you’d be doing this non-stop.  Unfortunately, there is no regulation when it comes to these data brokers, and just because you remove your data from the web doesn’t mean the data brokers aren’t going to resell it again months from now.

While no service promises to remove all your data from the internet, these top services are great if you want to constantly monitor and automate the process of removing your information off hundreds of sites continually over a longer period of time.
I have found these to be very effective for continual removal.  The first time I tried one, everything I did not want to see about myself was gone. Then months later it bubbled back into the crevices of Google.   That’s when I learned that subscribing to removal services that constantly scour and remove private data is the way to go.


Top Choice: Incogni


Incogni_homepage

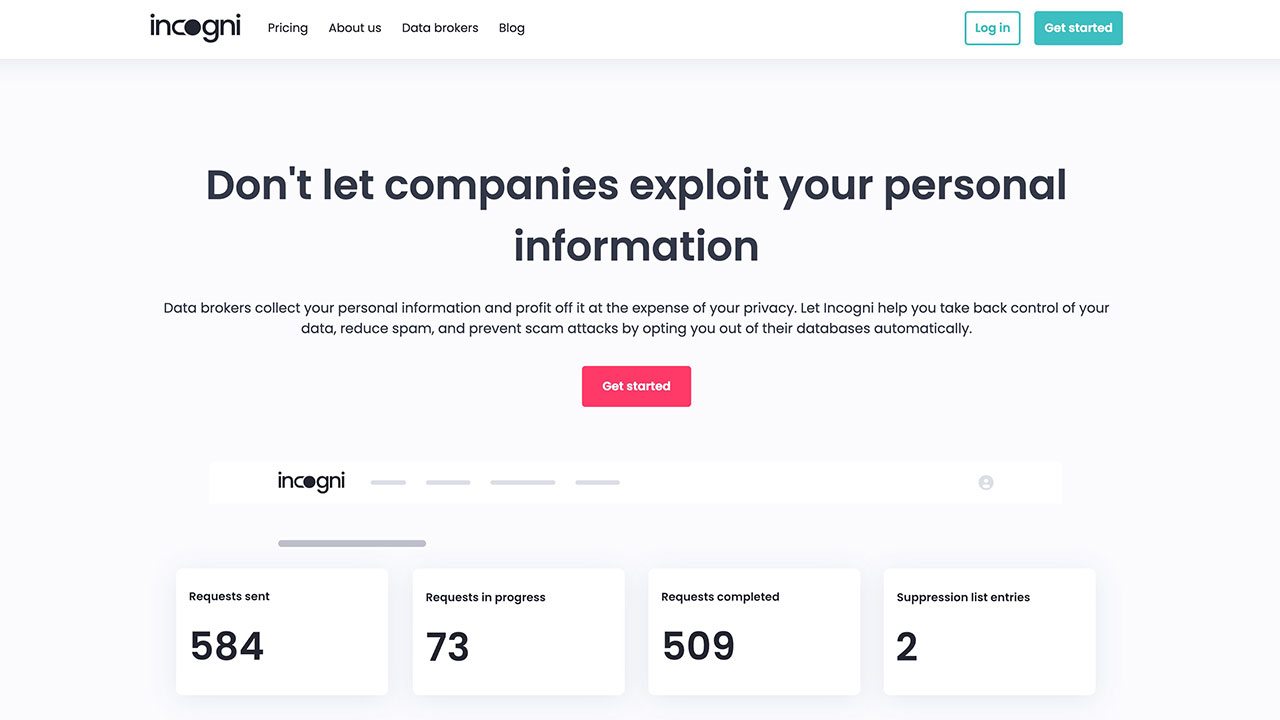
Every day, data brokers profit from your sensitive information, collecting hundreds of details like your phone number, date of birth, social security number, address, interests, and even your vehicle VIN. They sell this information to the highest bidder. Best case scenario: companies target you with ads. Worst case: scammers and identity thieves exploit it.  Incogni scrubs your personal data from the web, confronting data brokers on your behalf. Unlike other services, Incogni removes your sensitive information from all types of brokers, including tricky People Search Sites – preventing stalkers and fraudsters from getting your information.

  • Incogni removes your data from 190+ people search sites and hundreds of data brokers.
  • Makes your details harder to find online and keeps your private data off the dark web.
  • Add up to 3 emails, 3 home addresses and 3 phone numbers (U.S. citizens only)  and have them removed from data-broker databases.
  • Helps stop frauds, scams, stalkers, robocalls, and spammers.
  • You’ll receive regular progress reports.

Special for CyberGuy Readers (60% off):  Incogni offers A 30-day money-back guarantee and then charges a special CyberGuy discount only through the links in this article of $5.99/month for one person (billed annually) or $13.19/month for your family (up to 4 people) on their annual plan and get a fully automated data removal service, including recurring removal from 175+ data brokers.  I recommend the family plan because it works out to only $4.12 per person per month for year-round coverage. It’s an excellent service, and I highly recommend at least trying it out to see what it’s all about.

Get Incogni here


Get Incogni for your family (up to 4 people) here


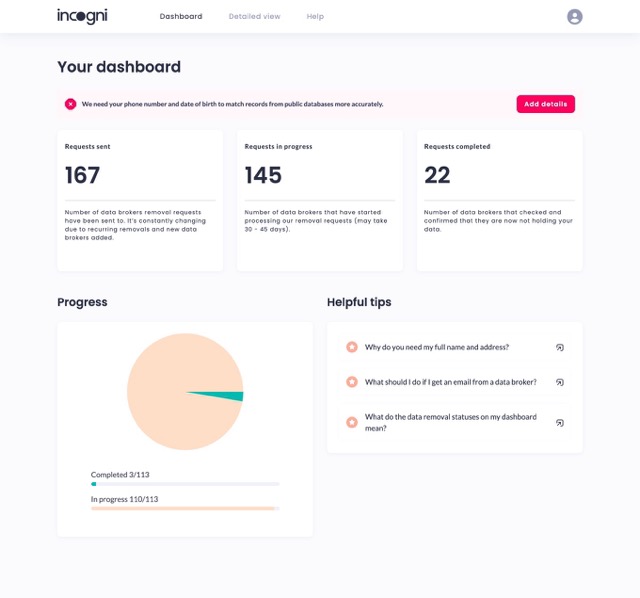
Incogni Report


OneRep

One Rep - Delete your personal information from the internet

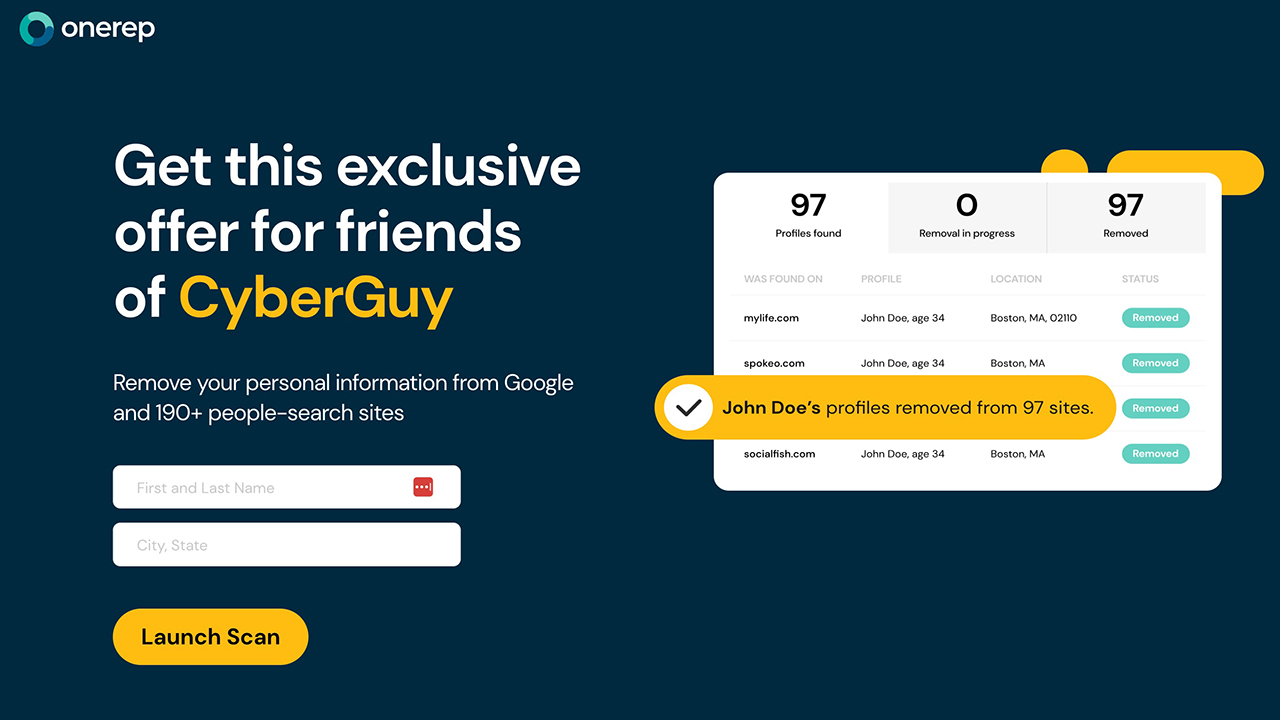
OneRep has a very clean interface and y
ou will be amazed at how much of your private information will be discovered and ultimately removed from the web including your name, age, home address, phone number, email addresses, your family members, other people associated with you, your income range, credit score range, political preferences, criminal records, and much more.

Special for CyberGuy Readers (50% off):  OneRep offers a 30-day money-back guarantee and then charges a special CyberGuy discount only through the links in this article of $7.49/month for one person on their monthly plan or $13.99/month for your family on their annual plan.  


DeleteMe

deleteme

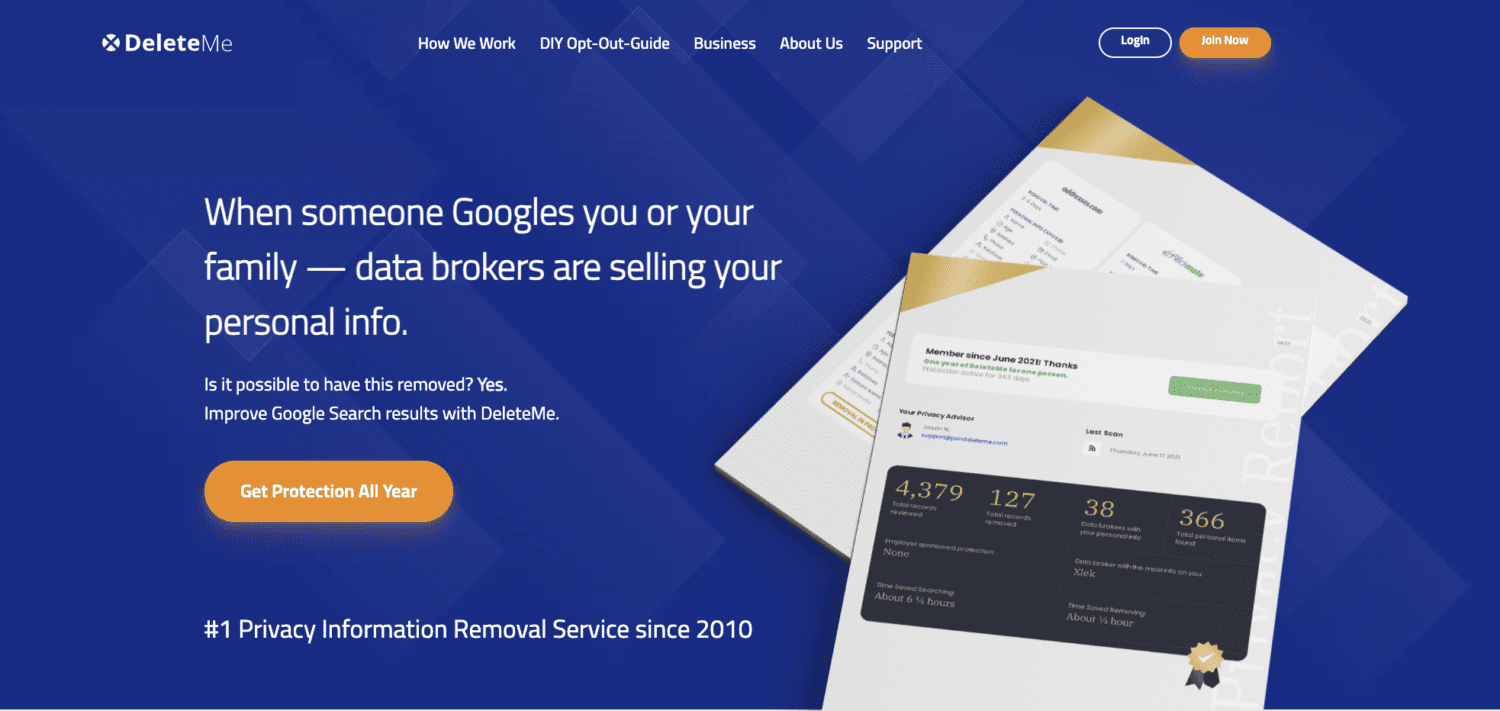
Starting at $10.75/monthly (billed annually at $129), the standard plan for one person for 1 year includes removing your information from over 30 data broker sites. In addition to receiving a detailed report in 7 days of sign-up, this annual service scans and removes personal information off websites every 3 months. If you ever find your information on a data broker site not included in your service, you can submit a removal request. DeleteMe will research whether or not it is able to remove your data off that site or not.  While DeleteMe is similar to OneRep, its annual plan is more expensive.


Copyright 2025 CyberGuy.com.  All rights reserved.  CyberGuy.com articles and content may contain affiliate links that earn a commission when purchases are made.

Categories
Crypto Dogecoin News

Dogecoin (DOGE) Active Addresses Jump 34% Amid Adoption Shift

Dogecoin (DOGE) onchain activity steadily increases, with active addresses jumping 34% on the monthly chart.

This jump suggests rising Dogecoin adoption as the memecoin shows signs of recovery.

Although major cryptocurrencies are in the green, DOGE is still down below key support levels.

However, analysts anticipate the token will increase by twice its current price by the end of February.

Dogecoin Onchain Active Addresses Metric

According to IntoTheBlock data, monthly onchain active addresses for DOGE increased by 34%, reaching an impressive 6.57 million.

The 30-day high active addresses reached 6.58 million, while the 30-day low stood at 6.57 million.

– Advertisement –

Dogecoin Active Addresses Chart. Source: IntoTheBlock

With monthly active addresses rising by 34%, DOGE has demonstrated impressive growth in its on-chain activity.

The active address metric demonstrates the increasing engagement within the Dogecoin ecosystem.

A spike in this metric might translate to a positive impact on Dogecoin’s price.

According to market data, DOGE price was trading at $0.2546, up 0.77% over the previous day.

However, the daily trading volume increased by 28.9% to $1.41 billion.

Expectations surrounding the launch of a DOGE Exchange-Traded Fund (ETF) are probably the leading cause of the rising trading volumes and active addresses.

In January, Grayscale filed a 19b-4 application with the U.S. Securities and Exchange Commission (SEC) to convert its recently launched Dogecoin Trust into an ETF.

This move marks a major step for institutionalizing DOGE as a legitimate asset.

Bitwise Investment has also filed for a Dogecoin ETF, reflecting growing institutional confidence in the memecoin as a financial asset.

The growing institutional interest in DOGE and President Trump’s pro-crypto administration could open the way for the memecoin’s broader acceptance in financial markets.

Profitability Trend for DOGE Holders

Meanwhile, Dogecoin investors are smiling as an impressive number of people are making money.

According to recent on-chain data, 60% of total addresses are now profitable.

Addresses at the break-even point total 180,000, or 5%, while those in loss total 885,000, or 25%.

This level of profitability suggests strong market sentiment, which may indicate a rally is imminent.

However, since most investors are already making money, additional signs of an uptrend may increase selling pressure.

Dogecoin whales have a major role to play to prevent this trend from occurring. These large investors must intensify their activities to cement a sustained growth trend in the coming weeks.

Where is Dogecoin Price Heading?

ÐOGE has faced severe heat lately, dropping below $0.3 for the first time since November 2024.

The price has fallen lower, currently consolidating around $0.25. Historical trends show a likely breakout if it surpasses the current level.

A successful hold above this level could drive the price toward the next resistance at $0.3.

On the other hand, Dogecoin’s failure to break $0.25 may lead to a retest of support at $0.2. If bearish pressure continues, DOGE could fall lower.

Despite the bearish outlook, DOGE shows signs of a strong rebound. A “Golden Cross” pattern recently appeared on the DOGE chart.

This was indicated by the 50-day moving average crossing above the 200-day moving average, suggesting a potentially bullish price reversal.

Some market analysts speculate the price could pump twice its current levels by the end of the month. Others claim DOGE may surge to $2 if it secures the long-awaited ETF approval.

Categories
Gadget Gadgets News

OnePlus Watch 3: A Closer Look

OnePlus Watch 3

The OnePlus Watch 3 stands out as a significant addition to the smartwatch market, offering a blend of premium design, enhanced functionality, and a robust feature set. Designed with Android users in mind, it builds on the strengths of its predecessor while addressing key areas for improvement. However, some limitations may influence its appeal to specific users. The video below from Mike O’Brien gives us a closer look at the device.

Design and Build Quality

The OnePlus Watch 3 showcases a refined design and durable construction, setting a high standard for smartwatches in its category. Its stainless steel body, complemented by a titanium bezel, provides a premium feel and ensures long-term durability. The 1.5-inch sapphire crystal display offers exceptional clarity and brightness, reaching up to 2200 nits, making it easily readable even in direct sunlight. Thin bezels further enhance its modern aesthetic, while the rotating crown introduces a tactile and intuitive navigation experience.

Available in two elegant finishes—Emerald Titanium (silver) and Obsidian Titanium (black)—the watch caters to a variety of style preferences. With IP68 and 5ATM water resistance ratings, it is well-suited for swimming, outdoor activities, and everyday wear, adding to its versatility and durability.

Battery Performance

Battery life is one of the standout features of the OnePlus Watch 3, making it a reliable companion for extended use. The watch employs a dual-engine architecture, combining the Snapdragon W5 chip with a secondary low-power processor to optimize energy efficiency. In Smart Mode, the watch delivers up to five days of usage, while Power Saving Mode extends this to an impressive 16 days. The 631mAh battery supports USB-C fast charging, allowing a full charge in under an hour. This minimizes downtime and ensures the watch is ready to go when you are.

Health and Fitness Tracking

The OnePlus Watch 3 offers a comprehensive suite of health monitoring features, making it a valuable tool for tracking overall well-being. It monitors key metrics such as heart rate, blood oxygen levels, wrist temperature, and stress. Advanced sleep tracking provides detailed insights into sleep stages, nap detection, and even includes a morning brief to help you start your day informed. Additionally, the watch generates a 60-second health report summarizing your key health indicators for quick reference.

Fitness enthusiasts will appreciate the inclusion of 100 sport modes and dual-band GPS. While the GPS performs well in open areas, it struggles with accuracy in urban environments with dense buildings. Similarly, the optical heart rate sensor is reliable during steady activities but less accurate during rapid intensity changes. Swimming tracking is effective for continuous laps but less so for interval-based workouts.

Despite its robust health tracking capabilities, the watch lacks female-specific features such as menstrual cycle tracking, even though it includes a temperature sensor. Additionally, ECG functionality is unavailable in the U.S. and Canada, which may limit its appeal for users seeking advanced health monitoring options.

Software and Features

Running on Wear OS 5, the OnePlus Watch 3 delivers a smooth and customizable user experience. Users can personalize the interface with tiles and watch faces, while enjoying access to Google apps like Maps, Wallet, and Assistant. Offline Spotify support and the ability to make phone calls directly from the watch enhance its practicality for daily use.

However, the watch has some notable limitations. It lacks wireless charging and Qi compatibility, which may be a drawback for users accustomed to these features. Furthermore, its exclusivity to Android devices excludes iPhone users, narrowing its potential audience. These limitations may affect its appeal to users seeking broader compatibility and charging options.

Pros and Cons

  • Pros:
    • Exceptional battery life compared to competitors.
    • Rotating crown for intuitive navigation.
    • Premium materials and sleek design.
    • Comprehensive sleep tracking with a morning brief feature.
    • Fast and responsive interface powered by Wear OS 5.
  • Cons:
    • Only one size option, which may not suit smaller wrists.
    • No female-specific health features or menstrual cycle tracking.
    • ECG functionality unavailable in certain regions.
    • Limited fitness tracking accuracy in urban areas and swimming intervals.
    • Not compatible with iPhones.

Price and Availability

The OnePlus Watch 3 is priced at $329, offering competitive value for its feature set. It is available in two color options—Emerald Titanium and Obsidian Titanium—with pre-orders currently open. This pricing positions it as an attractive choice for Android users seeking a well-rounded smartwatch that balances style, functionality, and performance.

Final Thoughts

The OnePlus Watch 3 excels as a versatile and reliable smartwatch, offering exceptional battery life, a polished design, and a range of practical features. Its rotating crown and comprehensive health tracking enhance usability, while its premium materials ensure durability. However, the absence of female-specific health features, limited fitness tracking accuracy in certain scenarios, and lack of iPhone compatibility may deter some users. For Android users prioritizing style, battery performance, and everyday functionality, the OnePlus Watch 3 presents itself as a compelling option at its price point.

Source & Image Credit: Mike O’Brien

Filed Under: Gadgets News

Latest Geeky Gadgets Deals

Disclosure: Some of our articles include affiliate links. If you buy something through one of these links, Geeky Gadgets may earn an affiliate commission. Learn about our Disclosure Policy.
Categories
AI Computing DeepSeek guide How To PC

How to Install and Run DeepSeek-R1 AI Locally on Your Computer

DeepSeek AI has been gaining a lot of popularity recently. This is primarily because of its advanced capabilities, low API cost, and reasoning features. However, some users have raised concerns related to privacy and data sharing since a Chinese firm developed the chatbot. Some users have also accused the bot for censoring information.

So if you want to try the DeepSeek AI but are concerned about your data, then the best way to use it would be to locally install it on your device. Installing the chatbot locally means it will have no affiliation with the cloud or internet whatsoever and your data will be stored in your device only.

What are the advantages of running DeepSeek AI locally?

There are several advantages of running the DeepSeek AI locally. One of the most important advantages in this case would be data privacy and security. Since all your data is stored locally on your device, you will have full control over it.

Further, since local installation removes any dependence on the internet, it means you can use the AI anywhere, anytime you want. The overall performance and response time will be also increased given that there would be no network latency.

How to Install and Run DeepSeek-R1 AI Locally

Two ways are using which you can run DeepSeek AI locally. Method 1 requires LM Studio while Method 2 requires Ollama. Both methods do not require any technical expertise and are easy to install.

Run DeepSeek AI Locally using LM Studio

Step: 1 Download and install LM Studio V0.3.0 or later on your device. (Download Link)

Step: 2 Once the download is finished, run and install the .exe file. It will take a few seconds to finish the installation.

Step: 3 Now open the installed application. Click on the “Search” icon and then select “DeepSeek R1 Distill (Qwen 7B)” and tap on the “Download” button. Since the file is around ~4.5GB, the download might take some time.

Step: 4 After the file is downloaded, click on the “Chat” icon and then click on “Select a model to load” (or press CTRL+L). Now select DeepSeek R1 and click on “Load Model.”

That’s it. You will be now able to access and run the DeepSeek R1 locally. However, if you get any error, then go the Step 4 and drag the “GPU offload” slider to the minimum (or zero). This will fix the issue, if any.

Run DeepSeek AI locally using Ollama

Step: 1 Download Ollama and install it on your device. (Download Link)

Step: 2 A terminal will now open in front of you. Copy the below-given command, paste it on the terminal and hit enter.

ollama run deepseek-r1:1.5b

Step: 3 Once the installation is finished, you will be now able to chat with the DeepSeek R1. If you want to exit, simply close the terminal or press “CTRL+D”.

Conclusion

These were two simple methods to install and run DeepSeek AI locally on your device. And since the model is not connected directly to the internet, it may get some facts or answers wrong. So it’s recommended to only use the AI bot for general purposes.

For advanced use, you can use the web or app of the tool. Local installation protects your data but has some cut-downs in terms of overall performance and reliability.

Read more:

Categories
Android Apple iphone News smartphones

List of Smartphones With the Most Green Line Issues

Smartphones have been evolving year after year, with new processors, more storage, great displays, and faster processors. While it is good to see smartphones moving ahead, one issue has plagued numerous smartphones across various brands: the notorious green line issue.

While the issue didn’t make the phone unusable, it certainly became an incontinence to many users who weren’t responsible for this massive headache.

Today, we will be diving into the notorious green line issues, how they are caused, what devices have been affected, and also what have brands done to solve this crazy green line crisis.

Before we dive into the list of devices that were impacted, let’s take a look at how the green line issue has occurred.

Green Lines: What Caused It?

The green line on the display generally occurs if there is some sort of physical damage to the display or a loose or broken display connector/flex cable.

However, the widespread cause of the green line issue was caused by two major factors: faulty Samsung displays and poor software. Since this issue began rising during the pandemic period, a lot of the quality control for the displays, as well as the software, was not thoroughly looked through.

As a result, many brands that used the particular Samsung display started displaying green line issues after either a major android version upgrade or a simple monthly security patch update.

Green Line Issues: Who Were Affected?

Well, many users who have reported that their devices displayed the green line, and in certain cases, the pink lines were mostly from India. These issues were seen across the following brands.

  • Apple
  • CMF
  • Google
  • iQOO
  • Motorola
  • Nothing
  • Oppo
  • Poco
  • Realme
  • Samsung
  • Vivo
  • Xiaomi

Almost every smartphone brand that sells its devices in India has this issue. As a large smartphone market, brands push out and release new smartphones regularly.

Because of this intense competition, the quality control on the display as well as the software has simply been overlooked, resulting in the green lines appearing after a software update.

All Devices Affected with Green Lines (Brand and Models)

Apple Devices

  • iPhone X
  • iPhone 12 series (Source)
  • iPhone 13 series
  • iPhone 14 series
  • iPhone 15 Pro/Pro Max
  • iPhone 16 Pro (Source)

Samsung Devices

  • Galaxy A54
  • Galaxy A73 (Source)
  • Galaxy M52
  • Galaxy Note 20 series
  • Galaxy S20 FE
  • Galaxy S20 series (Source)
  • Galaxy S21 FE (Source)
  • Galaxy S21 series
  • Galaxy S22 series (Source)
  • Galaxy S23 series (After Update – Source)
  • Galaxy Z Flip 3 (Source)
  • Galaxy Z Flip 5
  • Galaxy Z Fold 3 
  • Galaxy Z Fold 4

OnePlus

  • OnePlus 13 (Source)
  • OnePlus 11 (Source)
  • OnePlus 10
  • OnePlus 10 Pro (Source)
  • OnePlus 8
  • OnePlus 8 Pro (Source)
  • OnePlus 8T
  • OnePlus 9
  • OnePlus 9 Pro
  • OnePlus 9R (Source)
  • OnePlus Nord 4 (Source)

Nothing Phone

  • Nothing Phone 1
  • Nothing Phone 2a (Source)

CMF

Motorola

  • Motorola Edge 30 (Source)
  • Motorola Edge 30 Fusion
  • Motorola Edge 30 Neo
  • Motorola Edge 30 Ultra
  • Motorola G52 (Source)
  • Motorola G72
  • Motorola G82 (Source)

Realme

  • Realme GT 2 Pro
  • Realme GT Master Edition
  • Realme X7
  • Realme X7 Pro

Oppo

  • Find X2
  • Find X3 Neo
  • Find X3 Pro
  • Find X5 Pro
  • Reno 5 Pro
  • Reno 6 Pro

Vivo

Xiaomi

Poco

iQOO

  • iQOO 13 (Source)
  • iQOO 11 (Source)
  • iQOO 7 (Source)
  • iQOO 8T
  • iQOO Neo 7
  • iQOO 9 Pro
  • iQOO 9 SE (Pink Line)
  • iQOO 9T (Source – After Funtouch OS 15 update)
  • iQOO 9T Legend (Source)

Google

Green issue: What Have Brands Done?

The most affected devices with the green line issue seem to be from OnePlus and Samsung. OnePlus has brought out a wonderful solution for the green line display.

They now provide lifetime service for devices that have been impacted by the green line issue. Users can get their display replaced free of cost as long as the device doesn’t have any physical or water damage.

For older OnePlus devices that have been impacted by the green line issue, OnePlus is offering vouchers that can be used to purchase any of the newer OnePlus devices.

Meanwhile, Samsung India has also come out with a solution for devices impacted by the green line problem. This solution, however, can be available only to select Galaxy devices. Here are the conditions

  • The device should be free from physical and water damages
  • The user should be the original owner of the device
  • Original invoice/bill should be provided
  • The device submitted should be within three years of the purchase date.

Eligible Devices

  • Galaxy S22 Ultra
  • Galaxy S21 FE 5G
  • Galaxy S21 Ultra
  • Galaxy S21+
  • Galaxy S21

The replacement offer for Samsung began in 2024 until September. The offer was then extended until the end of 2024.

Green Line Issue: What Should Brands Do?

Brands should now consider testing out the hardware as well as software before shipping the devices out to the public. Moreover, on the software side of things, through testing needs to be done so that issues like these can be avoided at all costs.

Display manufacturers such as Samsung and BOE will have to make their Quality Control checks a lot stricter because a ton of devices and users can get affected.

Green Line Issue: What Should Users Do?

Since the green line issue can be caused either by software issues or physical damages, users need to keep these things in mind.

  • Apply good quality screen guards and covers for your devices
  • Keep your devices in places where it is less likely to fall and get damaged
  • Check out community forums for your particular device to see if the newly released update for your particular device is safe to install.
  • Try to keep your device in areas where the room temperature is on the cooler side.
  • Do not shake or roughly handle your device. Such violent action can damage the internal components.

So, have you been a victim of the green issue? If so, what device did you use and what resolution did the brand give in your region? Let us know about it down below in the comments section.

Explore More:

Categories
Android Galaxy S25 samsung Tips

Just Got a Galaxy S25? Change These 11 Settings Now!

Samsung’s new flagship Galaxy S25 series has been released, and many users are getting their devices delivered. Congratulations on becoming a Galaxy S25 owner! But before you go about daily driving your Galaxy S25 device, there are a few crucial things you need to know and do.

We’ve compiled a list of several changes and settings that you adjust adjust, especially if you’re a first-time Galaxy smartphone user. Each user has their own preferences, so brands enable basic settings instead of performance modes by default for general use. It’s always recommended to customize settings according to your liking as soon as you get the device.

Must Change Settings for Your Galaxy S25 Series

The Galaxy S25 is a premium series that typically costs around $1000, and is a beast among premium phones. But you may not get its best performance out of the box. To optimize the device performance, you can tweak settings. Following these must-change settings will help you fully take advantage of your smartphone’s capabilities. Let’s get started.

Get Good Lock

Good Lock is the best customization tool for Samsung devices. It is the official app now available in all regions. In the app, you can add various modules that help you customize different aspects on the device such as home screen, lock screen, control center, UI, fonts, keyboard, and more.

You can easily install Good Lock on your device just like any other apps from Galaxy Store or Play Store.

You May Also Like: How to Customize Samsung Galaxy S24 with Good Lock

Uninstall The Apps You Will Not be Using

Samsung phones in particular, regardless of the price point, come with a number of pre-installed apps. Some of these apps will be first-party Samsung or Google apps, and some will be third-party apps. Uninstall the apps that you don’t want by long pressing on an app icon and tapping on Uninstall.

Uninstall Apps Galaxy S25Uninstall Apps Galaxy S25

Removing bloatware will help you save some storage space. However, you may encounter some apps that cannot be uninstalled easily. To remove such apps, you can use adb commands as mentioned in this guide.

Change Your Screen’s Resolution

Your Galaxy S25 series devices (except base model) come with a high-resolution display. By default, the resolution has been set at FHD+ for better battery performance. If you want to take advantage of that gorgeous 2K AMOLED display, you can follow these steps to change the display resolution.

Change Galaxy S25 Screen ResolutionChange Galaxy S25 Screen Resolution
  1. Open the Settings app on your Galaxy S25 device.
  2. Now, scroll and tap on Display. Finally, tap on Screen Resolution.
  3. Tap on the QHD+ option. You can now enjoy the sharpness and bright colors of the AMOLED 2K screen on your Galaxy S25 series.

Adjust The Color Modes

Some users like to have the color profile of their device between a warm tone and a cool tone. You can easily change and customize this to your liking by following these steps.

Galaxy S25 Color ModesGalaxy S25 Color Modes
  1. Launch the Settings app on your smartphone.
  2. Tap on Display, followed by Screen Mode.
  3. Here you can choose between Vivid and Natural.
  4. If you want, you can also tap on Advanced Settings to adjust the RGB values.
  5. You can also adjust how vivid you want the screen to be.

Adjust That Refresh Rate!

All the Galaxy S25 devices come with a 120Hz refresh rate display. You get two options Adaptive and Standard. The Standard option doesn’t provide smooth scrolling but gives better battery performance. The Adaptive option enables 120Hz for smooth scrolling but drains the battery faster. You can choose according to your need. For example while traveling, you can switch to Standard for better battery life.

Change Galaxy S25 Refresh RateChange Galaxy S25 Refresh Rate
  1. Open the Settings app and tap on Display.
  2. Now, tap on Motion Smoothness.
  3. Tap on Standard if you want the fixed 60-hertz refresh rate. If you want the higher 120-hertz refresh rate, tap on Adaptive.

Enable Dolby Audio

All high-end Samsung Galaxy smartphones come with Dolby Audio support. This enhancement improves the audio levels and lets you change the sound levels based on the content you are consuming. Follow these steps to enable Dolby Audio on a Galaxy S25 device.

Enable Dolby Audio Galaxy S25Enable Dolby Audio Galaxy S25
  1. Launch Settings and choose Sound and Vibrations.
  2. Tap on Sound Quality and Effects.
  3. Finally, tap on the toggle to switch on Dolby Audio.
  4. You can play with the equalizer settings.
  5. To set how Dolby Audio adjusts audio, tap on Dolby Atmos and pick from the four options: Auto, Movie, Music, or Voice.

Enable Battery Protection

With One UI 7 on the Galaxy S25 series, you can now decide up to how much percentage you would like your phone to charge. To increase the life span of your device battery, it’s recommended to limit charging to 80 to 85% and avoid letting your phone drain completely. Here is how you can enable this and protect your device’s battery.

Enable Galaxy S25 Battery ProtectionEnable Galaxy S25 Battery Protection
  1. Open Settings and tap on Battery.
  2. Scroll and tap on Battery Protection.
  3. Switch the toggle on.
  4. Now, pick from Basic, Adaptive, or Maximum.
  5. If you select Maximum, it lets you pick from 80, 85, 90 and 95%.

Change Your Ringtones and Notification Alerts

Keep the alert tones and ringtones on your Samsung Galaxy S25 unique. Don’t be that guy who just leaves this at default, who runs to their phone whenever someone’s Samsung Galaxy device rings. Here is how you can change that.

Change Ringtones Galaxy S25 TipsChange Ringtones Galaxy S25 Tips
  1. Open Settings and tap on Sounds and Vibrations.
  2. Tap on Ringtones and choose a ringtone from the many options available.
  3. Similarly, tap on Notification sounds and choose the notification alert of your choice.
  4. You can make things more interesting by playing with the vibration type as well as the intensity.

Process AI Data on Device Only

Are you someone who doesn’t like all their data being stored on the cloud? Well, with Samsung’s Galaxy AI tools, you can choose between processing all data via the cloud or if you would like to have it take place locally on your device. This gives you better privacy control over your data. Here is what you need to do.

Process AI Data on Device OnlyProcess AI Data on Device Only
  1. Open Settings and tap on Galaxy AI
  2. Scroll to the end and switch the toggle to On to enable on-device processing.
  3. Do note that some Galaxy AI tools require online processing to give the user the best results possible.

Enable Dark Mode

Dark Mode is one of the best features that have come to almost every operating system out there. And, when you use an AMOLED display, Dark Mode helps with saving a bit of battery as the panel doesn’t have to power up every pixel. Enable dark mode by following these steps.

Galaxy S25 Enable Dark ModeGalaxy S25 Enable Dark Mode
  1. Launch Settings and tap on Display.
  2. Simply tap on the Dark radio button to enable Dark Mode.
  3. If you want to set Dark Mode automatically at a certain time, tap on Dark Mode Settings.
  4. You can choose the Sunset or Sunrise option, or set up a custom time.

Adjust the Animation Speed

The animation speed on the Galaxy S25 series with One UI 7 are good. But, what if you wanted to make it faster? Well, you can do that by following these steps.

Adjust Animation Speed Galaxy S25Adjust Animation Speed Galaxy S25
  1. Open the Settings app and scroll to About Phone.
  2. Now tap on Software Information and scroll to Build Number.
  3. Tap on it 7 times to enable Developer Options.
  4. Go back to the Settings app and at the bottom you should see the Developer Options.
  5. Tap on Developer Options and switch the toggle to On.
  6. Now, scroll down to where you see the Drawing sub-menu.
  7. Tap on the Window Animation Scale and set it to 0.5x.
  8. Do the same for the Transition and Animation duration scales.

Extra: For unlimited wallpapers, you can download our PhoneWalls app on your Galaxy S25.

Closing Thoughts

This concludes all the settings and adjustments that you must do when you get your brand-new Galaxy S25 device for an improved performance. This is only just the start to daily driving your Galaxy S25 device. If you’re someone who wants to make their Galaxy S25 device stand out and look unique, wait around for our guide to customizing different elements. If you have queries, feel free to drop them below.

Thumbnail: Samsung

Related to Galaxy S25:

Categories
Bitcoin Crypto News

Bitcoin Price Recovering Amid Rising Open Interest and Declining Sell Pressure?

Bitcoin bears have been dominant for the last 3 weeks or so, with sentiment increasingly leaning on the side of FUD. However, fresh signs indicate the possibility of a bullish conclusion for Bitcoin price in the last week of February.

According to CryptoQuant analyst ShayanBTC, Bitcoin open interest has been on the rise despite the cryptocurrency’s struggle to find a bullish footing. This observation could indicate that BTC is finally ready for a bit of recovery.

The uptick in open interest may indicate a demand build up, an outcome that is already reflecting in Bitcoin price action. The cryptocurrency has so far achieved substantial upside in the last 3 days, with price recovering from a low of $93,34 to a $97,010 press time price tag.

Bitcoin price action | Source: TradingView

BTC’s bullish recovery in the last 3 days was courtesy of liquidity injection observed as per the MFI. Its MACD was about to make a crossing above the signal line, with the histogram profile demonstrating a decline in bearish volume.

Is Bitcoin Price demand building up?

While the price and rising open interest may be leaning in favor of the bulls, they were not the only signs. For example, Bitcoin’s spot flows have mostly been negative since the start of February. However, outflows have notably declined and this gives the bulls a chance to dominate.

Bitcoin spot flows | Source: Coinglass

It is however worth noting that spot flows were yet to demonstrate a substantial uptick. This may indicate weak demand. On the derivatives side, futures open interest bounced back above $60 billion in the last 10 days, confirming renewed interest at sub- $100,000 prices.

– Advertisement –

Still on demand build-up, exchange flows recently dropped to key levels where they pivoted twice in January. This historically significant level may offer a psychological buy back zone and exchange outflows were already higher than inflows at the time of observation.

Bitcoin Exchange flows | Source: CryptoQuant

Higher exchange outflows than inflows signal that the bulls might already be putting in some work. However, a modest gap of about 2,000 BTC between inflows and outflows may indicate that the market is still in a cautious mood.

Can Strategy inject more optimism into BTC demand?

Michael Saylor and his Strategy team have for the most part, offered a confidence boost to the market in times of doubt. The company might be about to do so once again as revealed in its latest announcement.

Strategy is reportedly planning to issue about $2 billion worth of convertible notes to purchase more BTC. The company has been taking advantage by purchasing BTC especially every time it dips below $100,000.

A $2 billion liquidity injection into BTC especially now that the bears are easing off their attack, could pave the way for recovery above $100,000. These observations may trigger enough excitement for Bitcoin to possibly achieve a net positive performance in the next 8 days.